What's new
Van's Air Force

Don't miss anything! Register now for full access to the definitive RV support community.

Cowling install issue

gyoung

Well Known Member
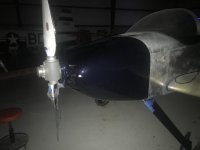
I was feeling pretty good that my punch list for my -6 was down to a very few items, one being paint and install the cowling. The painting is done but I can't get the lower cowling to fit between the spinner backplate and front baffles. Of course it's been on and off multiple times including with the baffles in place. I suspect I somehow never did it with the spinner backplate in place. I know the spinner and cowling have been on at the same time to check the alignment but it was so long ago I may have removed the backplate and kept working on cowl finishing. It's a Whirlwind prop FWIW.

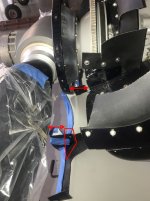
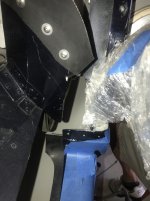
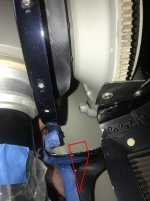
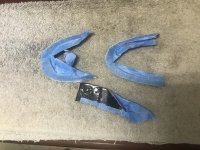
Regardless, I'm here now and need a solution. I've tried every orientation I can think of but maybe it's some type of Chinese puzzle and I'm not holding my tongue right. The stumbling block seems to be the extension (marked on the pic) on the left intake. A possible solution is to just chop it off. Another is modifying some of the baffling to make it removable. I'm not anxious to do either. I could use some help on other suggestions and pics of how others fit. I'm going to fret over it this until a solution I can live with presents itself. Thanks for any help.
 

Attachments

  • 20201108_cowling3.jpg
    20201108_cowling3.jpg
    249.4 KB · Views: 391
  • 20201108_cowling2.jpg
    20201108_cowling2.jpg
    252 KB · Views: 359
  • 20201108_cowling1.jpg
    20201108_cowling1.jpg
    255.6 KB · Views: 326
May need significant re-work.

I hope the pictures aren't telling the story I see, but this is a situation I have given advice to RV-4 builders to take very seriously, and make sure the cowling fits and can be removed with the aircraft "flight ready" before any painting is done. Its real easy to overlook, as many milestones are completed with the prop off, gear leg fairings,ect. that make a difference. On a -4, the trim outs for the gear legs will cause this, and need opened , as well as the leg fairings trimmed at an odd angle so the cowling can shift AFT while down below the spinner plate. All that additional trimming can be done while painted, and the upper intersection fairings will hide it. I'm not sure if this will get you clear on the -6, but its worth looking at. If your upper cowling can be fit in place, and you have 3/8" or so clearance you should be able to get it fit I would think. Fingers crossed for you !
 
I have a 7 and James cowl. The cutouts were made for the gear then I installed the gear fairings. Mine has to tilt nose down, get over the gear fairings then rotate the front up. To do that the sides have to be bowed out slightly. To handle a cradle was made with two driveway marker rods on the sides to pull the sides out and it is mounted on a 3/4" pipe post inserted in a floor jack. the cradle is allowed to rock. The tilt is not much, and it has to generally go nearly straight up to install. Each install is a puzzle tailored by the builder. You. I feel for you having it painted, but still will have to solve the puzzle.

BTW - I see you have tape for protection. That did not work for me, and settled on cheap plastic report folders from the Dollar store. Two sleeves get wrapped around the gear fairings and one gets clipped to the front of the lower cowl as a thin, but strong barrier between cowl paint and spinner paint. The folders are very slippery and relatively strong material so the ends of the cowl won't cut it.

Good luck - -you might look for crabandy's posts about the same thing, he has the Vans cowl and a 7.
 
I had the same thing happen when I converted from a fixed pitch to a C/S prop.
The fix was opening up the holes around the gear legs a bit. you can make these openings pretty large as long as the upper gear leg juncture fairing can still cover the hole.
 
Try using some blue tape to temporarily pull the lower cowl's rubber seal up and forward, taping it to the front side of the lower cowl.
It makes getting my -A model lower cowl on a little easier, but it is still a hold the tongue the right way maneuver.
 
Successful surgery

Thanks for the feedback. It pushed me over the edge to just cut it and deal with any fallout. I actually didn't have to cut much, about an inch of the intake protrusion, a bit around the gear leg openings and a tiny bit on the left front baffle. I don't think I'm going to have to make any seal changes. I've got some fit tuning to do from the paint but the hand wrenching part is done. I got off relatively easy on this one. Thanks.
 

Attachments

  • 20201110_235050675_iOS.jpg
    20201110_235050675_iOS.jpg
    226.5 KB · Views: 173
  • 20201110_235904995_iOS.jpg
    20201110_235904995_iOS.jpg
    611 KB · Views: 195
Back
Top