What's new
Van's Air Force

Don't miss anything! Register now for full access to the definitive RV support community.

GAP 26 plumbing connections

mburch

Well Known Member
Patron
I've seen other builders post pictures of the various ways they handled the plumbing connections for their GAP 26 pitot tube / AOA probe, but I've never seen photos of this exact method, so I thought I'd share in case it helps someone else.

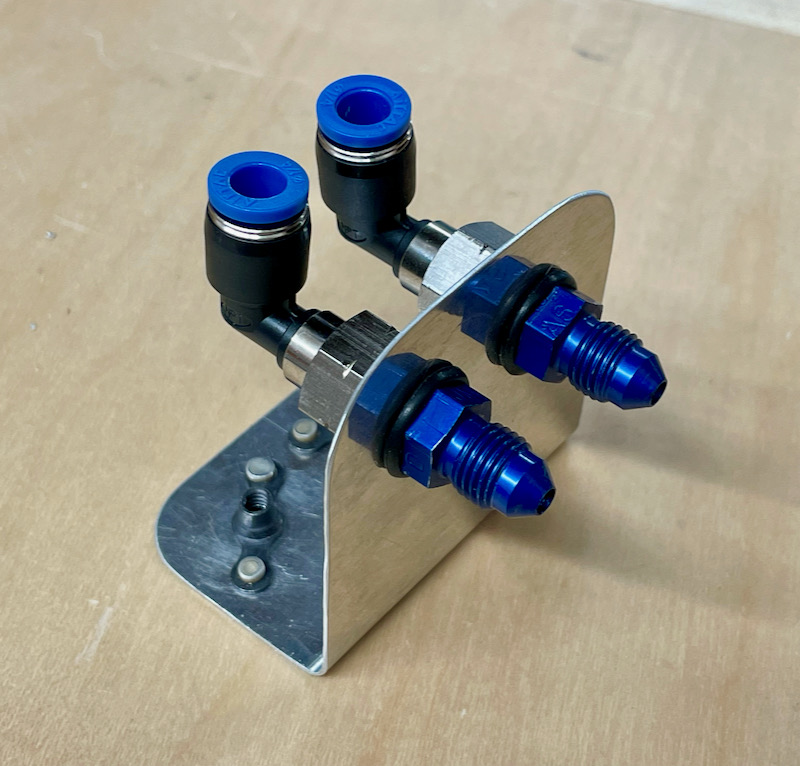
I made this little bracket, which holds a pair of AN816-3D nipples connected to some 90-degree 1/4" push-to-connect air fittings that have female NPT threads:

20210731_bracket1.jpg


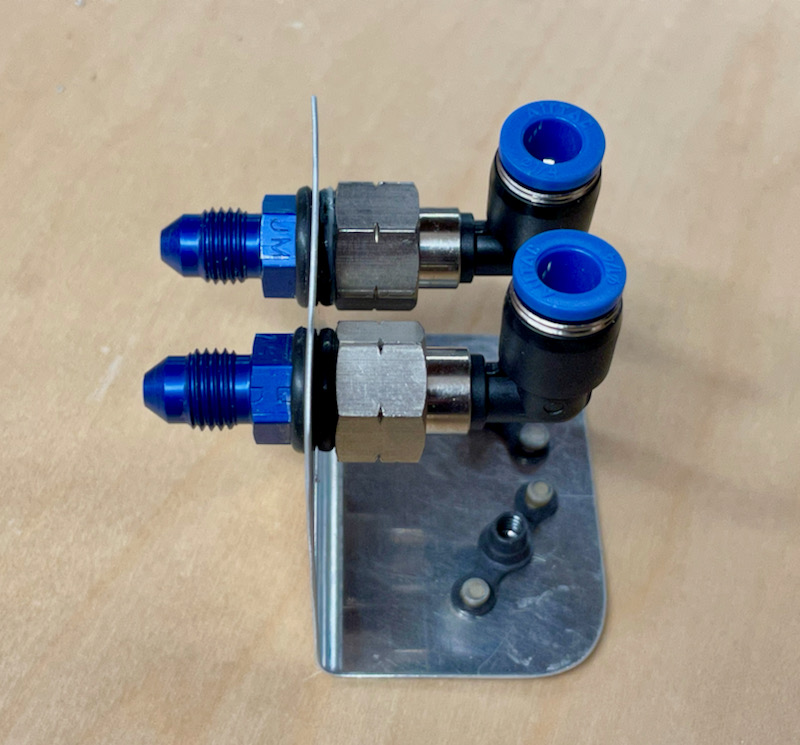
I sandwiched the bracket between the plumbing components using rubber O-rings to create a bulkhead-fitting effect:

20210731_bracket2.jpg


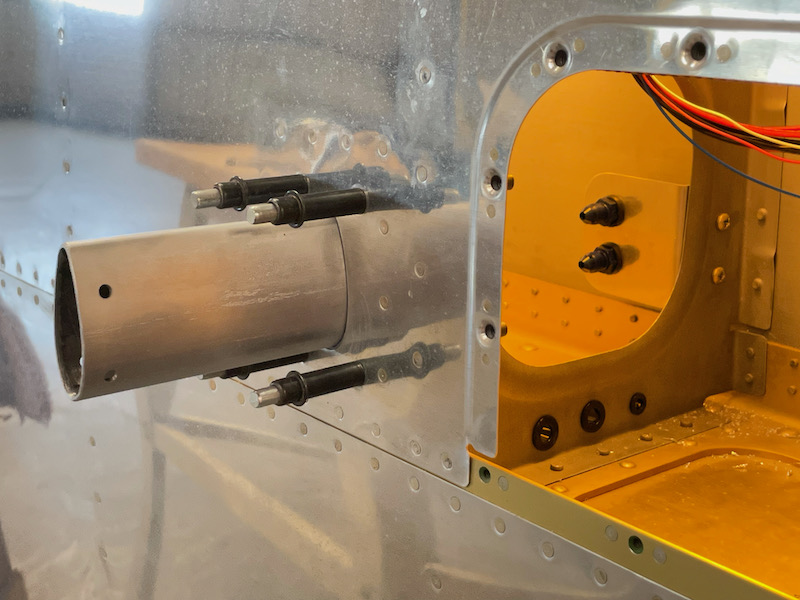
The bracket attaches to the top of a wing rib. The air fittings are on top, with about 1/4" of clearance to the top skin:

20210731_plumbing1.jpg


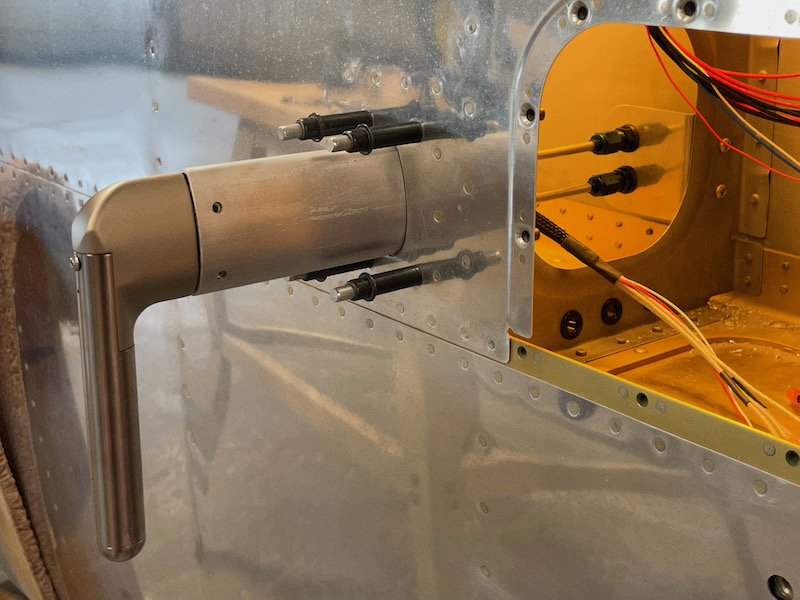
The aluminum tubes from the pitot run straight to the bracket fittings, no complicated bending required. The 90-degree fittings face towards the wingtip, and the 1/4" nylon hose will do a gentle 180 from there and then pass through the snap bushings at the front of the rib:

20210731_plumbing2.jpg


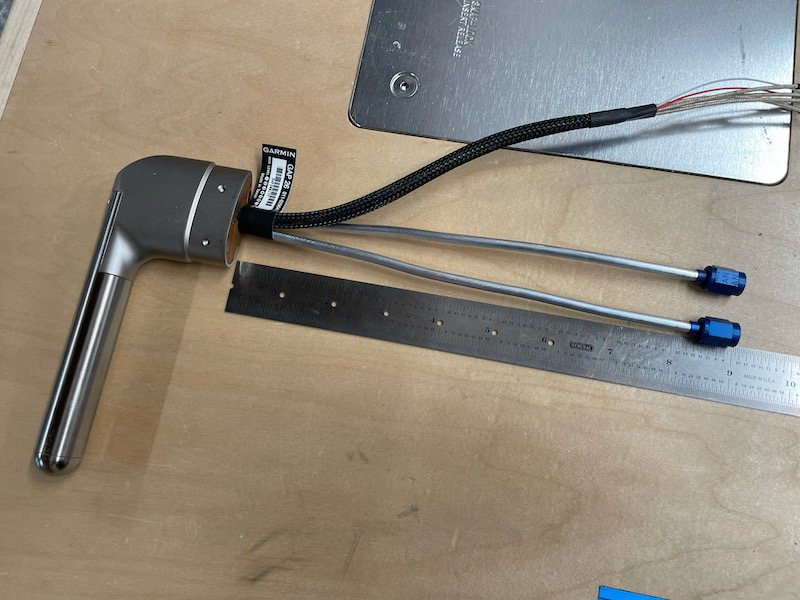
With this method I ended up with almost 9" of tubing coming out of the pitot (8" is the minimum length specified by the manufacturer).

20210731_pitot.jpg


Not sure if this will work in an RV-9 which I think has a skinnier airfoil, but in my RV-7 it worked like a charm and was way easier than trying to bend the tubes but still allow them to pass through the pitot mast.
 
Last edited:
Nice

Now all you need to do is label them so you always know which is AOA and which is pitot...or you might forget...ask me how I know!
 
Now all you need to do is label them so you always know which is AOA and which is pitot...or you might forget...ask me how I know!

The forward tube of the GAP 26 is pitot pressure, aft is AOA pressure. I am using different-colored plastic tubing for each, so that shouldn't be an issue!
 
Clever! I assume your pitot head is mounted outboard of the bay where the aileron bellcrank is located?
 
Bottom skin fit with pitot mast

Matt,

I plumbed my pitot tube lines similarly. But my question is what did you do to get the bottom skin to slide over the flap bracket in the notch of the skin and then still be able to slide the skin over the close clearance opening for the pitot mast?
Did you cut a slit in the small width at the skin where It would just fit around the flap bracket after already having slid the skin over pitot mast hole?

Hi Ed - Since I have a 7 instead of a 9, I don't have the same flap bracket setup you do, so I can't fully picture what you're saying (been a long time since I sold my 9A!). But if you browse through the posts in the "Wings" section of my build site, link below, you might hopefully find a photo that helps.
 
Matt,

Your solution looks great, quick question.

It looks like the cut and flare would have to be absolutely perfect to avoid a gap or misfit between the actual pitot and the mast, how did you do this or is there some play in the fit?

Thanks,

Fred
 
It looks like the cut and flare would have to be absolutely perfect to avoid a gap or misfit between the actual pitot and the mast, how did you do this or is there some play in the fit?

Good question - I did have to be somewhat careful when cutting the tubing to length, but the bracket that holds the fittings is pretty light-gauge which allowed me to tweak the geometry for a perfect fit. Also if the flared tubing ends up being, say, 1/16" too long it would be easy enough to put a gentle S-bend in it as it comes up the mast, reducing the effective length.
 
Great post! Could you not have the tubes and bracket assembly all connected and then drill the bracket to rib to get a perfect fit? Also, where did you buy the 90 degree fm NPT X push air connect?
 
Could you not have the tubes and bracket assembly all connected and then drill the bracket to rib to get a perfect fit?

I think you could certainly do it this way if you were installing the pitot plumbing prior to riveting on the bottom wing skin. In my case I was working through the access hole, so it would have been difficult to drill holes for the bracket from the hidden side of the rib. Also, if you ever had to replace the pitot tube for some reason, you'd be in the same boat.

Also, where did you buy the 90 degree fm NPT X push air connect?

I got mine here, although I had to buy 10. Maybe I'll send this thread to Steinair and suggest they start carrying these fittings.
 
Matt,

Thank you, what an elegant solution. I think I will attempt this approach. Unfortunately I already cut my the Tubes so may have to raise the bracket mid-wing a little but this may facilitate access and when and if there is a need to access the GAP 26. If you know off the top of your head, what seize O-rings did you use?

Kojo
 
If you know off the top of your head, what seize O-rings did you use?

Sorry, I don't - I have one of those cheap boxes of "assorted O-rings" which I just dug through until I found some that worked.

- Matt
 
I am installing GAP26 pitot in my RV10 wing now and if anyone has any extra 90 elbow fittings please let me know and I’ll buy some:)

Is it recommended to flare the metal tubes coming off the GAP26 or not??
 
John, these will make your life easier.

Matt, very nice work and I was going to do something like what you did until I saw these at OSH at the Garmin exhibit. They transition the pitot/AOA tubes to 1/4” lines. I know Stein sells because I bought a pair.
 

Attachments

  • IMG_6082.jpg
    IMG_6082.jpg
    165.5 KB · Views: 108
Last edited:
JI was going to do something like what you did until I saw these at OSH at the Garmin exhibit. They transition the pitot/AOA tubes to 1/4” lines. I know Stein sells because I bought a pair.

Yes, this approach works too. If you have a heated pitot, just remember to leave more aluminum tube than Garmin did in their exhibit booth... you need a minimum of 8 inches per section 5.2.1 of the installation manual.
 
Yes, this approach works too. If you have a heated pitot, just remember to leave more aluminum tube than Garmin did in their exhibit booth... you need a minimum of 8 inches per section 5.2.1 of the installation manual.

Thanks for the tip. I will definitely do so.
 
Back
Top