What's new
Van's Air Force

Don't miss anything! Register now for full access to the definitive RV support community.

Washers, aka 5702-75-60

wirejock

Well Known Member
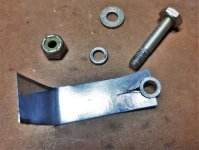
These little buggers may be the most evil thing in the kit.
Firewall Forward, they are on every control rod end bearing attachment. To make matters worse, when you drop one, they bounce and roll into a parallel dimension. I must have dropped a half dozen before the light came on.
Lay a couple towels or a blanket under the work area. Significantly reduces the flight time.
Just a little humor. I actually found all the lost washers. I swept the shop and ran a magnet over the debris in the dustpan.
 
5702-75-60 washers

One other trick of the trade that worked for me. Buy a bag of 50 of them from Van’s. They are cheap, and don’t tend to “run away” if they have lots of buddies in the drawer.
 
I also know how to drop them but what I really wanna know is how to get them onto the rod ends down at the bottom of the control column and in between the seat ribs! :confused:
 
control column washer installation trick

I also know how to drop them but what I really wanna know is how to get them onto the rod ends down at the bottom of the control column and in between the seat ribs! :confused:


Somewhere I learned about this trick. Here’s an attempt at describing it (sorry, no photos).

Tie a washers to the end of a monofilament fishing line….one large enough to prevent the line from pulling through a 3/16” bolt hole. Run the monofilament fishing line through one ear of the control column. Thread the required washers, and rod end on the line in the correct installation sequence. Finally, thread the line through the opposite ear of the control column. Pull the line tight, and all the washers and rod end should line up between the control column ears. Now, push a piece of hinge pin, or a small diameter screw driver into the bolt hole, through the previously installed hardware…….do this in the opposite direction the bolt will be installed. Pull out the fishing line. Finally, push the wire or screwdriver out of the hole using the final bolt. Install the final washer and nut…..done.
 
Last edited:
Washer wrench

I also know how to drop them but what I really wanna know is how to get them onto the rod ends down at the bottom of the control column and in between the seat ribs! :confused:

I use a washer wrench. One of my favorite tools. Worth every penny.
 
I wasn't sure if the washer wrench set that Spruce sells would fit the small 5702 washers because they are not a standard size aviation washer.

I'll try the fishing line trick. I guess the line will need to be fine enough to allow the last washer to be pushed in.

Another trick I read about but haven't tried yet is to superglue the washers onto the bearing before installation.

The washer wrench set that I bought years ago has a size that fits those small washers. It has saved me lots of time and frustration. I still manage to drop them once in a while, but I have a pretty healthy stash of extras.
 
Thank you for the tip below!! Will try it later with dental floss once I regain my composure after many hours of unsuccessful tries. Made a "washer wrench" out of a piece of galvanized steel sheet metal and did not find it helpful when trying to use at the bottom fork of the control sticks.


Somewhere I learned about this trick. Here’s an attempt at describing it (sorry, no photos).

... Run the monofilament fishing line through one ear of the control column. Thread the required washers, and rod end on the line in the correct installation sequence. Finally, thread the line through the opposite ear of the control column. Pull the line tight, and all the washers and rod end should line up between the control column ears. Now, push a piece of hinge pin, or a small diameter screw driver into the bolt hole, through the previously installed hardware…….do this in the opposite direction the bolt will be installed. Pull out the fishing line. Finally, push the wire or screwdriver out of the hole using the final bolt. Install the final washer and nut…..done.

Stuart Grant
RV-12 - Working on Finish Kit Flight Controls
 

Attachments

  • Washer wrench-reduced.jpg
    Washer wrench-reduced.jpg
    386.9 KB · Views: 52
Another trick you can use is to super glue them to the nut, and then glue to the nut to the wrench. I've also glued washers to structure before assembly, where access is terrible to try and slip on a bolt or screw.
 
Popsicle stick

I was going to try to drill a hole in a popsicle stick near the end. Once everything is aligned and the screw is in, then I could break the popsicle stick apart.

I think a popsicle stick might work well because then I can slide the washer around any which way.
 
Had to glue them

I tried dental floss (broke) and light monofilament and a nail as a pin. Ultimately, I took things apart and Superglued the spacers to the spherical bearings. Getting glue on the bearings can be a real problem though. I used snap-ring pliers to slightly spread the control stick forks so the bearing and spacers would slide in. Worked on it off and on for three days between other steps. Like so many other RV-building mission impossible tasks, at least it feels good when you manage to do it. My $42 washer wrenches will arrive from Spruce in a few more days.

Stuart
RV-12 Hooking up flight controls
 
The washer wrench set that I bought years ago has a size that fits those small washers. It has saved me lots of time and frustration. I still manage to drop them once in a while, but I have a pretty healthy stash of extras.

+1 for the washer wrenches. One of my favorite tools.
 
I have the standard set of washer wrenches which work great. It seems the only one I use much is the #3/#4 size. The biggest ones never come out of the drawer. Where can you get a washer wrench that fits the much smaller washers used with the spherical bearings?
 
Here is another trick I have found very useful when trying to insert a rod bearing or other bearing into a bracket "fork" with spacer washers on either side of the bearing.

I cut a piece of 3/16" dowel just a slight bit longer than the spacing between the forks. (assuming a 3/16" bore in the bearing, for a AN3 bolt) It should be possible to easily push the dowel pin in between the forks when gripped with needle-nose pliers, but should be snug enough to stay put if you let it go.

Now, put the dowel pin through the bearing, with the appropriate spacer washers on either side, resting on the dowel pin. Then, slide the bearing and washers into the fork. The dowel pin will hold the washers in proper position as you slide the assembly into place. When the dowel gets to the hole in the forks, you may even feel it catch, but otherwise, you can look and position the bearing, etc. so you can see all the dowel end through the hole. Then, just push the AN3 bolt in, pushing the dowel pin out the other side.

Works every time.

I have a little box full of various length dowel pins that have been used over time, so I rarely need to make one up for a particular task anymore.
 
Back
Top