I have no doubt this will be resolved before the back country RV15 comes out.....
How does this help the current topic and those of us with laser cut parts now?


I have no doubt this will be resolved before the back country RV15 comes out.....
Greg, I have seen that guidance as it relates to cracks, but would you address the issue of notches that exceed the max OD of the hole but do not crack when dimpled? I have not seen any cracks do to notch left in the hole.
I have called support on this subject a few times already and their guidance was not to replace the part but to file it smooth and oblong the hole. I mentioned this was almost every hole on some parts. There are without doubt some that I have missed and some that I decided not to file. This is omni present on my kit and I would have to replace nearly every laser cut part if replacing it was the correct path. I could be the odd man out here but suddenly I am considering abandoning my build as there is just too much uncertainty that a notch will cause me headaches down the road. How can we be sure that the outsourced QB kits do not have the same issues and are hidden behind the already placed rivets?

Watch out on RV14A J stiffeners on the tail cone, I've gone back and looked, and I see some of the same notches after riveting, sent this to support for feedback as well.
View attachment 42907


The Vans "FIX" for the holes is completely unacceptable. PUNCH the holes slightly undersize and let the builder ream to final size.
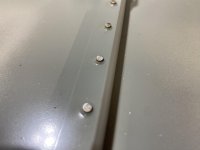
I have very similar results on multiple parts. Here is a shot from the -10 elevator ribs. I emailed several pictures to support on June 3, with 2 follow ups so far, but total silence from Vans. Very frustrating that I can’t even get a reply.
Does anyone know when this issue started and what changes to the process has been to cause it.
I haven’t started building yet but I assume that this will be an issue for me as my tail and wing kits arrived March 22. Is it possible to just upsize these holes to get rid of the imperfections and use different rivets?
Burt, I'm in the same boat. Been back and forth on canceling my entire order (all kits were ordered at the same time).
SNIP: :SNIP
Emailing vans tonight with example pictures but not really expecting anything, and even if replacements are offered, am I going to have to build my whole fuse kit, inspect each part as I go and then dis-assemble, email support, and get a new part to replace the **** they should not have shipped in the first place?? come on.
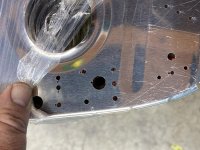
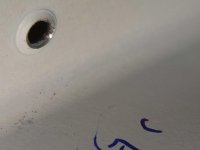
This is the F-01405D-R rear fuselage bulkhead side channel. I cleaned up the holes with a needle file prior to dimpling, but they still cracked. Sadly I did not notice until well into Ch26 where it's all one massive assembly.
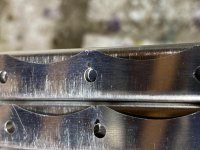
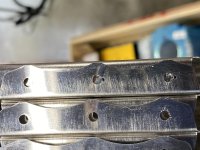
These are the #40 holes that attach the side channel to the righthand skin of the fuse, and since they are already cracked, I decided to do some experimenting with riveting techniques(gun marked with a G, squeezer marked with S) to see which was worse for creating cracks as well as vans new guidelines from section 5.
I cleaned up two of the holes (marked with a C) with a round file under magnification until I could see no evidence of the crack, but to get there I had to enlarge the holes beyond allowable spec. I set the rivets, mainly to see if I could see any cracking appear on the surface, which I did not, except on the one I squeezed but did not clean up (for science!).. it just looked like oblong holes.. Upon drilling out the rivets I found the same crack I thought I had filed out had just continued to grow.
So... following the guidance to clean up your cracked dimples - even when it puts the hole out of spec, in this case did not even completely resolve the issue once a rivet was set in the hole.
What choice do I have but to put doublers of 1.5x thickness on every dimpled flange in my fuse kit or dis-assemble what I've got, and re-build it all with punched parts? If I'm following 43-13-1b I cannot do nothing knowing cracks exist in the structure of an airframe.
No dog in this fight, but thought I would throw out an observation. Everyone seems to assume it is the original crack or deformity that grows once the rivet is set or dimple pressed, but this test shows that may not be the case. From the start of this thread, I had guessed this was a hardness issue. I have no real experience hardening alum, but am pretty familiar with the hardness issues on steel when welding and the brittleness and cracking that it can cause in the heat affected zone. The laser uses heat to cut, just like an oxy acetylene torch, just far more precise in it's placement. It is is clear to me from the pics that the laser is starting just outside of the desired hole or is dwelling too long at it's starting point and am guessing that is creating a small hardened area outside of the hole that is not later tempered and can't help but speculate that this hardened area is causing the crack when the dimpling or rivet expansion happens. I am sure this is part of the Vans investigation.
Who else remembers the train story days, when they explained that the laser was a process not generally accepted in aviation but it could double production capacity? Something about hiring away a Boeing engineer to validate the process.
Greg
As stated by several builders in different ways in this thread. Can you provide a list of kits that may be involved in this issue. I am concerned specifically about the RV-10 QB kits..... All mine were manufactured during 2022. Not being able to inspect areas of the Wings, Ailerons, Flaps etc. Was there any issues brought to you from EXEMPLAR of cracking of dimpled parts during manufacture?
I am wondering the same. RV-10 QB Fuse green tagged Exemplar Jan 2022 and QB Wings green tagged Exemplar April 2022.
Open letter to Vans:
I think you need to move quickly to address this issue or this will spiral out of control so fast that it may take years for you to recover. Don’t underestimate the power of public opinion and the viral influence of social media. How your customers feel is more important than engineering facts.
Suggestions:
1- In all things, error entirely on the side of safety and customer good will.
2- Publish (widely) the model, kit, part numbers and manufacture date of affected parts and update it daily.
3- Create a clear parts replacement plan and communicate the plan to all staff.
4- Make the “defective” parts replacement as easy as possible for builders. Don’t force them to prove they have problem parts or return them for exchange. Trust your customers.
5- There should be no cost to builders for replacement parts and they should take precedence over new kit parts.
6- Refer to #1
Regardless of the results of the engineering study, builders will not accept parts with holes that may develop cracks after dimpling or riveting. Period.
Regardless of whether or not this turns out to be a serious safety issue, it is a serious public relations issue. If not handled properly and promptly, the long term sales decline and hit to your reputation will likely be far worse than the short term parts replacement costs - as painful as that may be.
Just to be clear: does this issue affect the earlier kits? In other words, will the -8 parts in my newly-ordered kit be 100% punched by Van's like always, or might some of them be laser cut by random vendors?
I've been excited to get started on my third RV, but I'd rather cancel the order than be subject in any way, shape, or form to this laser cutting debacle.
Brian and Everyone,
One thing I can tell you is this: Not every laser cut parts is potentially problematic.
That's an engineering answer, but as Brian is pointing out, it's no longer an engineering problem. It's a PR problem.