

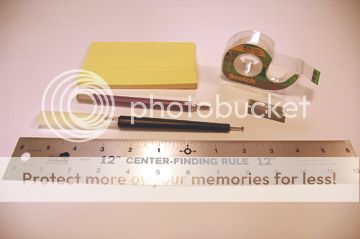
Once you have your transfer sheet it?s on to application and finishing. Just a few simple tools are all you?ll need. A metal rule (centering), X-Acto knife or single edge razor blade, Scotch ?Magic Mending? tape, 4? wide Post-it Notes, and a burnishing tool. All of these items are available at most art supply stores.
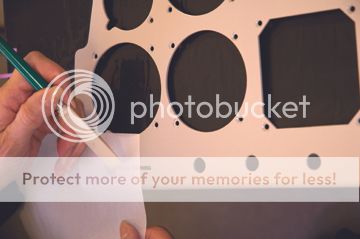
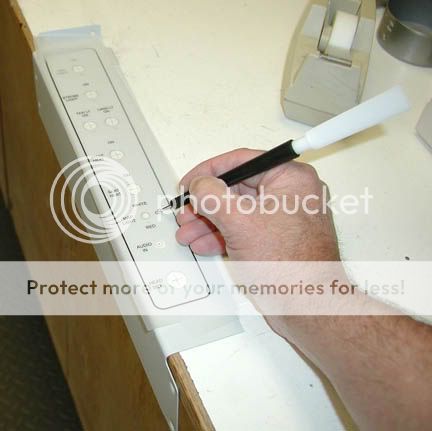
If you are dealing with a newly painted panel, it?s very important to work clean. Wash your hands so there isn?t any dirt or skin oil transfer. The use of a 4? Post-it Note as a straight edge is a wonderful tool. You can mark the center in pencil. Find the center of your type to apply and line up above your Post-it edge. In positioning, remember that your type must clear any washers or flanges from instruments or switches. Burnish your type down. You?ll find with practice that it doesn?t take much pressure to get the transfer to release from the sheet. The release is more from the friction of the burnishing tool rather than the amount of pressure. There are burnishing tools which are adjustable (spring loaded tension) that can compensate for the natural tendency to press hard. Whichever type of burnisher you use it is advisable to test and get a feel for what it takes to get the transfer to release. Your first goal is to just release items from the sheet and onto the panel.


Post-it used as straight edge..... Positioning sheet...... Burnishing (rubbing) the type down
Final burnishing with backing sheet to make sure all is locked down....
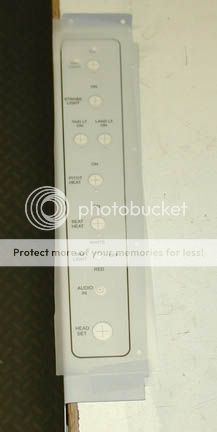
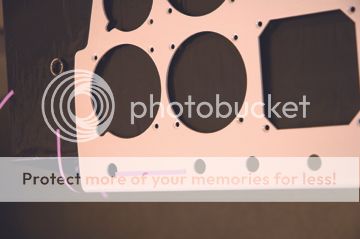
Panel layout with all type in final position. Note hole locations on sheet.
During burnishing you will see the type change color as it releases from the base. You want to roll back the base sheet to check that all has released and transferred. Some bits may not release and stay on the base. You can easily roll the base back down and burnish to get those areas to release. The next step is a final burnishing with the parchment sheet placed over your type or graphic to get it to ?lock down? to your panel.
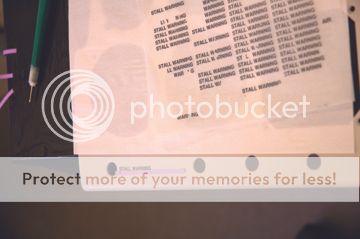
If you make any sort of mistake in application, it can be easily removed. This is where your ?Magic Mending? tape comes to the rescue. The tape has enough tack to pull the transfer up without leaving any residue on your painted finish. It may take some repeated applications of the tape followed by a quick jerk to remove all the bits of ink. It will all come off with some work. The beauty of the tape is its ability to take the transfer off and leave the panel clean so you can apply a transfer again.


Magic mending tape applied and removing text
It is best to work from the top of your panel down and left to right. This way there is less chance that you will damage any of the type or graphics you have applied. You can cover those graphics with paper to protect them from scratches.
The same techniques apply to transferring to a panel already in place in your plane. However you?ll be working in much tighter quarters with your switches and instruments in place. You may have to get creative as far as alignment is concerned. An alignment guide can be built into the art for in-plane applications.
Finishing with a clear coat is your final step. For a new or repainted panel, it?s back to your painter for the clear coat. For you do-it-yourselfers or the in-plane panel application, all you need to complete your project is to mask off your switches and instruments and applying a light spray of Krylon 1311 or 1313 clear (or Clear of your choosing) is all you need to complete your project. I highly recommend testing of any clear coat to determine its compatibility with the transfer and the panel paint.
John
You can reach me at [email protected]
If you are dealing with a newly painted panel, it?s very important to work clean. Wash your hands so there isn?t any dirt or skin oil transfer. The use of a 4? Post-it Note as a straight edge is a wonderful tool. You can mark the center in pencil. Find the center of your type to apply and line up above your Post-it edge. In positioning, remember that your type must clear any washers or flanges from instruments or switches. Burnish your type down. You?ll find with practice that it doesn?t take much pressure to get the transfer to release from the sheet. The release is more from the friction of the burnishing tool rather than the amount of pressure. There are burnishing tools which are adjustable (spring loaded tension) that can compensate for the natural tendency to press hard. Whichever type of burnisher you use it is advisable to test and get a feel for what it takes to get the transfer to release. Your first goal is to just release items from the sheet and onto the panel.
Post-it used as straight edge..... Positioning sheet...... Burnishing (rubbing) the type down
Final burnishing with backing sheet to make sure all is locked down....
Panel layout with all type in final position. Note hole locations on sheet.
During burnishing you will see the type change color as it releases from the base. You want to roll back the base sheet to check that all has released and transferred. Some bits may not release and stay on the base. You can easily roll the base back down and burnish to get those areas to release. The next step is a final burnishing with the parchment sheet placed over your type or graphic to get it to ?lock down? to your panel.
If you make any sort of mistake in application, it can be easily removed. This is where your ?Magic Mending? tape comes to the rescue. The tape has enough tack to pull the transfer up without leaving any residue on your painted finish. It may take some repeated applications of the tape followed by a quick jerk to remove all the bits of ink. It will all come off with some work. The beauty of the tape is its ability to take the transfer off and leave the panel clean so you can apply a transfer again.
Magic mending tape applied and removing text
It is best to work from the top of your panel down and left to right. This way there is less chance that you will damage any of the type or graphics you have applied. You can cover those graphics with paper to protect them from scratches.
The same techniques apply to transferring to a panel already in place in your plane. However you?ll be working in much tighter quarters with your switches and instruments in place. You may have to get creative as far as alignment is concerned. An alignment guide can be built into the art for in-plane applications.
Finishing with a clear coat is your final step. For a new or repainted panel, it?s back to your painter for the clear coat. For you do-it-yourselfers or the in-plane panel application, all you need to complete your project is to mask off your switches and instruments and applying a light spray of Krylon 1311 or 1313 clear (or Clear of your choosing) is all you need to complete your project. I highly recommend testing of any clear coat to determine its compatibility with the transfer and the panel paint.
John
You can reach me at [email protected]

