
Van's Air Force
You are using an out of date browser. It may not display this or other websites correctly.
You should upgrade or use an alternative browser.
You should upgrade or use an alternative browser.
Show us the status of your 9/9A project!
- Thread starter DeltaRomeo
- Start date

RickWoodall
Well Known Member
Good job
Good job!
Lets see that plane at the airport with a birth certificate in hand soon!
9's rock.
Good job!
Lets see that plane at the airport with a birth certificate in hand soon!
9's rock.
ArVeeNiner
Well Known Member
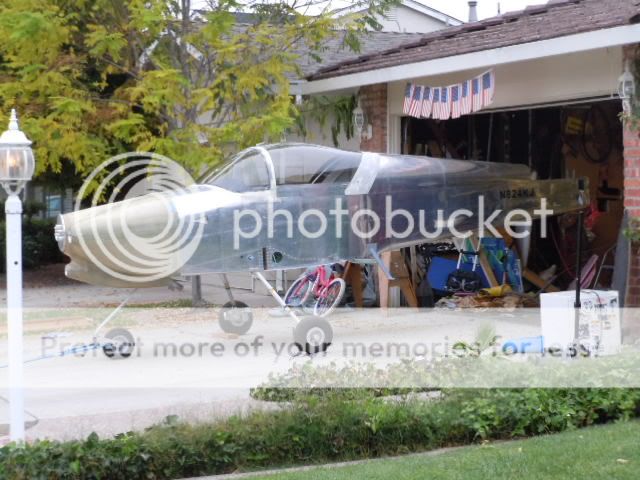
Wings go for one last ride!
Today, my wings took a ride from RHV (where they have been spending the last few years in storage) to E16. The next time they will move a significant distance they will be producing lift!
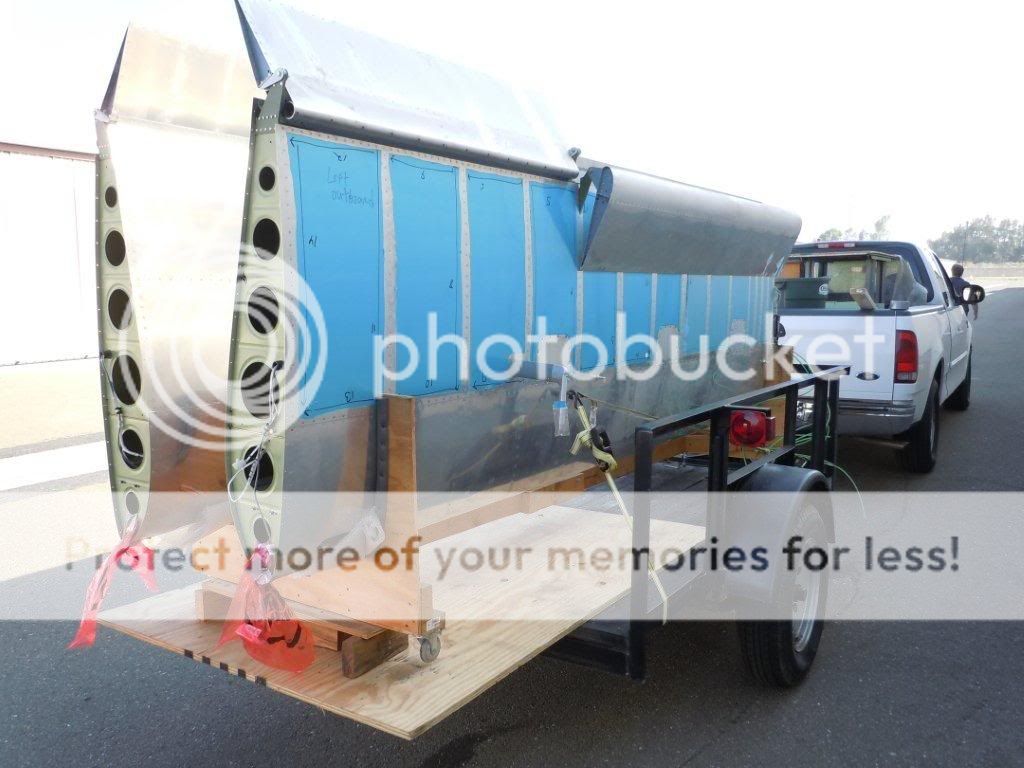
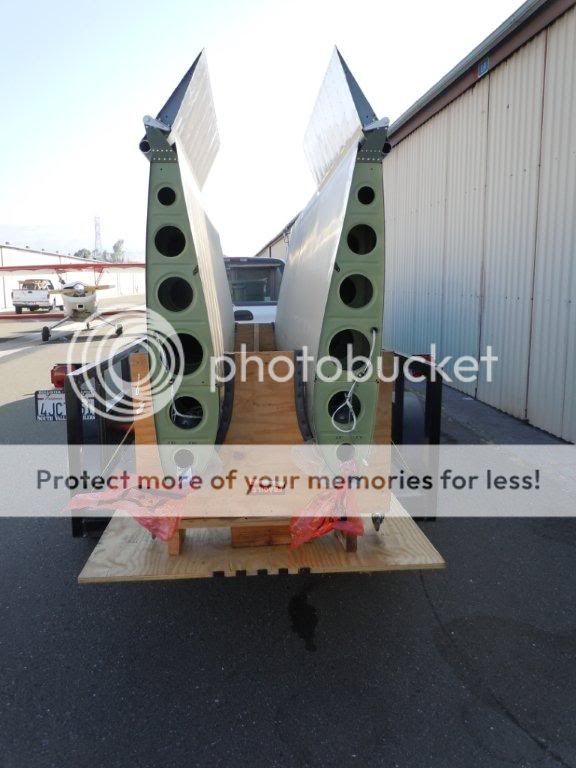
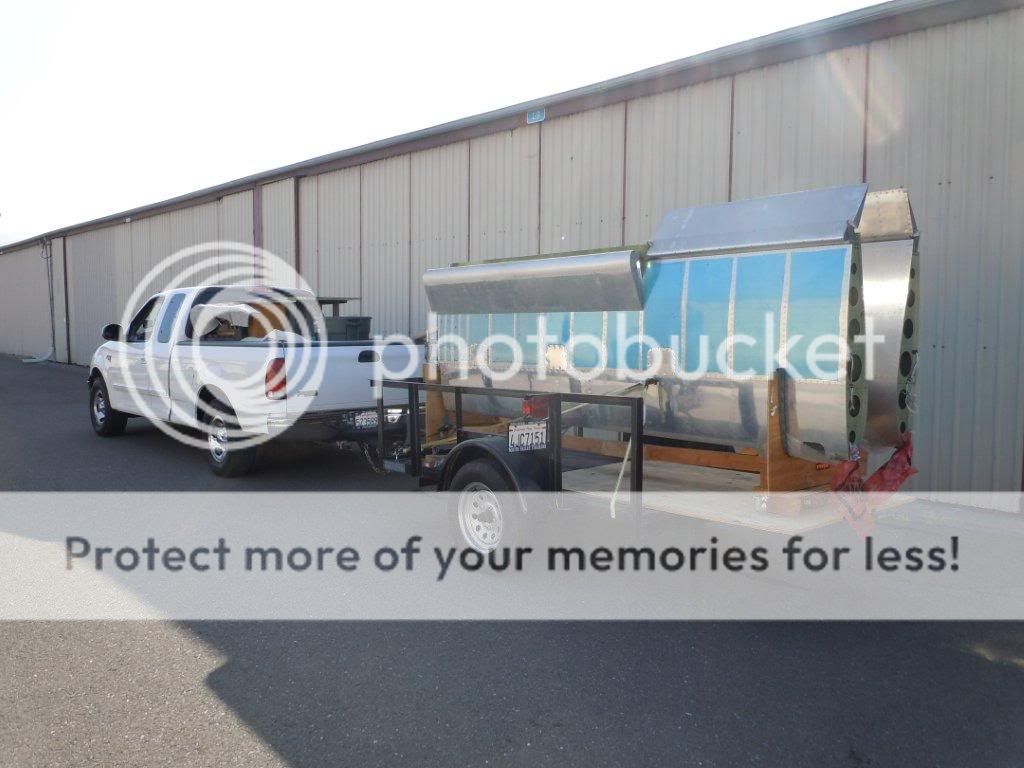

Thanks to my friends Brian (RV-7 in progress), Paul (co-pilot extraordinaire and fellow guitar picker), and Gary (neighbor and the owner of a great trailer).
Next weekend, the fusalage leaves the garage for E16 as well.
Today, my wings took a ride from RHV (where they have been spending the last few years in storage) to E16. The next time they will move a significant distance they will be producing lift!
Thanks to my friends Brian (RV-7 in progress), Paul (co-pilot extraordinaire and fellow guitar picker), and Gary (neighbor and the owner of a great trailer).
Next weekend, the fusalage leaves the garage for E16 as well.
ArVeeNiner
Well Known Member
Nice job Bruce. Check off another high pucker factor job from your list. What did you end up using to cut it with?
bruceh
Well Known Member
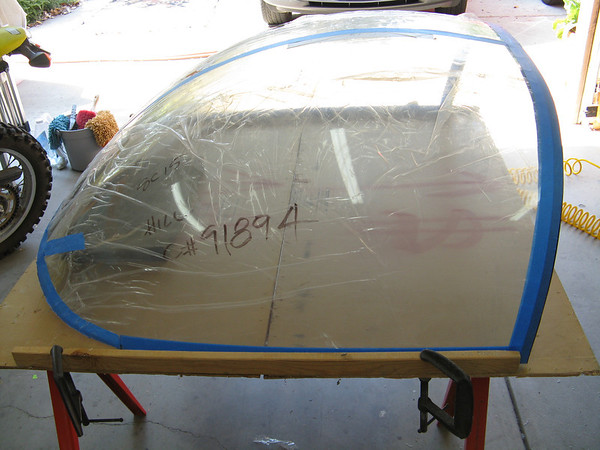
I used the cheap Harbor Freight die grinder and the disc's that Van's gives you to cut it. Gave my poor little air compressor a workout. ") Temps here in SoCal have been mid 90's, so plenty warm on the plexiglass. Still need to clean up the rear edge with a sanding block to get it really straight, then trim up the rear window.
Temps here in SoCal have been mid 90's, so plenty warm on the plexiglass. Still need to clean up the rear edge with a sanding block to get it really straight, then trim up the rear window.
Temps here in SoCal have been mid 90's, so plenty warm on the plexiglass. Still need to clean up the rear edge with a sanding block to get it really straight, then trim up the rear window.turneraero
Member
Spring 2012 with luck
This is my serious builders face
 [/IMG]
Jerry Turner
Stevensville MT
Wiring and fiberglass in progress
This is my serious builders face
Jerry Turner
Stevensville MT
Wiring and fiberglass in progress
ArVeeNiner
Well Known Member
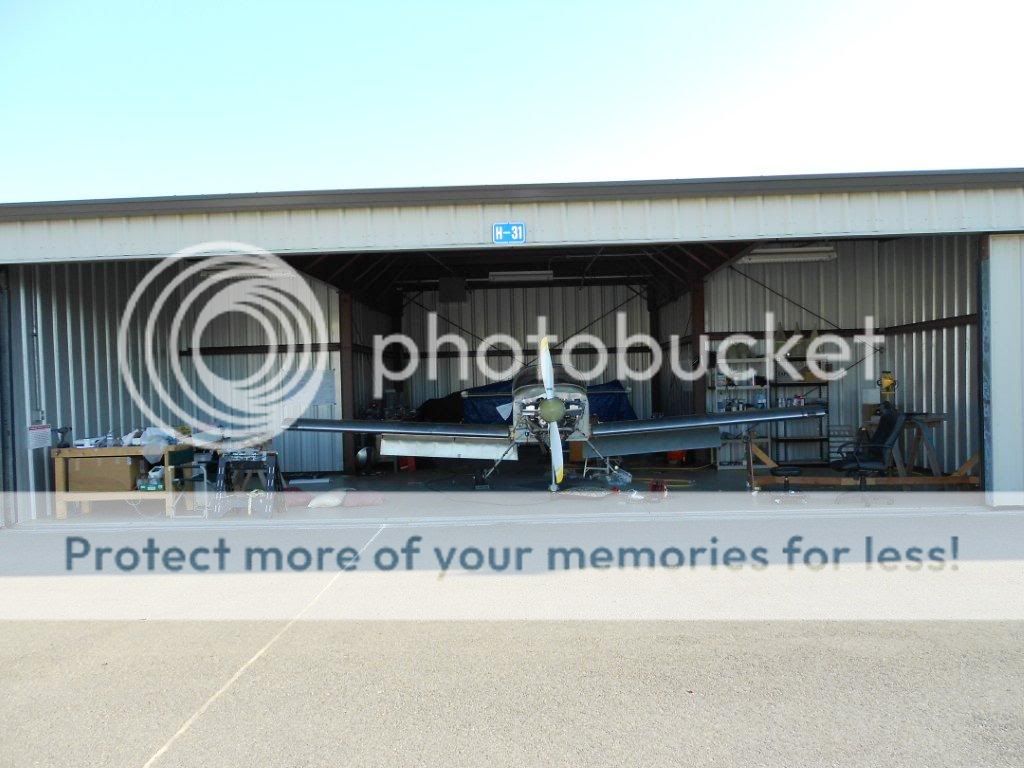
Move to the airport, part II
Last weekend, I moved the wings to the airport. Today, I moved the fuselage.
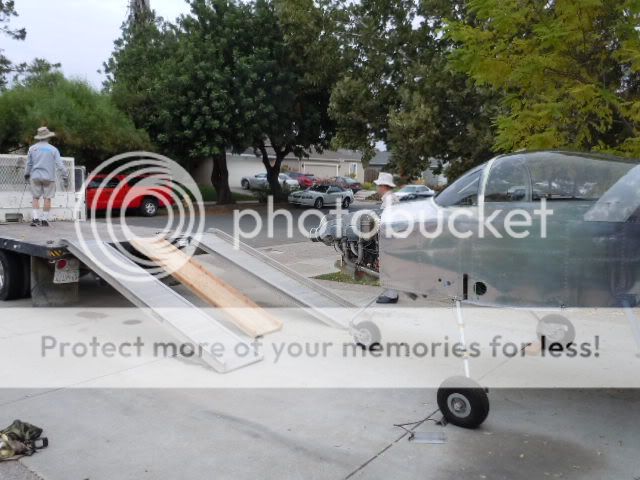
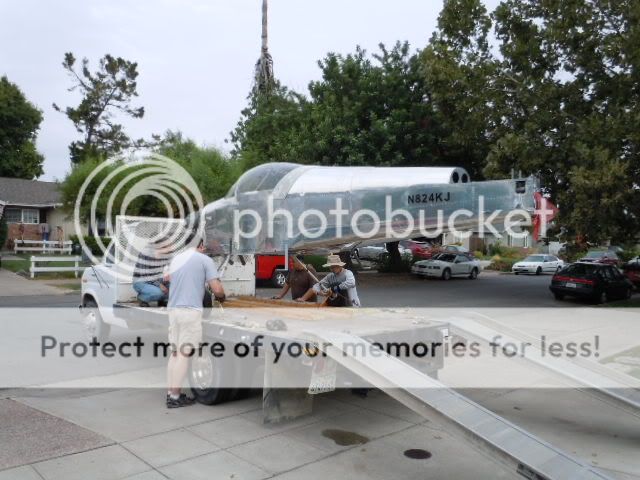
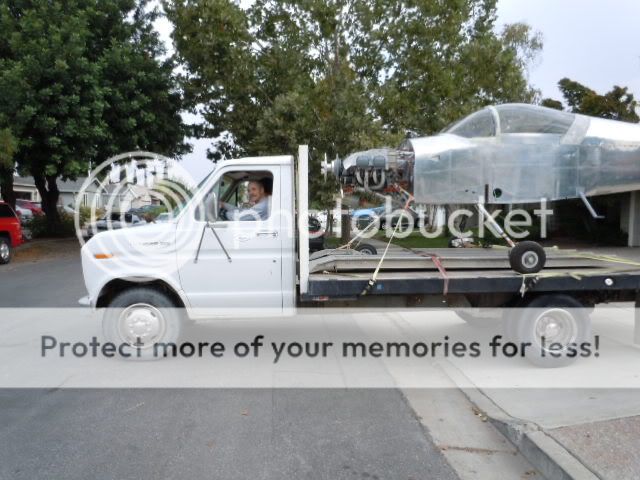

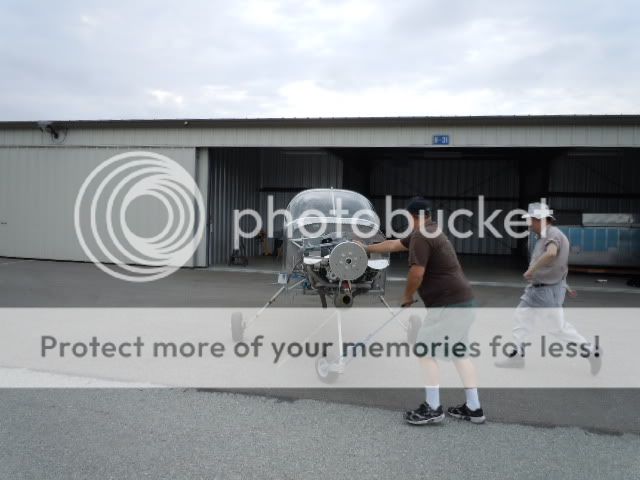
It went very well! It looks quite at home at the new digs.
I want to thank the following people for making this possible today:
Bob Mackey (sorry I was such a backseat driver)
Jason Beaver
Don Lindsey
Anthony Scott
my son, Craig Johnson
Chris Hand
David Martin
and last, but not least, Cooter the flatbed truck.
Last weekend, I moved the wings to the airport. Today, I moved the fuselage.
It went very well! It looks quite at home at the new digs.
I want to thank the following people for making this possible today:
Bob Mackey (sorry I was such a backseat driver
)Jason Beaver
Don Lindsey
Anthony Scott
my son, Craig Johnson
Chris Hand
David Martin
and last, but not least, Cooter the flatbed truck.
RetiredRacer
Well Known Member
Congrat's Kelly,
As mike said, now the fun begins.
The best part of getting it to the airport and into the hanger, is it now seems to come together in big leaps and bounds. I know how exciting it is, once it is on the way to the hanger. And every day from now on it just seems to get more exciting. Enjoy it, you deserve it, because of all the hard work it took to get it to this point.
Bob
RV9a 30 hrs flying since April
ArVeeNiner
Well Known Member
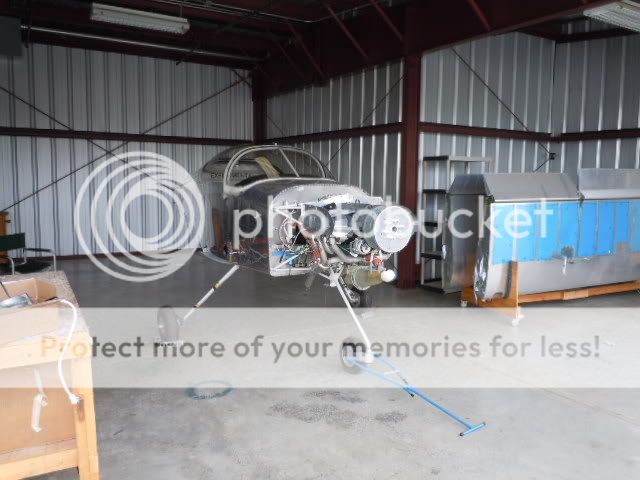
Thanks guys!
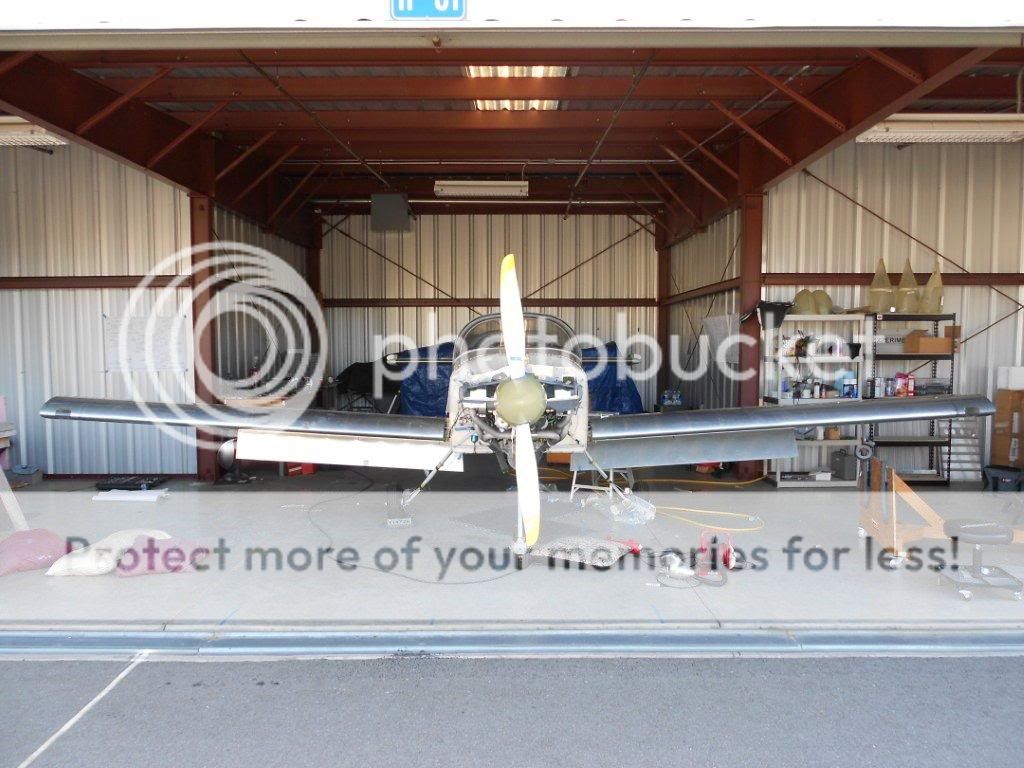
Seeing it in the hangar is really exciting!! The amount of room there is incredible compared to the garage. I'm temporarily storing my HS actually on the plane until I get a chance to install the tail for good next weekend.
Too bad work is impeding my airplane building!!
Unlike "normal" people, I think my garage looks weird WITHOUT an airplane in it!
Thanks guys!
Seeing it in the hangar is really exciting!! The amount of room there is incredible compared to the garage. I'm temporarily storing my HS actually on the plane until I get a chance to install the tail for good next weekend.
Too bad work is impeding my airplane building!!
Unlike "normal" people, I think my garage looks weird WITHOUT an airplane in it!
Better start thinking about that next project then!
alpinelakespilot2000
Well Known Member
It's been 6 years since anyone has seen any thing like this here


[email protected]
Well Known Member
looks weird... what are those things in your shop?
looks weird... what are those things in your shop?
looks weird... what are those things in your shop?
RetiredRacer
Well Known Member
Even the dog looks like he cannot believe what he is seeing
alpinelakespilot2000
Well Known Member
Yes, not only can my dog not believe it, my wife called about 3 minutes after we left the house to the airport to let me know that both my girls were crying. Neither can remember a time when there hasn't been an airplane in the garage (one was 2 and the other 5 when I started). They're not quite sure how they're going to deal with that void, or where they'll go to find blue vinyl to draw on!

Now that I think about it, it does look quite lonely in the hanger!


Now that I think about it, it does look quite lonely in the hanger!

RetiredRacer
Well Known Member
"FINAL ASSEMBLY AT THE AIRPORT"
They were the words I was looking forward to most during the build.
Congratulations Steve!!!.....Your there!!!!!
It's now going to go together in big leaps and bounds.
They were the words I was looking forward to most during the build.
Congratulations Steve!!!.....Your there!!!!!
It's now going to go together in big leaps and bounds.


Philippe CORDIER
Member
Engine hanging done !
I have done my engine hanging without problem but honestly it took me a little more then three hours to have the job done, included the cotter pins.
Lycoming YO320D2G.
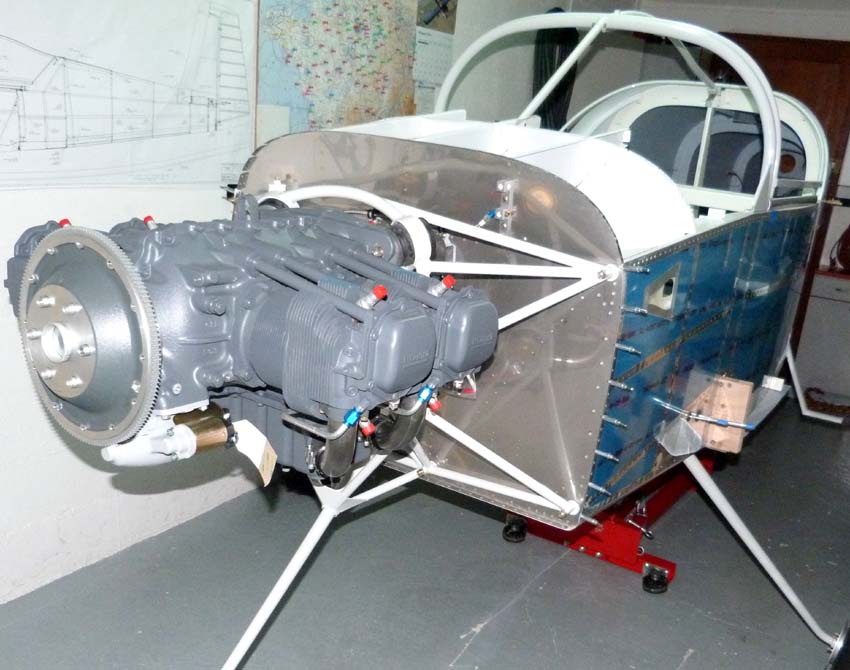
I have done my engine hanging without problem but honestly it took me a little more then three hours to have the job done, included the cotter pins.
Lycoming YO320D2G.
alpinelakespilot2000
Well Known Member
RV-9 W&B complete

Got my weight and balance done today. I have access to scales, so I just did a preliminary one (notice the 8 qts of oil on top of the cowl rather than in the sump). Still, I think it turned out well. Just as another data point for an RV-9:
right main: 502
left main: 504
tailwheel: 48
Total Weight: 1054 (including 20-lb Saber crush plate)
Total weight includes gear leg fairings and intersections, wheel pants, 8 qts oil, but no paint or fire extinguisher (yet). It also includes a 20-lb crush plate installed to make sure I have full 100-lb baggage capacity. Running the numbers, it appears that the only way I can get out of c.g. is with the most fwd c.g. example/minimum pilot weight (100 lb pilot, no passenger, full fuel, and 0 baggage). In every other configuration I get get full fuel, two 190-lb pilots, and 100 pounds baggage and be within gross and c.g. in all conditions. Not sure I need all 20 lbs on the nose, but it seems to have served its purpose.
Not sure how good 1054 lbs is, especially compared to other tailwheel -9s, but since it's less than Van's sample W&B of 1057, and b/c I have an optional 20 lb crush plate, I think I'm doing OK.
Configuration: Aerosport o-320, mags, Catto 2-blade, D180, backup ASI, ALT, radio, transponder, 2000c GPS. Seats upholstered but no other fabric, cockpit painted, primed throughout
Last edited:
ArVeeNiner
Well Known Member
Partial success with wing installation
Today was a huge milestone for me. After gathering a whole crew a week ago only to have it all go bust (I wasn't as ready as I had thought) I got the wings on today. Now I still need to install the nuts and torque everything up so I know I'm still not out of the woods but it sure feels good.
This weekend I gathered my good friend Paul, my daughter Gianna, and her boyfriend David and we knocked it out. It took us about 4 hours from going from wings on saw horses to installed with bolts in place(less nuts). Not too bad. It made for quite an RV grin!
Really, the bolts didn't fight us too much. I froze the bolts (which I don't think added much to the party) and applied liberal white grease to each bolt. A few light taps with a hammer got each bolt started and then tapped them home with a rivet gun. I made sure to not push the bottom bolts too far through the holes. Too far and you'll have a heck of a time getting the nuts on.
I'll get the nuts installed and torqued by the weekend.
This part of the build is a lot of fun!!
apkp777
Well Known Member
Got my weight and balance done today. I have access to scales, so I just did a preliminary one (notice the 8 qts of oil on top of the cowl rather than in the sump). Still, I think it turned out well. Just as another data point for an RV-9:
right main: 502
left main: 504
tailwheel: 48
Total Weight: 1054 (including 20-lb Saber crush plate)
Total weight includes gear leg fairings and intersections, wheel pants, 8 qts oil, but no paint or fire extinguisher (yet). It also includes a 20-lb crush plate installed to make sure I have full 100-lb baggage capacity. Running the numbers, it appears that the only way I can get out of c.g. is with the most fwd c.g. example/minimum pilot weight (100 lb pilot, no passenger, full fuel, and 0 baggage). In every other configuration I get get full fuel, two 190-lb pilots, and 100 pounds baggage and be within gross and c.g. in all conditions. Not sure I need all 20 lbs on the nose, but it seems to have served its purpose.
Not sure how good 1054 lbs is, especially compared to other tailwheel -9s, but since it's less than Van's sample W&B of 1057, and b/c I have an optional 20 lb crush plate, I think I'm doing OK.
Configuration: Aerosport o-320, mags, Catto 2-blade, D180, backup ASI, ALT, radio, transponder, 2000c GPS. Seats upholstered but no other fabric, cockpit painted, primed throughout
Looking great Steve, you'll be soaring with the Chinook winds in no time!
Last edited:
rv9aviator
Well Known Member
I couldn't wait until I finished putting it back together. I think I'm more excited now than when I made the first flight.
A big thanks to Jeff Orear for letting me steal his paint scheme to use on my plane and also to Bill Coleman for the beautiful paint job.


A big thanks to Jeff Orear for letting me steal his paint scheme to use on my plane and also to Bill Coleman for the beautiful paint job.
Last edited:
Don Jones
Well Known Member
Fiberglass done.
I finally finished the glass work, with exception of the main gear wheel pants and gear leg fairings (for obvious reasons). Pulled everything out of the garage to clean and reorganize everything. It's amazing how much dust you create working on fiberglass. I spent almost 6 hours redoing the garage. Looks nice now! Probably can't find anything though
So all major construction is done, basic wiring is done. Just need the engine baffles and plenum, avionics wiring, mostly the efis's, radio stack is wired. Not going to put it on the gear
until avionics wiring is done. Just need to rob a bank and this thing will be getting close.
Last edited:

Painting a tiger
A lot more work than anticipated goes into painting a plane. Against many kind suggestions to reconsider my paint idea, I painted the plane in a Bengal Tiger design and colors. I wish now that I had taken my wife's suggestion to just paint it white with a blue stripe. I might have been flying now if I had only listened. Have a few places to sand with 2000 grit and buff before moving to the hanger. I designed my own tiger snarling mouth for the cowl and used tape, paper and scissors to create the design. Painting took an enormous amount of tape and time.
Here are a few shots.
Pat Garboden
N942PT (reserved)
9A with Lycoming O-320 150 hp 0 SMOH
Cowl painted
A shot of the cowl design that I laid out over the Thanksgiving holiday. The family was really pleased with me spending 10 hours in the basement with paper, scissors and tape to create the design. Here is upper and lower cowl. Hope to have some pics of this on the plane in a few days. Orange and white paint is Sherwin Williams JetGlo and black and red is Sherwin Williams AcryGlo.
Pat Garboden
942PT (reserved)
9A
Last edited:
ArVeeNiner
Well Known Member
That's grrrrrrrreat!
Seriously, that is cool!
Seriously, that is cool!


panheadmark
Member
Ready to go at last
After a six year build RV-9A 91317 N622BE is ready to make it's first flight. If the weather is good it will happen this coming Monday.
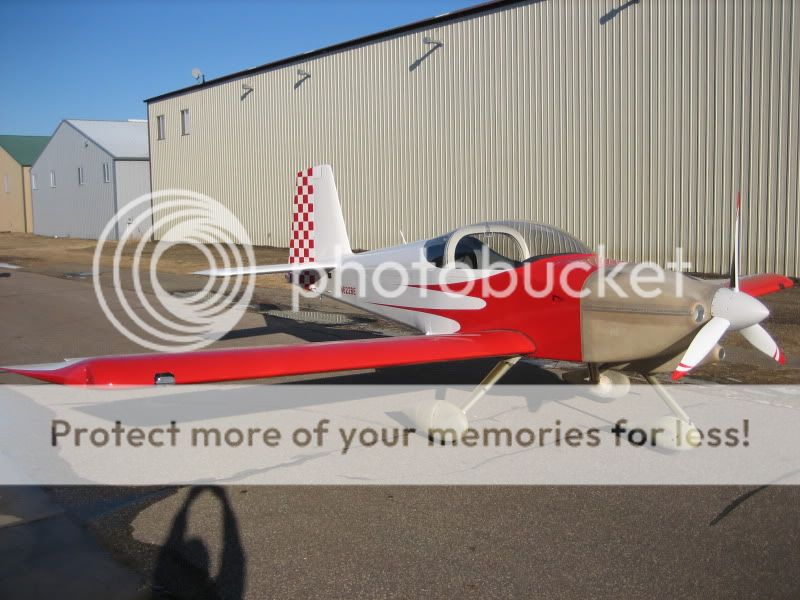
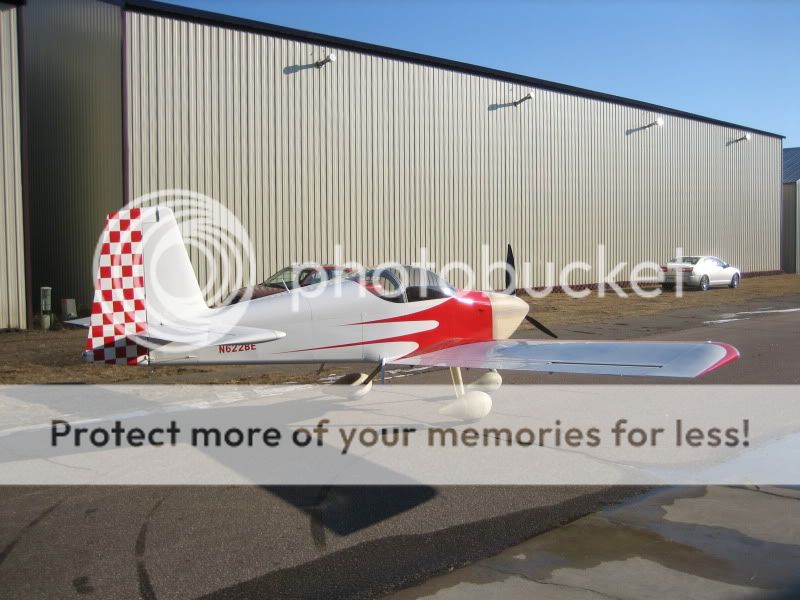
Equipped with an AeroSport O-360-A2A, dual Lightspeed ignition, Catto 3 blade propeller,
Dynon D100, D120, dual axis auto pilot, Garmin SL-40 and GTX-327, Flight Cheetah FL210 GPS.
Although this is my first plane, it's not the first thing I've built that has had wings.
That belongs to the sailboat that I built back when I was in my twenties living down in Key West.
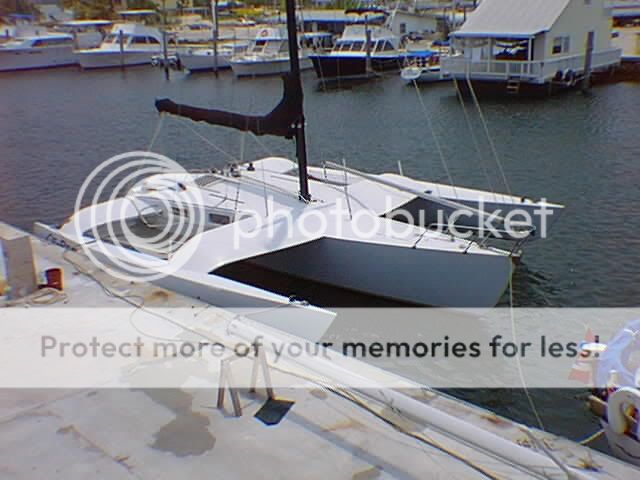
41 feet long, 27 feet wide, foam core fiberglass.
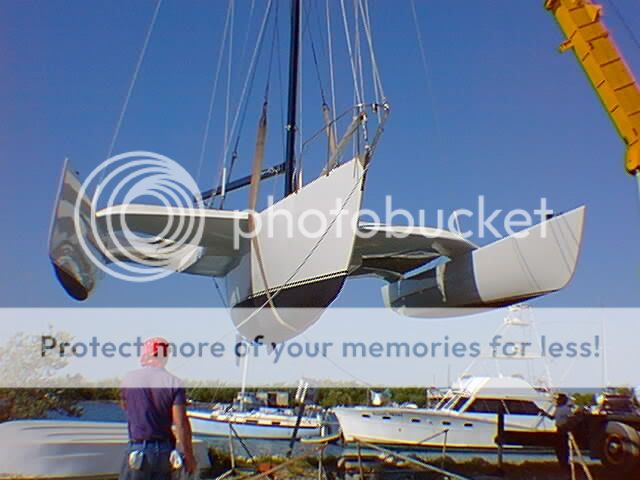
And yes.... it did FLY!
After a six year build RV-9A 91317 N622BE is ready to make it's first flight. If the weather is good it will happen this coming Monday.
Equipped with an AeroSport O-360-A2A, dual Lightspeed ignition, Catto 3 blade propeller,
Dynon D100, D120, dual axis auto pilot, Garmin SL-40 and GTX-327, Flight Cheetah FL210 GPS.
Although this is my first plane, it's not the first thing I've built that has had wings.
That belongs to the sailboat that I built back when I was in my twenties living down in Key West.
41 feet long, 27 feet wide, foam core fiberglass.
And yes.... it did FLY!
Fuselage goes to the airport
After a lot of work finishing the paint and related cockpit chores, N942PT (reserved) was loaded on a friendly aircraft carrier, also known as a tow truck, and hauled to the assembly hanger. Upper molars were added for aesthetics. Flightline interior to be installed after we take the wings to the hanger and make it look like a plane. All parts are now painted with a few areas to be buffed. It is nearing time when we can finish assemble the plane and work towards first flight.


Pat Garboden
RV9A
N942PT Lycoming O-320 150 hp
After a lot of work finishing the paint and related cockpit chores, N942PT (reserved) was loaded on a friendly aircraft carrier, also known as a tow truck, and hauled to the assembly hanger. Upper molars were added for aesthetics. Flightline interior to be installed after we take the wings to the hanger and make it look like a plane. All parts are now painted with a few areas to be buffed. It is nearing time when we can finish assemble the plane and work towards first flight.
Pat Garboden
RV9A
N942PT Lycoming O-320 150 hp
Last edited by a moderator:
Bullseye
Well Known Member
Upper molars were added for aesthetics.
That's a phrase I never expected to hear on VAF.
Great paint job!
The build of 92094 begins!
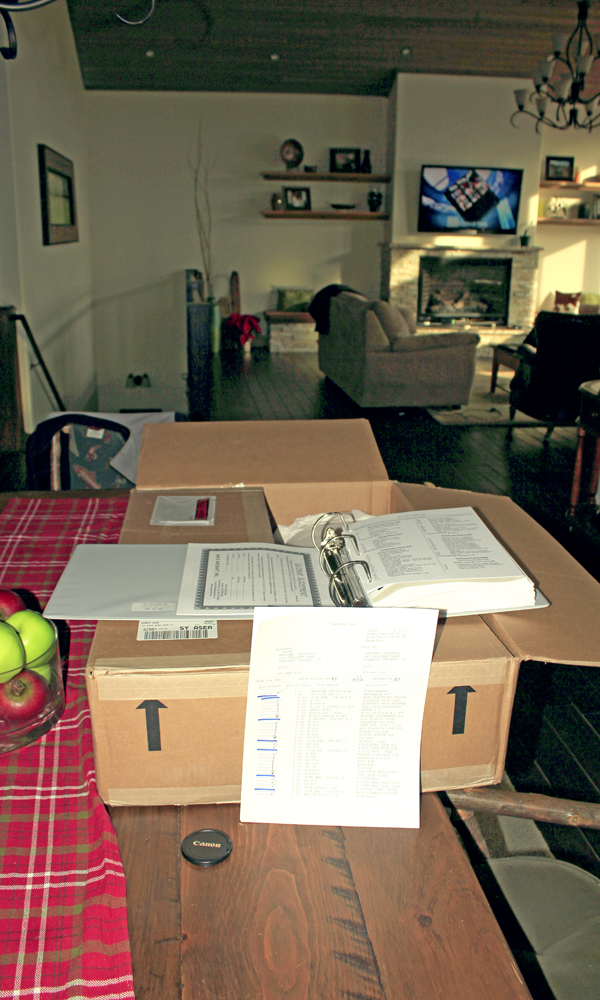 Well, enough dreaming, time to build. the first parts of my kit came today. It was scheduled for Monday so I was surprised to see FEDEX drive up the driveway. I snapped a quick picture of one of the boxes on the dining room table and will start inventory this evening. It is lightly snowing outside, so I'll put it in the garage tomorrow. Now all I need is tools!

Last edited:
what game?
No 49ers or Denver, so no game! As I unpack and make sure everything is here, I figure the guy who packed this must have made fireworks in an earlier job. I have never seen so much paper!
Congrats
Now dont let that football game on Sunday get in the way of the airplane.
No 49ers or Denver, so no game! As I unpack and make sure everything is here, I figure the guy who packed this must have made fireworks in an earlier job. I have never seen so much paper!
longranger
Well Known Member
IIRC, he is blind.
Not sure whether he packs, but he DOES nail the crates together!
Last Rivets
Last evening my son and grandson came over and helped me set the last of the rivets on the top forward skin. I'm trying to get everything done that I can at the house before going to the airport. List is getting shorter!!! Gear leg fairings, heat shield in the lower cowl and prime the outside of the cowl, wheel pants and gear leg fairings!! It's getting exciting now!! Only 90% to go!!
Picture of my "helper".
Pat Stewart
Well Known Member
Looking good Paul.
Pat
Pat

