What's new
Van's Air Force

Don't miss anything! Register now for full access to the definitive RV support community.

Oil pressure line arc to battery

rockwoodrv9

Well Known Member
Patron
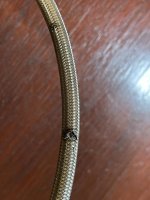
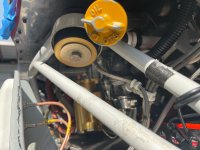
I had an interesting thing happen the past 2 days. I did an update on my G3X and I guess I took too long with the update and checking some settings. I tried to start my plane and just clicking and small movement of the prop. I tried charging overnight but still no go in the morning. I bought a new PC680 and when I was installing it I touched the wrench to what I thought was the motor mount. I finished installing the battery and putting the top cowl back on I noticed a black spot on the oil pressure hose. My first thought was what was it rubbing on to make it black?

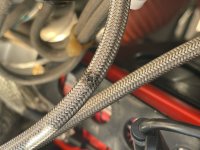
I put my glasses on and felt it. Then I remembered the ark and wondered if that was it. I took a couple pictures and sent them to Tom at TS Flightlines asking if he thought the line needed to be replaced before further flight. It really didnt look that bad to me. He said - do not fly! I have my check ride to FINALLY get my license scheduled for Friday. Ugg!! Tom told me to order new ones online and to contact Steve at Aircraft Specialties. Steve called me almost instantly and said he would build the hoses and get them sent overnight so I will have them tomorrow. What great service. I appreciate them rushing this for me.

I was advised to have the hoses fire sleeved. That is something I had never considered or even known it was a good idea. It is a good idea - do it now. Besides saving the cost of new hoses it is VERY easy to not notice and it could make your flight end really bad.

The hose was from the pressure manifold on the firewall to the engine near the mag. It is really easy to short out when changing the battery or even hooking up a charger. I cant wait to install my new hoses tomorrow.
 

Attachments

  • oil 2.jpg
    oil 2.jpg
    310.7 KB · Views: 202
  • oil line.jpeg
    oil line.jpeg
    859.1 KB · Views: 200
  • oil 3.jpeg
    oil 3.jpeg
    695.8 KB · Views: 209
  • oil 4.jpeg
    oil 4.jpeg
    985.2 KB · Views: 204
Also to remove a chance of arcing the wrench to anything, you remove the negative first, followed by the positive. When reinstalling it, you install the positive first (it can’t arc because the negative isn’t attached yet) then the negative last (the negative can’t arc, because it’s negative anyway)
 
Last edited by a moderator:
basic free advice ;-)

Always hook the negative (ground) lead last when wrenching on a battery. With the ground side still open, no sparks will result from touching a tool to the positive post and the metal structure of the airframe. When attaching the negative post last, the tool will not spark from negative post to airframe parts as they are all at the same zero-potential.
 
Thanks for the info on taking the negative off first. I knew that but didnt think of it! I still think it is a good idea to fire sleeve all metal braided hoses FWF.

Mike - thanks! Wish me luck and hope the weather gets a bit better. I am not fond of cross winds!!!
 
If the aircraft was wired correctly and the master switch is off then it would not be possible for the positive terminal or anything connected to it to ark to ground. This is what we want if a crash is imminent and we have turned off the master switch. The master switch solenoid has to be on the ground lead close to the battery, all certified aircraft are wired this way.
 
The + terminal of any battery installed in any aircraft with a - grounding system will short out if something conductive is placed between the + post of the battery and a grounded (to the battery) surface.

You can't eliminate this, but you can reduce the chance by mounting your master as close as possible to the + terminal of the battery and have protective covers on battery + and the master + both sides.
 
If the aircraft was wired correctly and the master switch is off then it would not be possible for the positive terminal or anything connected to it to ark to ground. This is what we want if a crash is imminent and we have turned off the master switch. The master switch solenoid has to be on the ground lead close to the battery, all certified aircraft are wired this way.

Please name one.....
 
Well here in the USA, It would be safe to say that at least 95% of aircraft registered here use the negative side of the battery as a ground and switch the positive side of the battery with the master.

The general conversation on this website leans heavily towards the RV series of homebuilt aircraft. And as such, all of Van's kits are designed to be wired with the negative terminal of the battery grounded to the engine case and to the airframe.
 
Offhand, it probably doesn't make much difference. With a contactor on the negative side it would indeed be difficult to arc regardless of which terminal is R&R'd first. In a crash, either way would have a short length of unprotected cable capable of sparks.
 
My Beechcraft 23 and all the other similar aircraft I work on.

I just happen to have the Beechcraft 19/23/24 manuals; it clearly shows battery + going to the battery relay/contactor and the neg side going to ground. I think you better look again, (unless Beech made things backwards for the folks down-under? my manuals don't say USA only).
 
Last edited:
I just happen to have the Beechcraft 19/23/24 manuals; it clearly shows battery + going to the battery relay/contactor and the neg side going to ground. I think you better look again, (unless Beech made things backwards for the folks down-under? my manuals don't say USA only).

Beech battery install....
 

Attachments

  • beech battery.JPG
    beech battery.JPG
    90.2 KB · Views: 72
Back
Top