What's new
Van's Air Force

Don't miss anything! Register now for full access to the definitive RV support community.

How to make an RV fly really bad!!!!

Michael Seager

Active Member
I took my first RV flight in 1983 so I guess that means I have been flying RVs of all models for at least 38 years. I have helped a lot of people over the years either inspect and test fly or deliver and help check out a lot of people in their planes. I have test flew over 200 brand new RVs and flown more than 400 different airframes of all models of RVs. I have extensive time in all models except the RV-1. Last time I checked my logbook I had well north of 20000 hours in RVs.
I was ask to inspect and deliver an airplane this last weekend. I went and looked at it as I have done many times over the last 38 years. It was a very nice built and finished airplane, professional painted. On occasion I find an airplane that really stands out and this one was not in a good way.

This plane was so touchy to control that it was a handfull to fly even with all my experience. I seldom write on this forum but hopefully this will help some one else have a better flying plane. I have preached this to my students for many years. These two things will improve how your plane flys a lot. This will apply to RV-3 4 6 7 8.

1 Do not cut 6 inches off your control stick. It was designed to be the length that it was shipped in the kit. If you want to cut it down to put on a stick grip make sure you put back to the original length. Nothing I can think of worse than trying to negotiate a strong gusty cross wind with a touchy airplane that has the stick cut off to down between my legs. If you think I'm wrong on this take the steering wheel off your car and replace it with a 4 inch steering wheel and see how it goes. Van has wrote several articles on this and yet I still find lots of planes in the field that have really short cut off sticks. To make things even worse go to high altitude and load up the baggage compartment to make a rear CG and you have a really touchy hard to fly airplane when you cut the stick off. Over the years I used to carry some stick material with me so i could extend the stick back to the proper length before i ferried an airplane.

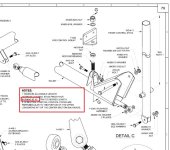
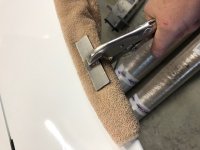
2 Make sure that the trailing edges of the ailerons are squeezed properly. This one very simple to fix item can make your ailerons nasty to fly. I find this a lot when test flying new planes. The trailing edge does not get squeezed enough and it makes this thing called aileron snatch. Aileron snatch makes the aileron very sensitive and unable to center. Give me 10 minutes and a hand seamer and I can fix this. A straight edge and a hand seamer can fix promptly. The particular plane that I delivered this weekend had terrible aileron snatch. Interesting that this plane had flown 700 hours this way and the original owners thought it flew great. I let the new owner fly it before I fixed it and he could believe how much different it flew.
I wonder how many other airplanes out their fly like this one did and could be improved a lot.

Michael Seager
[email protected]
 
You have me extremely curious as to why these two things apply more to the 3 through 8 models and less to the 9 through 14 models.
 
You have me extremely curious as to why these two things apply more to the 3 through 8 models and less to the 9 through 14 models.

The models listed have ‘folded’ trailing edges on the ailerons. The 10 and 14 have 2 piece, riveted trailing edges, which cannot be squeezed.
 
My experience too

Regarding n°2 : I flew my RV-7 for 8 years with very light ailerons without this being a problem to me, I then participated in a formation training camp and a pilot I was flying with told me that the ailerons were indeed very light (which did no help maintaining position). Inspection on the ground showed some pillowing between the aileron ribs and a too great radius at the trailing edge.
I did some trailing edge squeezing, progressing slowly with some test flights between each iteration.
Once satisfied, I felt initially that the ailerons were a bit heavy but after a few flight the feeling is that roll control is much better and that the pitch an roll axis are better balanced.
 
Last edited:
well north of 20000 hours in RVs
in 38 years = 526hr/year. Congrats on those impressive figures :cool:

And thanks for those 2 golden tips, let's hope present builders are listening ;)
 
If I may, add the elevator TE to that list, I've "fixed" a number of twitchy auto pilot problems the same way.
 
Inspection on the ground showed some pillowing between the aileron ribs and a too great radius at the trailing edge.
I’m not flying yet, but this thread has grabbed my interest. I realize that this is probably a progressive adjustment, but is there a ballpark number for a radius that we should be aiming for?
 
Mike, thanks for the tips. I found it necessary to cut my RV-8 stick down to clear the bottom of the panel; I have the stick grip positioned so it just barely clears. Bruce Bohannon's RV-8 has a welded-up stick with an aft offset. When I trained with him, I made a habit of holding the stick low so my grip would approximate what I have on my aircraft. It will be interesting to see if it gives me trouble once I'm getting formation training.
 
Eye opening

I’m sure this post will have a bunch of us wondering where our planes fall in this trailing edge spectrum. In my quest to get the optimum qualities out of Vans design, does anyone out there have before and after photos of a corrected poor trailing edge. If anything, just to compare our edges to a property formed edge.
There’s most likely a lot of RV’s out there that could be greatly improved and much safer. :)

Section 5 has descriptions and pictures. It will guide you through the process. My 6 was somewhat sensitive in pitch but not a problem. When I started IFR training, It was hard to hold 100' when doing other things. I addressed the under squeezed TE's on the elevators and it made a noticeable difference when under the hood. Didn't take away any of the fun factor, just the over sensitivity.

Larry
 
This looks like it's ripe for a nice video showing a trailing edge that is too rounded, and a trailing edge that is correctly rounded, and how to make it right. Also, any hints for those with painted surfaces would be welcome!

Mike, next time you're in Switzerland I'd love to have you fly my 8 to determine where on the --twitchy----------stable-- spectrum it sits. I'm happy with it, but I've only flown 5 RVs, and they all seemed about the same.
 
Pillowing trailing edges are also the major cause of skin cracking around the most aft rivets.
 
Section 5 has descriptions and pictures. It will guide you through the process.

Larry

This looks like it's ripe for a nice video showing a trailing edge that is too rounded, and a trailing edge that is correctly rounded, and how to make it right. Also, any hints for those with painted surfaces would be welcome!

As Larry wrote, there is fairly detailed instructions in SECTION 5 on how to evaluate the shape of control surfaces with bent (vs riveted) trailing edges, and how to adjust them if the shape is not correct.

The shape / profile is far more important than the actual bend radius of the trailing edge.

This is equally important for the ailerons, elevators, and rudder.

Next on the list of things that can make an RV fly bad is control system friction. This is particularly bad in the pitch circuit.
For the best flight qualities (and static and dynamic stability), the control system should be very low in friction.
I.E., if you flick a control surface, it should move and bounce around without quickly stopping.
Sometimes solving this just requires doing some good lubricating but it is usually caused by excess friction being induced by improper assembly.
 
Last edited:
I hope someone takes pictures or makes a video the next time they encounter this.

I actually went around at OSH and took pictures of the rudder and aileron trailing edges to compare to mine because as a first time builder I have no idea what I am doing.
 
I’m not flying yet, but this thread has grabbed my interest. I realize that this is probably a progressive adjustment, but is there a ballpark number for a radius that we should be aiming for?

From the Construction Manual, in the section on building the ailerons:

The bent skins must be straight up to the radius and the radius must be between 3/32” to 1/8”. Match the degree of bend to the full size end view drawings. The upper and lower skin should just touch the spar when placed in position.
 
This makes a lot of sense now.

I have owned of a -10 for several years. I had the chance to fly my first two seat RV last week, it was a -6. I have a lot of time in many high performance aircraft including many aerobatic biplanes. This -6 had the most sensitive elevator control I have felt. I called the owner who is new to Vans and he is checking the skins now.

Thanks for the tip!
 
...
1 Do not cut 6 inches off your control stick. It was designed to be the length that it was shipped in the kit. If you want to cut it down to put on a stick grip make sure you put back to the original length.
Michael Seager
[email protected]

From the plan, it says the maximum length from the bushing is 15 inches but it does NOT mention the minimum length to keep it from being twitchy.

What is the preferred length from the pivot point to the hand position? Like many builders, I cut mine so it will just clear of the lower instrument panel.
 

Attachments

  • Capture.JPG
    Capture.JPG
    113.3 KB · Views: 313
From the plan, it says the maximum length from the bushing is 15 inches but it does NOT mention the minimum length to keep it from being twitchy.

What is the preferred length from the pivot point to the hand position? Like many builders, I cut mine so it will just clear of the lower instrument panel.

Short enough to clear the standard kit supplied instrument panel is appropriate.
Shortening to clear a custom, deeper, panel would be staring to deviate towards unacceptable.
 
This -6 had the most sensitive elevator control I have felt.

Generally speaking, yes, the -6 (and the -4, and probably the -3) have the most sensitive pitch. And roll. And maybe yaw (for the ones sporting the -8 tail). If it ain't over-sensitive, it permits precise flying, prompt manoeuvring, almost instant think/do reaction. And pure joy :D

One of the problems is that lot of builders build their panel (or add a sub-panel) much taller than specified on the plans, then load the panel with clocks or glass, and finally once all installed... have to cut the stick short to fit :eek:
 
Good point Mike. You must have seen this issue (too) many times to prompt you to post it to this forum!


From the Construction Manual, in the section on building the ailerons:
Quote:
The bent skins must be straight up to the radius and the radius must be between 3/32” to 1/8”. Match the degree of bend to the full size end view drawings. The upper and lower skin should just touch the spar when placed in position.

It should be noted to not make the TE bend any tighter than the radius measurements above. Minimum sheet metal bend radius allowances assure that stress cracking does not develop in the bend. I came across one elevator that had been over bent & cracked in some places, and had to re-skin the unit.

The manual describes a bending fixture to use during construction. I found this good for the initial bend of the TE, but later after riveting, to finish off with a hand seamer as Mike described. Specifically a vice grip style hand seamer that can be adjusted to gradually pinch in the TE radius to a consistent radius. The other trick I use with the vice grip hand seamer is to lay a towel folded 3 layers thick inside the jaw to protect the seamer from making pinch marks at the ends of the jaw all along the TE.
 

Attachments

  • TE pinch.jpg
    TE pinch.jpg
    69.7 KB · Views: 313
Last edited:
Many folks don't get the subtlety (or subtle difference) between teh final radius of the trailing edge bend itself, and the “flatness” of the slopes leading up to it - this is the thing that needs to be emphasized in the links that Scott provided. If you lay a straight edge on the surface of the control surface, it should be absolutely straight leading up to where the actual final radius begins - any bulge will make it more sensitive, and any con cavity will make the controls feel very heavy.

I haven;t flown as many different RV’s as Mike (probably no one has!), but I have flown a wide enough variation to have experienced heavy RV-3’s and extremely light RV-8’s - and everything in between. Our RV-3 is the most delightful handling airplane I have ever flown, and I have flown an RV-8 that was so much lighter in roll as to be uncomfortable. Examining the ailerons proved to me the importance of the shape of the surfaces ahead of the final radius.

BTW - our RV-6 (the tail number is N164MS….which gives you a clue to the builder….) is a perfect example of how the RV is supposed to handle.

And Mike - the RV-1, as revolutionary as it was for the day, felt heavier (and a bit slower in roll) than a typical RV-3, more like a -7. At least by the time I got my hands on it!

Paul
 
Fit this up against the aileron every inch along its length and you will quickly see, top and bottom, where the trailing edge needs adjustment. Made from the plans for my RV6.

IMG_0749 Large.jpeg
 
Trailing edge

Several years ago Barnaby Wainfan did an article or maybe a series of articles on trailing edge shapes.
Based on Non RV experience it is possible to go overboard with the crimping and wind up with heavier than desired controls.
On my Wittman Tailwind I have all metal ailerons with just a slight bulge in the skin. The controls are perfect for me. Light stick forces but not excessively light and good centering.
On a Pitts the trailing edge is 1" wide and the ailerons are fabric covered. A bulge in the trailing edge results in zero centering force and when the stick is released the ailerons will move nearly to the stop by themselves. Proof that it's the very aft edge of the aileron that is causing the problem. With fabric covered surfaces the fabric normally bulges outward at cruise speeds or higher.
A square trailing edge 1/2" to 3/4" thick enhances the centering force of the controls and is alleged to be beneficial regarding flutter.
Extra used square trailing edges for a while and then went back to sharp edges.
 
Short enough to clear the standard kit supplied instrument panel is appropriate.
Shortening to clear a custom, deeper, panel would be staring to deviate towards unacceptable.

Thanks for the info. I just measured my Infinity grip after I got home this afternoon. It is 14.5 inches to the top of the grip. It's 13 inches just underneath the button group (the top portion of the hand where the thumb and index finger grip the stick)
 
Updated Section Five

I recently discovered that Section Five has been completely updated and re-written. My construction manual is very old (Builder No. 71580). (No snide comments, please. :rolleyes: )

The revised version is available for download from Van’s web site. I don’t think anything regarding the aileron trailing edge radii has been changed but it would be wise to use the latest info from the Mother site.
 
I briefly thought about 3d printing a squared off trailing edge that could be taped onto the trailing edge of my rv-7 ailerons. My mid wing extra 300 had square trailing edges and the feel of that airplane was unparalleled. My old 3b was perhaps nicer all around due to its light weight, but I felt it could be a little more “locked in” with improved trailing edge shape.
 
Define aileron snatch

I replaced two RV3 ailerons that were smashed too much. The new ailerons I built ended up with a TE radius about 1/8” when skins were flat and tangential to the trailing edge. The airplane was delightfully sensitive in roll.

I was alert to the potential for “snatch” as referenced here on VAF. I assumed it would be deadly.similar to an over centered toggle lock. Can anyone define snatch and centering to improve my mastery of this wonderful hobby ?

Also, remember the Gurney flap principle. Irregularities of the trailing edge, like square , but warped or with a rough edge, can be very powerful and potentially the cause of a heavy wing.
 
Control surface TE radius...

This is an important subject that many builders/flyers might not be totally aware of or, if so, what the fix is or what might be causing their specific issue. Should this thread be "Sticky"?

I know people might be aware of fine-tuning the ailerons but the rudder and elevators? Maybe, maybe not....

(heading out to the hangar with my straight edge now.....!);)
 
Last edited:
Fit this up against the aileron every inch along its length and you will quickly see, top and bottom, where the trailing edge needs adjustment. Made from the plans for my RV6.

View attachment 18872
Maybe there is an opportunity for someone to 3D print a bunch of "go-nogo" gauges with the exact radius profile, three or so inches wide for trailing edge inspections....
 
I agree. I have a heavy left wing and have read and squeezed some, read the instructions, used straight edges, etc. and the more I look at it the more I am not sure what my ailerons need. I am sure if I could see a proper one and could compare to mine it would be obvious but for some of us 1st time builders the experience is not there. Like knowing what snatch feels like and what an over sensitive RV feels like when I have so much time in pipers and Cessna's. I think some kind of gage would really help, or maybe a you tube video.

Thanks
John
TE under.JPG
TE proper.JPG
TE Over.JPG

Full info here... https://www.vansaircraft.com/wp-content/uploads/2019/01/RV-ALL_05.pdf Page 10.
 
I have access to a CNC router - could make larger gauges once I trace the relevant plans. Do you think it would be worth the setup?

Just getting started on my own build (RV-8) so haven't gotten there yet myself.
 
A straight edge laid cord wise as shown in Section 5 is about as accurate of a method as you will find. Not sure what the benefit would be in making a special tool. Especially since you would have to make a different one for each control surface.
 
Back
Top