BruceMe
Well Known Member
I want some group wisdom on cracking top skin repair (both wings, similar cracking).
Background, I purchased this RV-3 (no mods, just a straight RV-3) this year, I've owned an RV-3A (CN1&2) before and I knew what I was getting into. I saw these cracks when I bought the plane and I purchased it knowing I would need to do this repair. The damage might be caused by any or all of; over-stressing the wings without rear-spar mod, extending the flaps at too high of an airspeed (these cracks are right in the middle of the flaps), or a vibration mode in the rear spar.
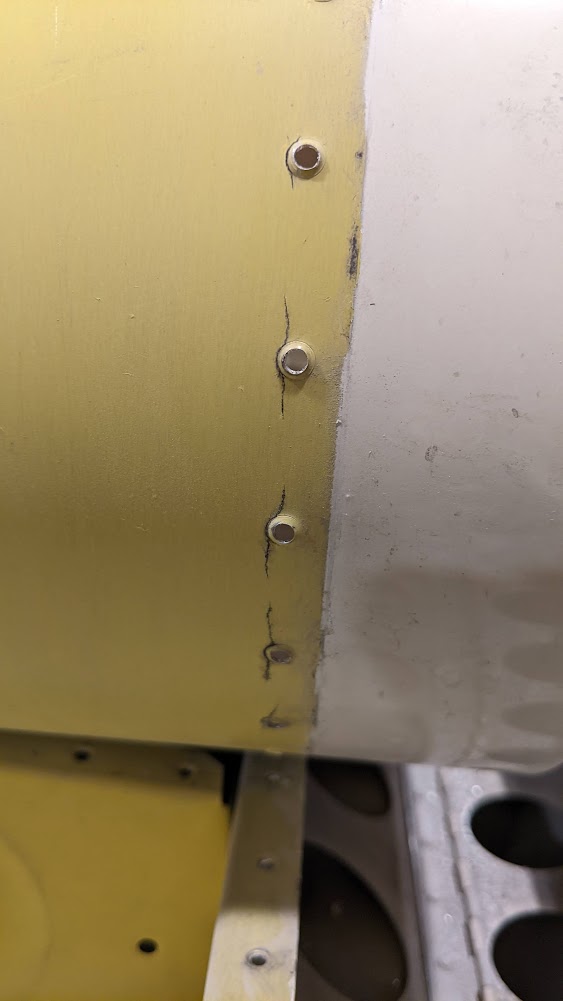
The cause doesn't really matter, they're there and they are on both wings (4 rivets 24" out from the root), which means it's stress.
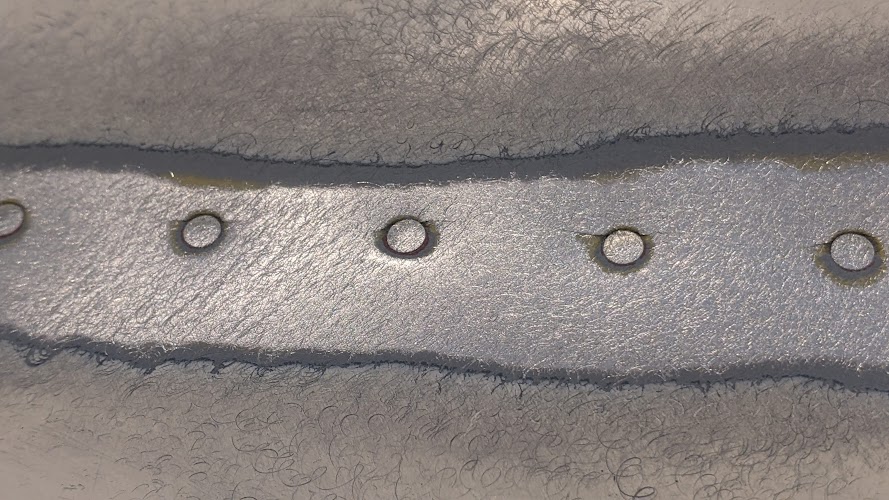
I've stripped the paint off the top skins and confirmed the cracks are not just the paint, it's in the skin. I've also boroscoped the rear spar from the inside and taken pictures from the outside, there's no sign of rear spar damage. Also I boroscoped te main spar and I do not see any signs of over-stress or damage. So the damage is limited to the top skin only and it's on both wings in roughly the same place.
On my RV-3, this top skin goes from the root to the tip 97" x 27", the material cost doesn't bother me, but man the riveting and the jigging. I'd rather just patch it. I need to pull a skin regardless to get to the spar for the mod.
The Actual Question:
Is it acceptable practice to put a patch under cracked skin?
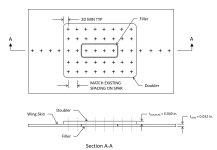
If not, I will probably cut the inboard skin and do a joint similar to the RV4's skins somewhere out by the aileron bell crank.
thoughts? suggestions?
Thanks!
-Bruce
Background, I purchased this RV-3 (no mods, just a straight RV-3) this year, I've owned an RV-3A (CN1&2) before and I knew what I was getting into. I saw these cracks when I bought the plane and I purchased it knowing I would need to do this repair. The damage might be caused by any or all of; over-stressing the wings without rear-spar mod, extending the flaps at too high of an airspeed (these cracks are right in the middle of the flaps), or a vibration mode in the rear spar.
The cause doesn't really matter, they're there and they are on both wings (4 rivets 24" out from the root), which means it's stress.
I've stripped the paint off the top skins and confirmed the cracks are not just the paint, it's in the skin. I've also boroscoped the rear spar from the inside and taken pictures from the outside, there's no sign of rear spar damage. Also I boroscoped te main spar and I do not see any signs of over-stress or damage. So the damage is limited to the top skin only and it's on both wings in roughly the same place.
On my RV-3, this top skin goes from the root to the tip 97" x 27", the material cost doesn't bother me, but man the riveting and the jigging. I'd rather just patch it. I need to pull a skin regardless to get to the spar for the mod.
The Actual Question:
Is it acceptable practice to put a patch under cracked skin?
If not, I will probably cut the inboard skin and do a joint similar to the RV4's skins somewhere out by the aileron bell crank.
thoughts? suggestions?
Thanks!
-Bruce
Last edited: