South Florida Sport Aviation interior installation
These interiors are excellent that are probably the best value currently. Elaine at South Florida aviation gives great support. The instruction includes images and videos. Nevertheless, I think sharing a few tips and an extra image or two may be helpful other Vans RV owners.
The kit comes with pre-cut portions of carpet and leather. Many pieces are sized and some come oversized are will be trimmed to fit. Carpet and leather pieces are glued down with 3M brand 1357 adhesive glue. This product is approved for use by the FAA. Unfortunately, it is rather expensive at about $50-$60 per quart on Amazon. I used 4 quarts. This is a contact adhesive. Both sides of material are coated with adhesive, then the pieces are applied after several minutes when glue is no longer tacky forming a permanent bond. This is not a cold-weather task. It requires 65° or warmer for the glue to harden. Wear a mask that captures organic chemical fumes while applying glue in the cockpit. The carpet and leather pieces will often cover panels with existing screw holes. We are going to have to re-open these holes once they are covered. I found that my 75-watt pencil shaped soldering iron works great on the carpeting pieces. A smaller 30 watt soldering iron had trouble melting holes. If you have a hot knife with the correct size tip this will work too. Just burn right through the screw hole from the metal side of the panel. Don’t over do it. You don’t want to burn or melt the surrounding carpet just open up the hole. Clean up the hole with a small razor knife after punching through with the soldering iron. Using a soldering, iron or hot knife should not be attempted with the leather pieces. This will burn and distort the leather pieces. I used a small drill stepping up the size until the hole is open. The clean open holes make screwing component back into the airframe much easier. The are carpet pieces that come with the cut holes. Line up a few holes at a time with a small rods or drill bits. Then progressively glue down small areas. Trying to glue and adjust the holes to fit on large pieces is problematic. Finally, there are few holes with nut plates that are going to get covered up. I located and opened these holes after gluing. This was done by inserting a sharp needle like a 2” hat pin from bellow into the nut plate. The needle was pushed up to see where the nut plate was located. I then drilled out the carpet.
I suggest starting with pieces that will be taken off.
This includes:
baggage - top and bottom bulkhead
baggage- tunnel cover
baggage - side inspection covers
seat backs
fuselage floor plates over the ribs.
All of this will be more comfortable outside of the aircraft on a table. It’s a great way to get to know the materials.
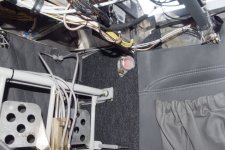
The most confusing area is the forward side cabin carpet and firewall cover. Unfortunately, this area is not well documented by the image in the instructions. The forward side cabin carpet piece has two holes. The largest hole is a rectangle with a cut slot. This will open up and slide forward over pivot point of the rudder pedals. There is smaller circular hole that will be located at the 2 o’clock position. This lines up with the NACA vent position. Much of the upper portion of this portion of carpet piece extends between the panel and sub panel. It not visible to the pilot or passengers. I trimmed often a lot of the carpet around vent off. ( Look at my Image )
The next pieces to go in are the two foam floor strips. These are really easy. They just slide in without glue. The forward outer corner tucks under the metal brace. You will need to trim a bit of the foam on the other end next to the landing gear.
The forward floor carpet is next. Glue the carpet to the top the foam.
You will find about 2 inches of the forward carpet folds up on to the firewall. Glue this tab of carpet to the base of the firewall. Notice that the faux leather firewall cover has the hook type Velcro strips on the perimeter. The tab of carpet that comes off the floor will attach to the Velcro on the bottom of the faux leather firewall piece. Matching strips of carpet are glued onto the firewall on the remaining sides. The firewall covers has some cut slots for gas and brake lines.
There is a good chance you will have to modify the firewall cover in some way to allow lines to come through. There may be too many modifications to be worthwhile in some planes.
Here are some more suggestions for individual pieces.
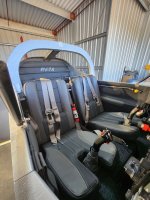
There are carpet strips that are applied between the seat attachment hinges. Make sure you leave about 1/16 or more clearance from the hinge loops. You might have to trim these strips slightly. This ensures that the seats will go back in easily.
The carpet on the baggage compartment floor extends forward under the flaps rod. Glue this portion of carpet in two steps. Place and fit the entire piece in position so it fits correctly. Slide the front half of the carpet under the flaps bar. Fold the front portion backwards over the flap rod then glue it down. Once this area is down then finish gluing the remaining baggage area.
L shaped pieces with the pockets are difficult to apply because these areas are not flat. My installation was complicated by tubes and wires. This makes the contact and surface is uneven. I added half inch close cell foam between the carpet and the fuselage wall. This creates a flatter surface and covers the tubes and wires.
The edges of this piece surround the inspection cover opening. You’re going to have to make some release cuts in the corners to get it to fit correctly. When you’re done, you will have to trim off a small amount of carpet to expose the nut plates. Don’t over trim otherwise will leave an area of bare metal.
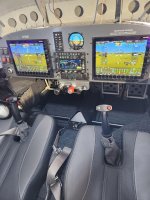
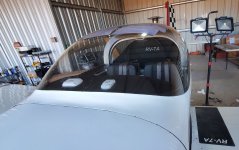
Glare shield. Start by marking the center of the glare shield at the edge. This mark will be line up with the center stitching on the leather. Trim the glare shield leather until it fit nicely. Best to leave a .5 to .75 inch at the front next to the glass. This allows the foam to fit flat. There is finish rope that will cover up the bit small bare area. Give glare shield foam a light coat of glue. It is open cell foam and is porous. Don’t to saturate the foam causing hard spots. Let it dry until it is no longer tacky. Then coat the center 4 inches of the aluminum until no longer tacky. Line up and attach the leather in the center. Glue in small sections from the center out.
Some final thoughts. My interior carpet is nearly black. The standard aviation AN 8–32 screws clash with the color. I was able to find black oxide steel 8–32 screws on Amazon. These look tons better but have not been approved by Vans Aircraft for engineering.
I imagine you can paint the AN 8-32 screw heads or get them powder coated.
These interiors are excellent that are probably the best value currently. Elaine at South Florida aviation gives great support. The instruction includes images and videos. Nevertheless, I think sharing a few tips and an extra image or two may be helpful other Vans RV owners.
The kit comes with pre-cut portions of carpet and leather. Many pieces are sized and some come oversized are will be trimmed to fit. Carpet and leather pieces are glued down with 3M brand 1357 adhesive glue. This product is approved for use by the FAA. Unfortunately, it is rather expensive at about $50-$60 per quart on Amazon. I used 4 quarts. This is a contact adhesive. Both sides of material are coated with adhesive, then the pieces are applied after several minutes when glue is no longer tacky forming a permanent bond. This is not a cold-weather task. It requires 65° or warmer for the glue to harden. Wear a mask that captures organic chemical fumes while applying glue in the cockpit. The carpet and leather pieces will often cover panels with existing screw holes. We are going to have to re-open these holes once they are covered. I found that my 75-watt pencil shaped soldering iron works great on the carpeting pieces. A smaller 30 watt soldering iron had trouble melting holes. If you have a hot knife with the correct size tip this will work too. Just burn right through the screw hole from the metal side of the panel. Don’t over do it. You don’t want to burn or melt the surrounding carpet just open up the hole. Clean up the hole with a small razor knife after punching through with the soldering iron. Using a soldering, iron or hot knife should not be attempted with the leather pieces. This will burn and distort the leather pieces. I used a small drill stepping up the size until the hole is open. The clean open holes make screwing component back into the airframe much easier. The are carpet pieces that come with the cut holes. Line up a few holes at a time with a small rods or drill bits. Then progressively glue down small areas. Trying to glue and adjust the holes to fit on large pieces is problematic. Finally, there are few holes with nut plates that are going to get covered up. I located and opened these holes after gluing. This was done by inserting a sharp needle like a 2” hat pin from bellow into the nut plate. The needle was pushed up to see where the nut plate was located. I then drilled out the carpet.
I suggest starting with pieces that will be taken off.
This includes:
baggage - top and bottom bulkhead
baggage- tunnel cover
baggage - side inspection covers
seat backs
fuselage floor plates over the ribs.
All of this will be more comfortable outside of the aircraft on a table. It’s a great way to get to know the materials.
The most confusing area is the forward side cabin carpet and firewall cover. Unfortunately, this area is not well documented by the image in the instructions. The forward side cabin carpet piece has two holes. The largest hole is a rectangle with a cut slot. This will open up and slide forward over pivot point of the rudder pedals. There is smaller circular hole that will be located at the 2 o’clock position. This lines up with the NACA vent position. Much of the upper portion of this portion of carpet piece extends between the panel and sub panel. It not visible to the pilot or passengers. I trimmed often a lot of the carpet around vent off. ( Look at my Image )
The next pieces to go in are the two foam floor strips. These are really easy. They just slide in without glue. The forward outer corner tucks under the metal brace. You will need to trim a bit of the foam on the other end next to the landing gear.
The forward floor carpet is next. Glue the carpet to the top the foam.
You will find about 2 inches of the forward carpet folds up on to the firewall. Glue this tab of carpet to the base of the firewall. Notice that the faux leather firewall cover has the hook type Velcro strips on the perimeter. The tab of carpet that comes off the floor will attach to the Velcro on the bottom of the faux leather firewall piece. Matching strips of carpet are glued onto the firewall on the remaining sides. The firewall covers has some cut slots for gas and brake lines.
There is a good chance you will have to modify the firewall cover in some way to allow lines to come through. There may be too many modifications to be worthwhile in some planes.
Here are some more suggestions for individual pieces.
There are carpet strips that are applied between the seat attachment hinges. Make sure you leave about 1/16 or more clearance from the hinge loops. You might have to trim these strips slightly. This ensures that the seats will go back in easily.
The carpet on the baggage compartment floor extends forward under the flaps rod. Glue this portion of carpet in two steps. Place and fit the entire piece in position so it fits correctly. Slide the front half of the carpet under the flaps bar. Fold the front portion backwards over the flap rod then glue it down. Once this area is down then finish gluing the remaining baggage area.
L shaped pieces with the pockets are difficult to apply because these areas are not flat. My installation was complicated by tubes and wires. This makes the contact and surface is uneven. I added half inch close cell foam between the carpet and the fuselage wall. This creates a flatter surface and covers the tubes and wires.
The edges of this piece surround the inspection cover opening. You’re going to have to make some release cuts in the corners to get it to fit correctly. When you’re done, you will have to trim off a small amount of carpet to expose the nut plates. Don’t over trim otherwise will leave an area of bare metal.
Glare shield. Start by marking the center of the glare shield at the edge. This mark will be line up with the center stitching on the leather. Trim the glare shield leather until it fit nicely. Best to leave a .5 to .75 inch at the front next to the glass. This allows the foam to fit flat. There is finish rope that will cover up the bit small bare area. Give glare shield foam a light coat of glue. It is open cell foam and is porous. Don’t to saturate the foam causing hard spots. Let it dry until it is no longer tacky. Then coat the center 4 inches of the aluminum until no longer tacky. Line up and attach the leather in the center. Glue in small sections from the center out.
Some final thoughts. My interior carpet is nearly black. The standard aviation AN 8–32 screws clash with the color. I was able to find black oxide steel 8–32 screws on Amazon. These look tons better but have not been approved by Vans Aircraft for engineering.
I imagine you can paint the AN 8-32 screw heads or get them powder coated.