What's new
Van's Air Force

Don't miss anything! Register now for full access to the definitive RV support community.

Simplified Approach

dual fed engine bus

Dual fed engine bus.

If you use a Bussmann 15600 fuse panel you can feed it from opposite ends to eliminate an FMEA SPOF, loose nut on stud. The fuse panel is easily modified for the 2nd stud; snap the cap off, remove the bus strip, find the 2nd hex hole in the base for the stud head, notch the cap for the 2nd stud you add, reassemble.

Photos here.
.
 
Is there any concern about a bus short or fault in this arrangement? (A bunch of water lands on the fuse block etc)

Typically, fresh water would not be a problem with a 12V bus.
 
Last edited:
Typically, fresh water would not be a problem with q 12V bus.

Just don't let there be any way at all that any water could be "contained"! Symmetry of redundant systems is your enemy. It could have you returning to the foreign country you just left over the ocean :). Don't ask me how I know.
 
Cross Tie (Bus Tie) which wiring diagram is correct

I have been getting different inputs on how to correctly wire a bus tie. I basically look at the Z-14 drawing and can figure that out and looks correct. I received another drawing what is also proposed to be correct. The diode connected to the ground is my concern. Maybe a better mouse trap but as a non-EE I don't know. This question is not about adding SPOF or added complexity I don't need just are these an acceptable way of wiring a cross feed contactor. Thanks, and as always appreciate the input.
 

Attachments

  • Z-14.png
    Z-14.png
    21.2 KB · Views: 69
  • panel 2.jpg
    panel 2.jpg
    7.6 KB · Views: 323
Last edited:
Use Bob's

Top one is the most airplane standard. The idea is the pair of diodes ensure there is power to the coil regardless which bus has power, and the diode between the coil terminals is a flyback to avoid an arc at the switch when you open it.

Depending on what you use for the diodes to ground you could make the bottom one work, but I don't see any advantage. Letting the energy from the collapsing field when you open circuit dissipate in the contactor coil is a long proven technique.

Derek
 
Thanks

Top one is the most airplane standard. The idea is the pair of diodes ensure there is power to the coil regardless which bus has power, and the diode between the coil terminals is a flyback to avoid an arc at the switch when you open it.

Depending on what you use for the diodes to ground you could make the bottom one work, but I don't see any advantage. Letting the energy from the collapsing field when you open circuit dissipate in the contactor coil is a long proven technique.

Derek

Derek, agreed and thanks. Z-14 has been working for quite some time and no need to reinvent the wheel.
 
I have been getting different inputs on how to correctly wire a bus tie. I basically look at the Z-14 drawing and can figure that out and looks correct. I received another drawing what is also proposed to be correct. The diode connected to the ground is my concern. Maybe a better mouse trap but as a non-EE I don't know. This question is not about adding SPOF or added complexity I don't need just are these an acceptable way of wiring a cross feed contactor. Thanks, and as always appreciate the input.

Seems to me the diode to ground in the 2nd image will not capture the flyback pulse because the flyback is positive.
.
 
Hi Dan - I'm currently mapping out the electrical system for our RV-10 and I ran across this thread.

When I download the JPG of your schematic and zoom in, the image becomes blurry and I can't read the labels (not enough resolution). Would it be possible to post a PDF of the schematic?

Also, you have a tie point where the yellow and white lines meet in the upper right of the schematic. I've seen these "fat wire tie points" in other schematics (maybe Z-101).

How are these tie points physically made? Is this a threaded post? Is this a bus bar with multiple screw terminals?

I know that's a basic question. Just haven't found the answer yet.

Thanks,

Charles
 
... "fat wire tie points"... how are these tie points physically made?

I haven't used one but a FAT wire tie point I have found online is Bussmann Stud Type Junction Block C1933-1, 5/16 studs is same as contactors, only available in black.
 
Hi Dan - I'm currently mapping out the electrical system for our RV-10 and I ran across this thread.

When I download the JPG of your schematic and zoom in, the image becomes blurry and I can't read the labels (not enough resolution). Would it be possible to post a PDF of the schematic?
I would appreciate that too! (If possible)
 
9/13/2023 - Updated drawing at post #149. EFI/EI on single bus with dual feed. EFI/EI bus and avionics busses supplied via MIDI fuses.

I'm going to post recent work, and risk being branded a heretic.

Opinion...the current approach to power supply wiring has become far too complicated, both physically and operationally. Both aspects can be simplified, if we throw out some fixed thinking.

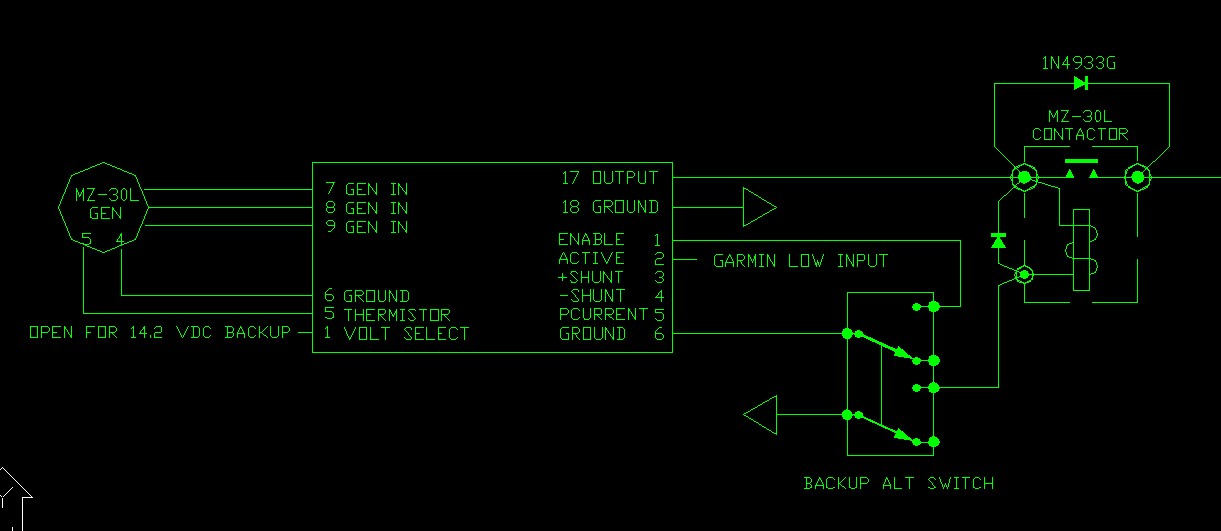
The attached is a dual bus, dual battery, dual generation system, supporting an SDS EFI /EI, and a three screen G3X/G5. Batteries are ETX900's. Primary alternator is a B&C L60 w/ an LR3D. Backup generator is an MZ-30L. The G5 has its own battery.

Yellow: cranking system.
Green: power generation.
Red: EFI/EI.
Blue: avionics.
White: typical main bus functions.

System is effectively modular.

Diagram.jpg


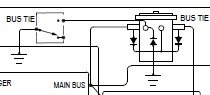
Nothing exotic at the main bus. No field switch, just a pull breaker, which is mostly relegated to being a test function. The LR3C handles overvoltage.

Main%20Bus.jpg


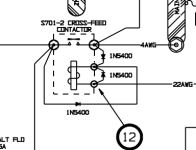
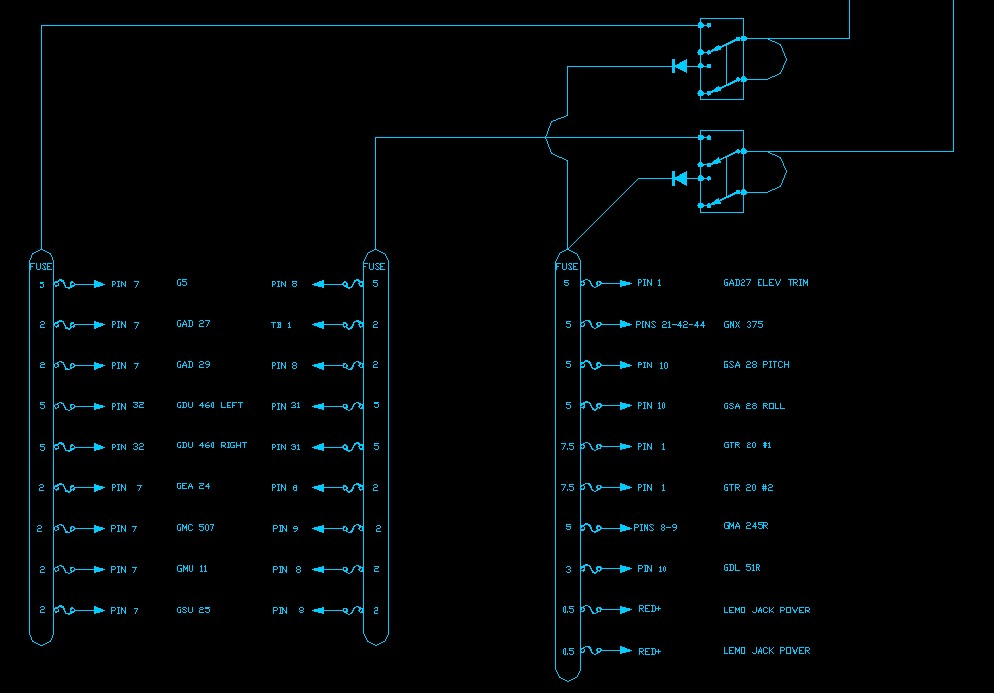
The leftmost avionics busses dovetail with the dual power inputs on many Garmin products. Single input avionics go on a bus with dual feeds. Avionics may be fed from either battery, or one.

Avionics.jpg


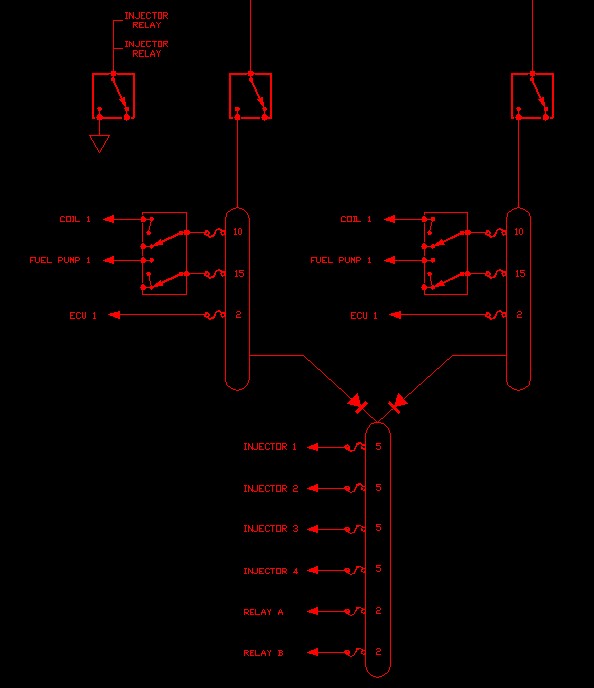
The SDS power supply is critical. Again, feed is from either battery, or one. Each coil/fuel pump switch is a three position Honeywell 2TL1-10 wired as OFF/COIL ON/COIL & FUEL PUMP ON.

EFI%20EI.jpg


The MZ-30L has several interesting features, foremost being self-start and electronic current limiting. Here the primary purpose is powering the SDS system no matter what. As a secondary mission, it will also support limited avionics and main bus function. It's wired with a relay or contactor because it's connected to battery #1, and the regulator does have a small parasitic draw. With the ENABLE switch closed, it is in standby, and comes online if bus power drops to battery voltage or less.

Note a typical Monkworkz application ties the regulator output to the switched side of the main contactor. In that case, if set as an auto backup (regulator pin 1 open), it would not need a relay. Again, here the goal was to feed an SDS bus with the masters open.

MZ-30L%20Auto.jpg


Operational simplicity should be a major design goal. When the spit hits the fan, pilot IQ tends to go out the window, at least for a little while. So, let's make the switching intuitive, and more important, arrange it so it requires little or no pilot action given power failure.

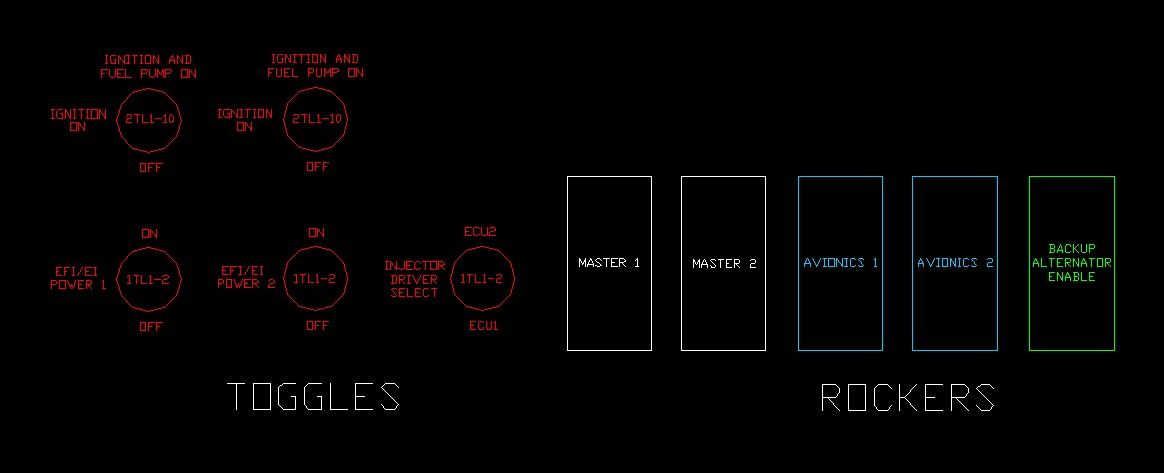
This is going in an Aerosport panel, so all the toggles to the left of the pilot's display are for the SDS EFI/EI. The critical rockers (DPST Carlings) are below the display. Note the conceptual similarities to traditional systems. It's basically mags and masters.

For a critical flight regime (like departure), the switch settings are dead simple...they're all UP, with one exception, INJECTOR DRIVER SELECT. Given power loss at 300 feet over the trees, the entire pilot response is flip that one switch, and change tanks. Again, pretty familiar.

Switching.jpg


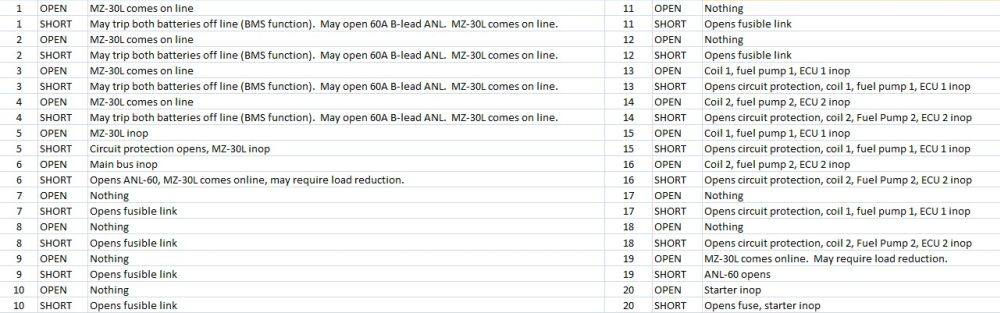
First pass, a basic "open or short" review doesn't turn up any critical issues, but if I missed something, hey, I'm all ears.

Open-Short%20Review.jpg


On a bad day, both main contactors can be opened, which immediately dumps the large loads and brings the MZ-30L on line. Avionics load is about 10A, maybe 13 running autopilot servos, and can be less. The pilot has access to both batteries and the MZ-30L, in any combination.

On a really, really bad day, the MZ-30L carries the SDS, and the G5 is on internal battery.
 
Sorry, I have not been following this thread. One track mind...

The old CAD program I use does not output in PDF format, so the best I can do is post blown up sections of the drawing. Jeff has already done it above (thank you sir).

The tie point at the upper right is an ordinary ANL fuse holder. Terminals are 5/16" IIRC. See below.

The design was for a RV-7 rebuild. The physical layout placed two sealed and vented EarthX batteries aft of the firewall, with contactors below and power distribution mini-ANL's above.

Contactors and ANL.jpg

Forward Fuselage 11-23.jpg
 
Dan - I suggest a piece of fire sleeve or such around that big fat wire as it goes through the firewall penetrator. Vibration against that SS passthrough will make short work of that wire’s insulation.

Carl
 
Dan - I suggest a piece of fire sleeve or such around that big fat wire as it goes through the firewall penetrator. Vibration against that SS passthrough will make short work of that wire’s insulation.

Carl

Is it ok if I fly with clecos and green tape?

Seriously, (1) it's a fabrication photo, not an installation, and (2) when it's time to install, I pump tubular firewall fittings full of FireBarrier, which both seals the penetration and entirely fixates the wire...no chafing.
 
Last edited:
Back
Top