Starting the fiberglass and it's my first time doing any epoxy stuff. The rudder and vertical stab fairings are off about 1/8". At this location, would it be safe to add 1/8-3/16" of micro and then sand to final shape? Would you suggest shaping the micro and then adding a layer of glass over top of it?

Van's Air Force
You are using an out of date browser. It may not display this or other websites correctly.
You should upgrade or use an alternative browser.
You should upgrade or use an alternative browser.
Microballoon max thickness
- Thread starter agent4573
- Start date

Ralph Inkster
Well Known Member
Experiment with your mix, you want it thick enough that it generally keeps it's form, still liquid enough that it can be worked, but not so liquid that it doesn't shift & run like syrup. Mix little amounts and apply in layers, sand off the high spots, than add another layer till you achieve it's final shape.
Non structural so you don't need to top it with a layer of cloth, which would only complicate the process.
Generally the less resin in the mix, the easier it is to sand.
Non structural so you don't need to top it with a layer of cloth, which would only complicate the process.
Generally the less resin in the mix, the easier it is to sand.
wirejock
Well Known Member
Flox
Personally, I would saturate a piece of glass then mix some flox. Sand and clean. Apply the flox then the glass then peel ply. Shape with a credit card till the flox underneath is a nice even layer. The part will sand evenly after it sets because the flox is encapsulated and less likely to crack. After that the filler layer should be much thinner if needed at all.
Personally, I would saturate a piece of glass then mix some flox. Sand and clean. Apply the flox then the glass then peel ply. Shape with a credit card till the flox underneath is a nice even layer. The part will sand evenly after it sets because the flox is encapsulated and less likely to crack. After that the filler layer should be much thinner if needed at all.
I found that the front piece (on top of the VS) was too wide - much thicker than the part on top of the rudder. I cut a small wedge out of the top of it with a dremel and squeezed it thinner - this raised the top a bit and I could then put it back together with some cloth and flox on the inside, and finished it with micro on the outside and shaped it to match the rudder fairing.
https://tasrv14.blogspot.com/2020/02/12-05-elevator-rudder-vs-and-hs-tip.html?m=1
https://tasrv14.blogspot.com/2020/02/12-05-elevator-rudder-vs-and-hs-tip.html?m=1
No bad advice above. Well maybe one. Sorry Ralph, but it's not such a good idea to do multiple rounds of fill, sand, fill, sand. It is very difficult to get the micro mix the exact same density for each round, so the layers don't sand evenly, and the surface has waviness to block out later in the finish process.
Me? I'd sand the bonding surface thoroughly with 80 grit, after which I'd just slather on a thick coat of flox mix.
"Flox" is chopped cotton fiber. When added to mixed epoxy and cured, the fibers add tensile strength and toughness.
Add more flox thickness than you need so the addition is a one-time shot. Don't worry about how difficult it will be to sand away the excess, although if allowed to cure, a random orbit air sander will shape it just fine. The trick to to shape the flox with a surform block or a vixen file when it reaches the "cheese" state, well before full cure.
Use dry micro ("dry" meaning like firm peanut butter) over the newly shaped flox for final contour. If you apply the micro before the flox has fully cured (i.e. right after you rough shape it above), you won't need to sand the flox for surface tooth, as you would if you let it cure to rock hard.
BY the way, specific to your thickness question, micro is not like polyester filler, in that it doesn't shrink with time. That means there is no maximum thickness, assume you can cure without exotherm. I have cast parts in solid micro which I still have 20 years later...no cracks.
Last edited:
Scott Hersha
Well Known Member
I would do the flox mixture on the top with a couple layers of wetted cloth On top of the flox to achieve the height you want. If it’s too thick, you can grind away some of that from the inside since that piece isn’t permanently attached yet. The cloth layers on top will give you the same strength as the original part. If it’s too wide on the sides, do the same thing, but do the flox/cloth layups on the inside this time and grind/sand away that extra width from the outside, using your inside the fairing layups as the final shape. As long as you manage to overlap these new layups - top and sides, you achieve the same strength as the original. It doesn’t take long to do these layups and it doesn’t take long to sand them down to where you want either. If you don’t like what you see when done, just do another layer and sand again. The only thing that takes much time with fiberglass is waiting for the epoxy to cure. And make sure you are using a good grade epoxy resin - none of that cheap polyester stuff you get at the boat store. Final filling of the weave and layers can be done with the epoxy/micro filler. Sand in assembly with the rudder counterweight to achieve the perfect match. You can protect the counterweight fairing with some thin aluminum flashing (from Home Depot) taped to the fairing to protect it from the sanding block.
terrykohler
Well Known Member
Have You Looked at Fit/Finish on Any Production Planes?
Personally, unless you're attempting to build a show plane, I'd prep for paint and move on. Unless you point it out, no one will notice and the impact in drag is probably greater where your intersection fairings meet the fuselage.
Also, you need to make sure that the gaps between control surfaces (rudder and elevator) and fixed elements are sufficient. If at any time you inadvertently encounter icing conditions, you don't want to risk controls jamming.
Just another opinion from the peanut gallery.
Terry, CFI
RV9A N323TP
I applaud your attention to detail. I had the same problem on my -14 and have noticed this "offset" on most RV's that I've seen. With all the time we spend building; and correcting the problem being so simple, I'm surprised more builders haven't done what you're proposing. To me, the current fit on most RV's looks like a building error.
I went the route that DanH mentioned. In addition to adding micro to the rudder, I distributed the mix between the vertical stab and the rudder. I did this with the rudder attached and to the vertical fin and immobilized it. When cured, I made a cut, brought the gap to proper tolerances, and matched up the rudder and the top of the fin. Looks great and added roughly .65 oz to the plane.
I'd like to say this was an original idea, but after noticing how unsightly the rudder to vertical stab fit was, I searched this web site and found a few folks that also thought the fit/profile was poor. I used Tom Martin's method to improve the look. Only added 2-3 hours of work and looks great.
Link below. Pictures are gone, but the description is excellent.
https://vansairforce.com/community/showthread.php?t=147284&highlight=micro
The quote above: "Also, you need to make sure that the gaps between control surfaces (rudder and elevator) and fixed elements are sufficient. If at any time you inadvertently encounter icing conditions, you don't want to risk controls jamming."
What is a distance that a person would be comfortable with to help make sure this isn't a concern?
Thanks,
Lance
What is a distance that a person would be comfortable with to help make sure this isn't a concern?
Thanks,
Lance
wirejock
Well Known Member
Idea
That is brilliant. Vans should add that step to the plans. Apply flox to both and layup a layer of glass over both. Then cut the two apart after it cures. Perfectly matched gap.
Makes me want to check my tips but they are all painted!
I went the route that DanH mentioned. In addition to adding micro to the rudder, I distributed the mix between the vertical stab and the rudder. I did this with the rudder attached and to the vertical fin and immobilized it. When cured, I made a cut, brought the gap to proper tolerances, and matched up the rudder and the top of the fin. Looks great and added roughly .65 oz to the plane.
That is brilliant. Vans should add that step to the plans. Apply flox to both and layup a layer of glass over both. Then cut the two apart after it cures. Perfectly matched gap.
Makes me want to check my tips but they are all painted!
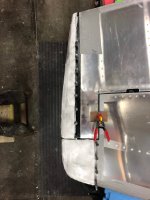
It was way too wide so I ended up cutting a slot in it and adding flox to get the shape close. Tomorrow I'll sand that down and remount it. I don't know if I'll make it one solid piece and cut it apart or just flox each side individually and then shape to fit. With the gap being about a 1/4" I think it would be easy to sand sides and top together even if I don't physically attach them.
With the gap being about a 1/4" I think it would be easy to sand sides and top together even if I don't physically attach them.
That’s the way I did it. I first cut the VS side and glued it back together using straight edges to keep it the correct shape. Then reinforced it with cloth and flox inside. Then buttered micro on both sides and sanded as a pair to a pleasing shape. It is very noticeable on completed airframes I’d seen - looked like something wasn’t right.
Attachments
RV7Guy
Well Known Member
Lots of ways
Dan's approach is close to what I have done. The only difference is I'll mix in both flox and micro balloons. You will still get the solid fill needed but sanding will be a little easier. Once it is close, you can use a straight micro mix for fine tuning. From there, I use Evercoat 416 for the fine finish fill. Finally, when I have it where I want it, I lock it all down with a layer of light glass. I used 2 ounce cloth for this purpose. Use peel ply to get the good finish. Final step before using a high build primer, is to fill as needed over the cloth and edges with 416. This stuff sands easily but it quite hard. Spray with a high build primer such as SEM. This will bring out any imperfections that need to be dealt with.
Some will question the need for the class cloth. The reasoning is that you have glass parts being bonded to metal parts. These are dissimilar materials with different expansion and contraction rates with temperature. Overlapping with glass cloth helps lock in the two parts. I have seen plenty of examples where this wasn't done and cracks in the fill develop. Not a structural problem but one of aesthetics. Why mess up a good paint job? The glassing can be done a little at a time while working on other stuff. The extra step in process is well worth the time in the end.
So here's what I ended up doing...
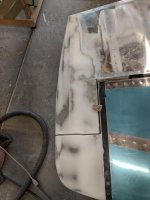
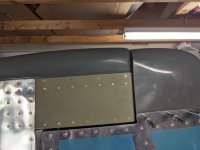
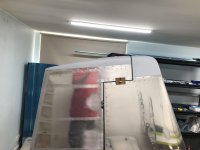
The vertical stab cap had a wedge cut out of it, pulled into shape and reglassed with 4 layers of 8ish oz fabric. Foam core was floxed into position to close out the rear of it. I then laid a layer of micro over the top and sanded in conjunction with the rudder top. After pic attached. I can't sand a smooth surface to save my life, but I did end up putting on some high build primer and getting it mostly flat and feathering all the edges down so it looks decent. Everything beyond this I'll pay the painter to get right.
The vertical stab cap had a wedge cut out of it, pulled into shape and reglassed with 4 layers of 8ish oz fabric. Foam core was floxed into position to close out the rear of it. I then laid a layer of micro over the top and sanded in conjunction with the rudder top. After pic attached. I can't sand a smooth surface to save my life, but I did end up putting on some high build primer and getting it mostly flat and feathering all the edges down so it looks decent. Everything beyond this I'll pay the painter to get right.
Attachments