What's new
Van's Air Force

Don't miss anything! Register now for full access to the definitive RV support community.

Steps Cracked

Cth6

Well Known Member
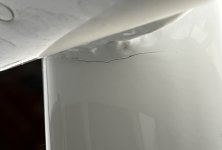
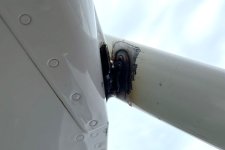
I have the step crack on the right side after ~400 hrs. These are the original steps, circa 2004-05.

Starting off, I am not the original builder. I have went through the build manuals that came with the plane and my copy of preview plans for the 9A and I can not find word one about the steps. Trying to do some research before removing the offending step. If I am just missing it, please let me know.

My plan is to put an access plate in the baggage floor, but without details of the construction for the steps I am at a loss of where to start. Many of the earlier posts on the subject have lost their photos.

Calling the mothership in the afternoon tomorrow. Does anyone have any pics or details of were the access panel was installed on the baggage floor? Did it provide enough access to get to the bolt?

Thanks!
 
Older steps WILL crack, and it's almost always on the copilot's side first

CT,
Since the steps were an optional mod, they weren't incorporated into the basic drawings/schematics. When you order the step from Van's, it comes with the installation drawing for the step(s). Therefore, don't get too worried about it up front: Just look it all over when you get the new step.

Now, here are two important questions.

1) How is your baggage floor fastened? Rivets or screws/nutplates (or "platenuts" depending on where you're from)? Bottom line: The baggage floor on that side has to come out in order to access the step's anchor bolt, and (as the Mandalorian says) "IT IS THE WAY" to do this. I urge you not to try to install an access plate because the flooring comprises part of the structural strength of the aircraft's belly. The baggage floor needs to come up, and then get securely reattached at the end of the job.

2) Are you good at drilling out pop-rivets? If so, great. This may be a job you can handle yourself. If not, perhaps you should let a good mechanic do the installation. The baggage floor, if pop-riveted in, needs to come out (see step 1 above). IN ADDITION, the step's base plate has over a dozen pop rivets holding it in place on the aircraft's side skin. They must come out, and without buggering up the holes through the aircraft side skin: They serve as the match-drill guide for the new step's base plate, or the two steps won't align.

In short, this is a straight-forward but somewhat delicate replacement. Still, the new steps, with the additional gusset welded in place for angular strength, should last the life of your RV.

PS: While you're ordering the right step, you may consider going ahead and ordering the left step too. Trust me: In about 400-600 hours, it's going to crack too. Food for thought.
 
The plans for the step installation are part of the step kit, so Vans can probably provide them to you.
I have installed the steps but not the access cover and would just make it the appropriate size to get to the bolt inside. Make a small hole and then enlarge it once the location is confirmed by looking inside.

I'm assuming that you are intending to get the current step(s) repaired, including welding on the reinforcing gusset from Vans? If however the intention is to install new steps then it would be better to remove the entire baggage compartment floor for access to drill the new bolt hole in the step tube.
 
Last edited:
CT,
Since the steps were an optional mod, they weren't incorporated into the basic drawings/schematics. When you order the step from Van's, it comes with the installation drawing for the step(s). Therefore, don't get too worried about it up front: Just look it all over when you get the new step.

Huh...

Coulda sworn you were wrong about that one and that I had a drawing for it - but nope, I was wrong, not you.

Anyway, you can get the drawings from Vans to show how to remove/replace them, it's not that difficult, drill out the pop-rivets on the baggage floor plate and you have access.

Now - once you get your replacement steps - the cracks are appearing because of stress risers in the welded step. If you'll take a torch and heat it to a nice dull red (before installation on the airplane!!) and let it air-cool this will remove most of the stress in the weld and likely allow your steps to reach a nice old age. Another prevalent theory on the step cracking is that it is propellor-induced airflow vibrations (some actual video backed this up years ago, gone down the interweb tubes now) that caused it. Many builders (me included) drilled a small hole in the hollow step itself and filled it about 1/2 way with sand, then epoxied over the hole. This makes the step a "dead blow" hammer and the sand will absorb the energy of the vibration induced by the prop pulses before it gains enough amplitude to crack the step.

I'm close to 1300 hours now and no cracks - I did both the annealing and the sand.
 
Somewhere in the VAF archives there is a research on the step crack (Alan?). It's always copilot side. Attributed to the slipstream if I am not mistaken.

I don't have the passenger step on my RV-9A (never thought somebody would ride with me) but after several thousand hours the pilot side step is still holding nicely. Well, I am a buck fifty after lunch in uniform with keys but couple fellas around 400#+ stepped on it. Still there not cracked.
 
Here is the OP drawing for the 6 but mentions the 7-9.
View attachment 39723

The page 6 drawing shows a rivet hole spacing between the step's square skin plate and the aircraft skin. Normally you would drill this pattern into the step skin plate first, then use it as the pattern to drill into the aircraft skin.

Big Picture: Yes that's great if this were the original installation, but you're going to do this backwards. You'll want to match drill your step's skin plate to the holes already present in the aircraft skin from the original step's installation.

How do you matchdrill through thin ALCLAD aircraft skin holes into a steel plate? You don't. You just START the drill for a couple of seconds to make a witness mark divet, then remove the step from the airplane and finish drilling the hole. Now, reinstall the step, line up that hole and apply a cleco through the aircraft skin, and drill a couple more match-drilled witness mark divets. Remove the step and repeat.

You do NOT want to booger up those holes in the aircraft skin. Keep them pristine.
 
Steps

Thank you all for the input. I am glad I wasn’t just missing it in the plans.

Bill, thank you for the detail. My plan was to remove the existing one, weld the crack and weld on the gusset. I have a shop down the street that can do it for me pretty quickly.

I am going to add the sand just as a precautionary measure.

I didn’t plan on removing the side panels, so that means pulled rivets. Currently I have solid rivets as these were done during the build. Drilling out the floor isn’t that bad of a task since they are just pulled rivets. I was just trying to avoid it after reading about adding an access panel.

Now off to the hangar to mull over it for a bit.
 
Step Cost in GA Aircraft - Slightly Off Topic

Just as a data point: My nephew's Baron needed it's step replaced when cracks were found during an Annual Inspection.

Beech is real "proud" of their parts - it was only $6000 + install!

He had it welded and reinstalled it - on the QT. (I would too!)

HFS
 
Very common on the co-pilot step. Pull the step and send it to Russ. He will re-weld it and add the gusset for a very reasonable price. He is the guy that makes them for Vans. You will find the details via search.

I think that I made a 4 X 4 or 5 X 5 cut out.
 
Last edited:
Rivets

I am going to pull the floor panel up after noodling on it. Hoping I dont have to do this repair again, so the access panel will be a bit overkill.

For those of you that did the repair post initial flight, did you end up using cherrymax rivets or just use solid 470 rivets? It looks like the top 2 or 3 rows are behind the aft baggage side cover (F-750-R). I am guessing there may be enough room to get a bucking bar and my hand behind that without removing that panel as well.

TIA!
 
MD-42-BS pop rivets per the plans. Solid rivers are also called out as an option, but I stuck with the pops. Cherry Max structural rivets are overkill IMHO.
 
I am going thru this process right now. What rivets have you guys been using it ?
 
Rivets

I ended using pulled rivets. The LP4-3 for the baggage floor, MSP-42 for most of the step. There were a few places the MSP-42 was slightly undersized. I used MSP-43 for those I needed a bit more grip length.
 
Same here ... RV-7A, PAX step cracked, after 430h, got the guy under the plane and he welded it on the plane.
But to be fair, I recognized the crack early, just short of an inch long.

The welder already made two other RV-7A's ... at one of them, the step was broken off completely. Also welded on the plane.

Interestingly, after the welding, no report of cracks again ... Also no additional part/piece was added. I can't tell this for myself, need to fly another 430h.

If the step has to come off, then for sure, a reinforcement part/piece would be added.
But I do not like to remove the baggage bottom, to get access to the screw on the tube
 

Attachments

  • Step Crack.jpg
    Step Crack.jpg
    39.5 KB · Views: 90
  • Step Weld.jpg
    Step Weld.jpg
    43.5 KB · Views: 121
Last edited:
WD-657 External Step

Most of the repairs have used MSP-42 pull rivets to reinstall the steps?
.

Vans instructions for installing the steps called out "Either solid AN rivets, MD-42-BS blind rivets, or a combination". If you buy them from Vans now, the part is MSP-42. I picked up 50 of them so I had enough for both sides and a few extra. I picked up 15 MSP-43s to go through the F-724

In measuring all of the components; the step, the skin, the bulkhead the thickness was right at the top of the grip length of the MSP-42. Add in a bit of primer and that brought me to the 43's.

Thanks for the reply!!!:)
 
Just trying to figure out the best approach to re-install the steps after the crack repair.
Seems like most of you are using pop rivets. MSP-42 and few MSP-43 in couple of spots. . Vans sells the 42,s but not 43’s. (Having a hard time finding the 43’s) When I called vans to ask about the rivets the tech guy told me to use cherrymax. Most of you says the cherrymax are overkill and I know that if later on you have to drill out a cherrymax is a tough task.
Confused on which way to go.
On a second note, any info on where to get the MSP-43? I tried few places and no luck. if I was to go with cherrymax anyone knows the part numbers to use? I am not around my airplane or hangar to get that figured out, but I would like to order and have it home by time I get back.
Thanks for any help.
 
Back
Top