
Van's Air Force
You are using an out of date browser. It may not display this or other websites correctly.
You should upgrade or use an alternative browser.
You should upgrade or use an alternative browser.
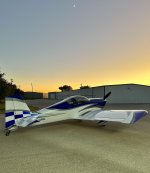
Targa Strip RV7A?
- Thread starter Tcheairs
- Start date

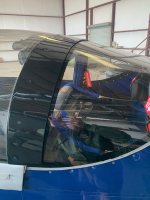
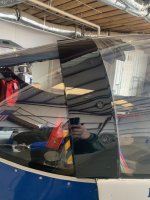
I made mine out of aluminum. 3 strips: One each covering each half, mated at the top as nicely as I could get it while still leaving a 1/16" gap at the top to allow for heat expansion. The 3rd piece is about 18" long and bridges the top center. The forward and back edges of the Targa extend to the edge of the black Sika primer I originally used as an edging effect on the canopy.
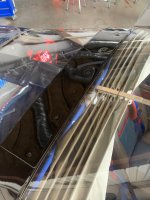
To make a pattern, I ordered tracing vellum paper from the online folks named after a big river in South America. It was easy to trace a pattern through the translucent vellum paper.
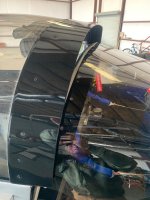
My forward canopy transparency is held onto the canopy frame and forward crash bar with Sikaflex, not screws. When I originally sika'd the canopy to the forward frame, I had drilled evenly-spaced #40 holes through the canopy and crash bar so I could use silver clecos to hold the canopy in place for sika curing. Now, I enlarged those cleco holes through the canopy and crash bar to accommodate #6 flathead screws, and tapped them 6x32 in the crash bar. I then enlarged the holes in the canopy to about 4x the screw's diameter: I want zero contact between the screw and the canopy.
The #6 flathead screws now pass through the Targa strip holes (which are countersunk) and through those enlarged screw holes into the tapped crash bar. I filled those canopy holes with Proseal to stop rainwater leaks and allow for cushioning/expansion. I also Prosealed the top center gap between the sheets. I used black vinyl tape between the Targa strips and the canopy as a cushion.
I love my Targa, but it took time, patience, and quite a few fittings to get it right. Also, because it adds a few ounces of weight out on the edge the canopy, watch for an earlier strength failure from the gas shocks especially on windy days.
I'll post photos later.
To make a pattern, I ordered tracing vellum paper from the online folks named after a big river in South America. It was easy to trace a pattern through the translucent vellum paper.
My forward canopy transparency is held onto the canopy frame and forward crash bar with Sikaflex, not screws. When I originally sika'd the canopy to the forward frame, I had drilled evenly-spaced #40 holes through the canopy and crash bar so I could use silver clecos to hold the canopy in place for sika curing. Now, I enlarged those cleco holes through the canopy and crash bar to accommodate #6 flathead screws, and tapped them 6x32 in the crash bar. I then enlarged the holes in the canopy to about 4x the screw's diameter: I want zero contact between the screw and the canopy.
The #6 flathead screws now pass through the Targa strip holes (which are countersunk) and through those enlarged screw holes into the tapped crash bar. I filled those canopy holes with Proseal to stop rainwater leaks and allow for cushioning/expansion. I also Prosealed the top center gap between the sheets. I used black vinyl tape between the Targa strips and the canopy as a cushion.
I love my Targa, but it took time, patience, and quite a few fittings to get it right. Also, because it adds a few ounces of weight out on the edge the canopy, watch for an earlier strength failure from the gas shocks especially on windy days.
I'll post photos later.
Last edited:
sahrens
Well Known Member
Struts and Top
Scroll, all -- Upgrade your gas struts to 150N, and flip them around so the canopy opens >almost< hands free and then opens with a nice "clunk" at the end.
See -- https://truck-hardware.orrorr.com/item/gas-springs/gas-springs-with-composite-ends/h-9503-35
For the Targa strip, mine is composed of two sections of .032" aluminum. Much like Scroll's detail -- #6 screws are used to affix the strip to the canopy and frame. Holes in the plexi glass are sized up to #19 to accommodate flex & float and countersunk for the dimples in the strip.
I also added a small handle at the top as the "grab point" in addition to the two angles at the side of canopy frame.
I also deviated from plans and made the whole canopy frame a little wider to accommodate extended (dropped) side skins that overlap the longerons. UHMW tape (very thin) solves any rubbing issues.
Attachments
Last edited:
Karetaker
Well Known Member
Howdy everyone. Here is a link on how I did my targa on my -7. Feel free to email me with questions or if you want pictures. There is also an earlier video when I first started the targa, (two or three videos before the one below.) but the video below sums it up nicely.
https://www.youtube.com/watch?v=HABDkLKKQDs
https://www.youtube.com/watch?v=HABDkLKKQDs
I made mine out of aluminum. 3 strips: One each covering each half, mated at the top as nicely as I could get it while still leaving a 1/16" gap at the top to allow for heat expansion. The 3rd piece is about 18" long and bridges the top center. The forward and back edges of the Targa extend to the edge of the black Sika primer I originally used as an edging effect on the canopy.
To make a pattern, I ordered tracing vellum paper from the online folks named after a big river in South America. It was easy to trace a pattern through the translucent vellum paper.
My forward canopy transparency is held onto the canopy frame and forward crash bar with Sikaflex, not screws. When I originally sika'd the canopy to the forward frame, I had drilled evenly-spaced #40 holes through the canopy and crash bar so I could use silver clecos to hold the canopy in place for sika curing. Now, I enlarged those cleco holes through the canopy and crash bar to accommodate #6 flathead screws, and tapped them 6x32 in the crash bar. I then enlarged the holes in the canopy to about 4x the screw's diameter: I want zero contact between the screw and the canopy.
The #6 flathead screws now pass through the Targa strip holes (which are countersunk) and through those enlarged screw holes into the tapped crash bar. I filled those canopy holes with Proseal to stop rainwater leaks and allow for cushioning/expansion. I also Prosealed the top center gap between the sheets. I used black vinyl tape between the Targa strips and the canopy as a cushion.
I love my Targa, but it took time, patience, and quite a few fittings to get it right. Also, because it adds a few ounces of weight out on the edge the canopy, watch for an earlier strength failure from the gas shocks especially on windy days.
I'll post photos later.
Here are the photos I promised.
Attachments
So...you painted yours Scroll?
Yes....well, I had it painted. Gloss black with clearcoat at the local car painter. It matches the underlying sika primer black trim on the canopy, and covers the white weather sealant on the crash bar (visible in one of the photos).
Steve Barnes
Well Known Member
Instructions
I wrote detailed instructions on how to make a (low drag) fiberglass targa band. Steve 707 972 3582
I wrote detailed instructions on how to make a (low drag) fiberglass targa band. Steve 707 972 3582
Here's how I made an aluminum fairing for the top of the rollbar on my slider canopy... the same process should also work for the aft edge of a tip-up canopy: https://www.rv7blog.com/2021/04/25/aluminum-rollbar-fairing/
wawrzynskivp
Well Known Member
I wrote detailed instructions on how to make a (low drag) fiberglass targa band. Steve 707 972 3582
I know the OP was asking specifically about aluminum, but since it got mentioned here I want to second that a composite Targa strip can be just as thin, and present a very tidy installation. Bonded rather than fastened it gets even tidier.
Attachments

Last edited:
Is there a shop that cut the aluminum strips for you that might also fabricate one for me? I had commissioned one to be built last year (which never happened)
If you’re talking to me, no I didn’t hire anyone. I built mine myself. Measure, trace, cut, fit, cuss, toss, adjust, cut, fit…experimental aviation at its finest.

BTW, I chose aluminum over composite because I suck at glass. I admire the nicely done composite parts out there. Real talent (and patience).
I do agree that "composite" (I guess that means fiberglass) would make a neater installation and I assume eliminate the bolts. I'm not the least bit experienced with glass or very handy with anything else for that matter. I'd be happy pay to have one molded. I'm sure that I could provide a paper model or accurate template taken from my tip up canopy.
Any takers?
Any takers?
wawrzynskivp
Well Known Member
I do agree that "composite" (I guess that means fiberglass) would make a neater installation and I assume eliminate the bolts. I'm not the least bit experienced with glass or very handy with anything else for that matter. I'd be happy pay to have one molded. I'm sure that I could provide a paper model or accurate template taken from my tip up canopy.
Any takers?
The best advantage of using composite is laying a compound shape right where it is needed so that is a perfect match. Doing it remotely loses some of that advantage.
Once you have made a paper model you have demonstrated most of the skill required to lay up the composite yourself.
You didn't ask, but I'll offer the process anyway:
1. build up some tape layers on the rear canopy to establish your desired clearance including whatever thickness of anti-scuff tape you'll apply to the bottom of the Targa where it covers the rear canopy glass.
2. Close the canopy and cover the targa area with a single layer of clear packing tape. Epoxy and polyester just won't stick to packing tape. You can wax that as well in case you have any gaps in your tape. Should go without saying, but be sure to cover the gap between front and rear canopy!
3. Put some masking tape over the packing tape to outline the targa shape, make it about 1/2" larger than desired. Lay some plastic sheeting over the whole targa area and tape it down. Trace the masking tape outline of your oversized targa and use a sharpie to mark the top side. Mark the mid point of the strip on the top side, and mark the masking tape on the canopy in the same place to help out later. Cut this out and then use that as a template to cut your fiber layers. I used three layers of 8 Oz woven Carbon fiber. Less or more would have worked just as well, it doesn't need a lot of its own strength.
4. Lay some plastic sheet on a workbench, place your plastic strip upside down on the large plastic sheet, and saturate those fiber layers with epoxy as you stack them up also upside down. A bit of soft plastic from a lid on a container of powdered drink cut into a squeegee is a lot more useful than a chip brush for working epoxy into a fiber layer. Just pour it from your mixing cup down the middle of your fibers and spread it with the squeegee. Save yourself some time and pour your epoxy strip on the template before you drop your first layer of fiber. Try to use your squeegee to push the epoxy up through your fiber layer from the bottom. That will help you to get a good wet-out without too much or too little epoxy.
5. Put some gloves on and pick up your 'applique.' You can fold it in half, or S-fold it, or roll it if you like. I like S-folding so I can cup the whole thing in one hand as I take it to the airplane. Rolling tends to induce wrinkles. Have faith, it will unfold, and the plastic will keep the fibers from sliding into weird shapes. Don't ever try to freehand a strip of wet fibers more than an armspan without the plastic to maintain the relationship of those basic two dimensions set on the bench, you'll regret that. Then just unfold it where it needs to be. If you made mid point marks on the plastic template and the masking tape on the canopy then you can place the middle first and then just unfold out towards the sides. If you get off, just pick it up and do it again. Don't chase any stray fibers, that just causes chaos. If it gets messy just pull it off, put it back on the bench and straighten things out. If it gets really out of hand then scoop it off, toss the fiber, clean off the plastic with denatured alcohol and do it again. When you have it all there and +- 1/4" of perfect, peel off the plastic template strip, use your gloved hands to squeegee out any bubbles working from the middle outwards until it is all very smooth and tight. If need be, pull from the ends tightening the weave to take out wrinkles don't push! If you want to save some time, then let it set up enough that it has 'gelled' and cover it with a couple coats of clear epoxy. You can use some thickened epoxy on the first coat if you used a rough open weave that has a lot of texture that needs to be filled. Again, your squegee is your friend.
6. Clean up any drips with denatured alcohol. Let it cure. Pop it off, and clean up enough masking tape so you can see the joint again. Put your rough targa back on, and use some narrow masking tape to establish your desired finish shape. Then trim with a high speed grinder, dremel, whatever.
That's a lot of words, but it is really simple stuff. The end product is a targa with a nearly airtight fit over the rear canopy.
Last edited:
Thank you, Sir.Scroll, that is beautiful. Nicely done.
Scott

