

Louise reported last week about how easy the installation of new Whelen strobe/nav lights went on the RV-6 (See http://www.vansairforce.com/community/showthread.php?t=111575) . She signed Mikey up for the Beta Test program through Mike Stewart at Team Aerodynamix and we decided to upgrade all of the external lighting and be done with it. We did the Nav/strobe swap in a few hours of work at a friend?s hangar in Houston, and the hardest thing was dealing with a couple of stuck wingtip screws. We had the new LED landing Lights on hand, but ran out of time that day, so I took Mikey to SnF sporting the new tip lights, and brought the Landing Lights to Nevada to install.
I did the swap in about two hours of total time ? not counting some troubleshooting of the wiring that was causing the Taxi (right) light not to work ? old, or new. That turned out to be a bad crimp on a splice under the panel, and I probably sent as much time under there fixing that as I did sitting comfortably in a chair in front of the wings doing the new light installs.
Mike Stewart of Team Aerodynamix is kitting the lights specifically for RV?s and supplies not only the 71865 light assembly, but adapter plates to go right in to the Duckworks mounts on the leading edge of the wing. Unfortunately, N164MS (kit #4) was built before the Duckworks light kits existed, so the leading edge lights are of unknown origin. Fortunately, since they appear to pre-date Duckworks, the designs are similar, and all I had to do was make a new adapter plate using the holes in the kit plates as templates, and changing the shape and size to fit Mikey?s unique configuration. It took longer for me to find my drill bits than to fabricate the plates.
I used a local ground and connected the supply side to the existing wing wiring ? and voila ? let there be light!
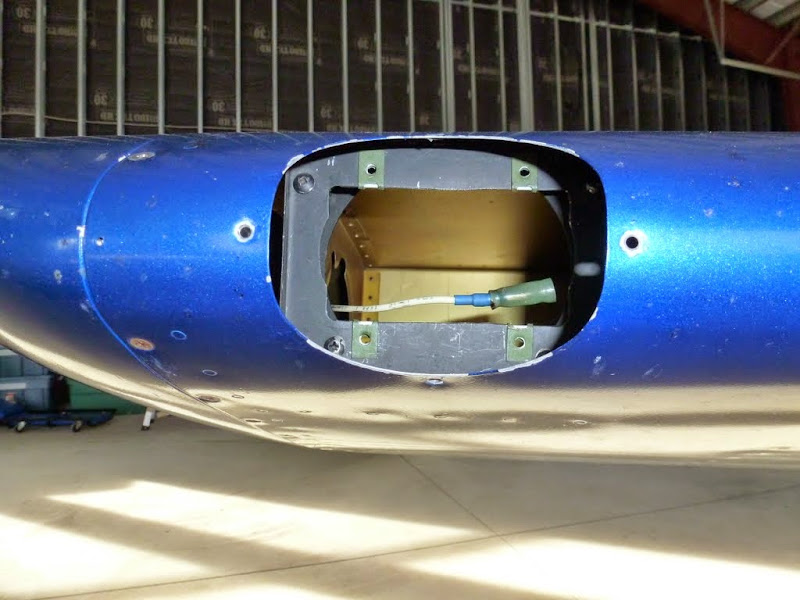
The empty cavity where the ancient driving lights were removed:
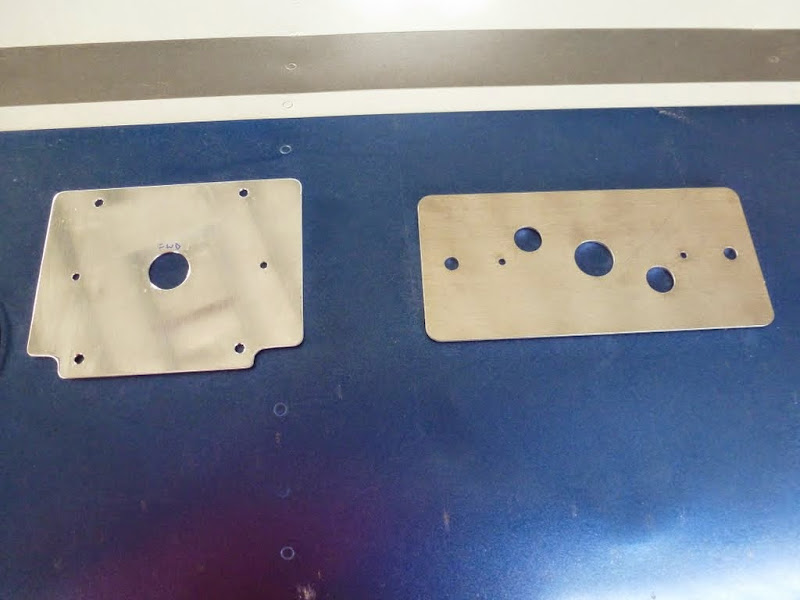
The plate on the right is supplied by Team Aerodynamix ? the one on the left I fabricated to match our non-standard leading edge mounts:
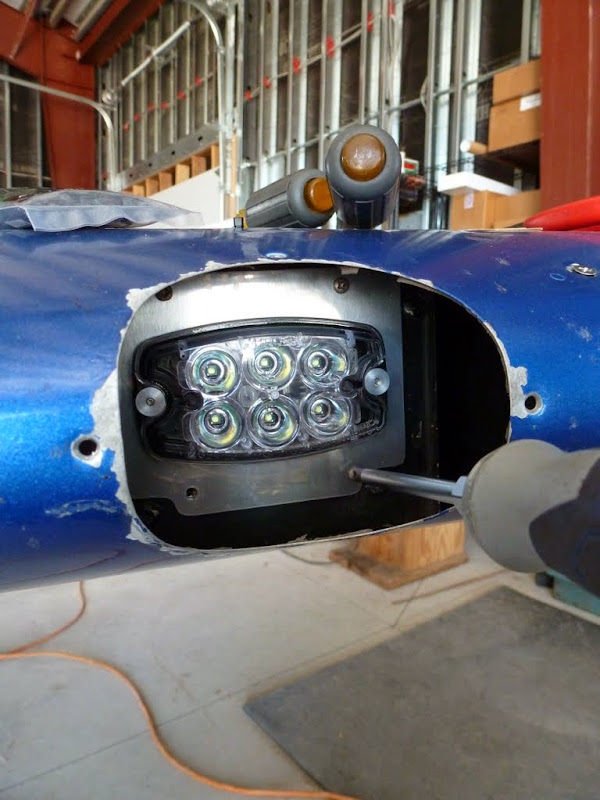
Feed the wires through the mounting plate and install two screws ? not much more than that!

Four Screws attach the plate to our mounts ? and you?re done!
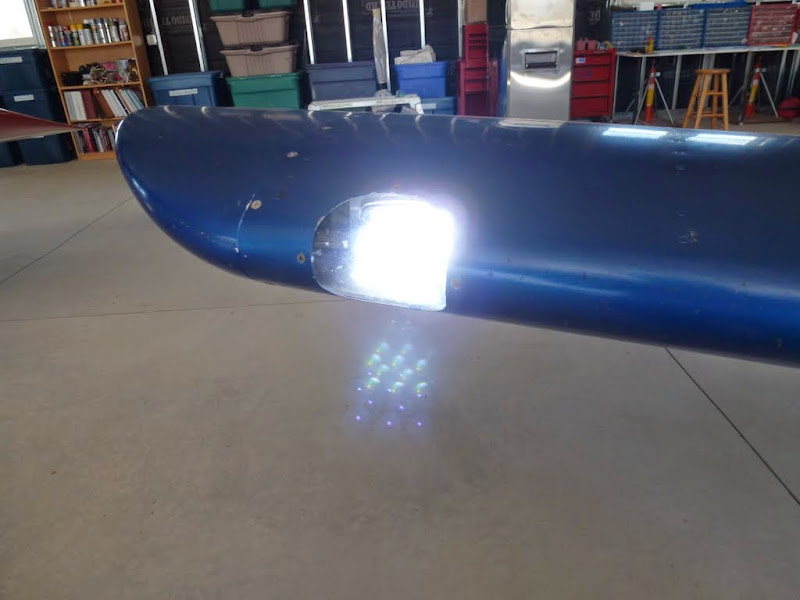
In the daytime, there appears to be plenty of light.
The lights are nice and bright ? far better than the original halogen driving lights (which were still better than the small HID?s I have in the RV-8). Our RV-3 sports Aerosun 1600?s from AeroLED on each wing, and I haven?t compared them in the dark yet, but the Whelen?s seem to be more than adequate at our unlit desert runway. The AeroLED?s are rated in Lumens (1200+) and the Whelens are rated in Candela (13,000) ? I?ll let others argue the comparison. The AeroLED?s do have built in wig-wag capability that the Whelens do not have, but they Whelens are also considerably cheaper, so perhaps a builder could supply their own circuit for this.
Now I have to decide if it?s time to cut Duckworks holes in the leading edge of the Valkyries wings ? the tip lights have always been just ?adequate? ? but now that we live on an unlighted strip, it might be time to get some real lights out there to supplement the FLIR?.
Paul
I did the swap in about two hours of total time ? not counting some troubleshooting of the wiring that was causing the Taxi (right) light not to work ? old, or new. That turned out to be a bad crimp on a splice under the panel, and I probably sent as much time under there fixing that as I did sitting comfortably in a chair in front of the wings doing the new light installs.
Mike Stewart of Team Aerodynamix is kitting the lights specifically for RV?s and supplies not only the 71865 light assembly, but adapter plates to go right in to the Duckworks mounts on the leading edge of the wing. Unfortunately, N164MS (kit #4) was built before the Duckworks light kits existed, so the leading edge lights are of unknown origin. Fortunately, since they appear to pre-date Duckworks, the designs are similar, and all I had to do was make a new adapter plate using the holes in the kit plates as templates, and changing the shape and size to fit Mikey?s unique configuration. It took longer for me to find my drill bits than to fabricate the plates.
I used a local ground and connected the supply side to the existing wing wiring ? and voila ? let there be light!
The empty cavity where the ancient driving lights were removed:
The plate on the right is supplied by Team Aerodynamix ? the one on the left I fabricated to match our non-standard leading edge mounts:
Feed the wires through the mounting plate and install two screws ? not much more than that!
Four Screws attach the plate to our mounts ? and you?re done!
In the daytime, there appears to be plenty of light.
The lights are nice and bright ? far better than the original halogen driving lights (which were still better than the small HID?s I have in the RV-8). Our RV-3 sports Aerosun 1600?s from AeroLED on each wing, and I haven?t compared them in the dark yet, but the Whelen?s seem to be more than adequate at our unlit desert runway. The AeroLED?s are rated in Lumens (1200+) and the Whelens are rated in Candela (13,000) ? I?ll let others argue the comparison. The AeroLED?s do have built in wig-wag capability that the Whelens do not have, but they Whelens are also considerably cheaper, so perhaps a builder could supply their own circuit for this.
Now I have to decide if it?s time to cut Duckworks holes in the leading edge of the Valkyries wings ? the tip lights have always been just ?adequate? ? but now that we live on an unlighted strip, it might be time to get some real lights out there to supplement the FLIR?.
Paul
")


