
Van's Air Force
You are using an out of date browser. It may not display this or other websites correctly.
You should upgrade or use an alternative browser.
You should upgrade or use an alternative browser.
painting checker pattern on rudder.
- Thread starter Sanch627
- Start date

[email protected]
Well Known Member
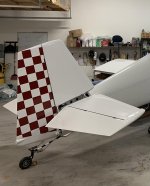
On the "leading" edge of the rudder it really doesn't matter as it's pretty much covered by the vertical stabilizer. It's the trailing edge is where you will see the miss match. I matched the trailing edge, sorta because of the slope.
I used printed vinyl to do it.
Painting would be a pain.
Art
I used printed vinyl to do it.
Painting would be a pain.
Art
On the "leading" edge of the rudder it really doesn't matter as it's pretty much covered by the vertical stabilizer. It's the trailing edge is where you will see the miss match. I matched the trailing edge, sorta because of the slope.
I used printed vinyl to do it.
Painting would be a pain.
Art
I always paint my checkers. It’s a ton easier to get each side the same.
andoman
Well Known Member
Leading Edge
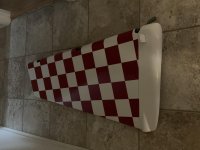
I started my checks at the leading edge with the goal of having 1/2 of the check visible with the rudder fared. The color wraps around the LE.
Extra care was taken to make the partial checks meet at the TE.
I used vinyl though I painted checks on a previous plane’s rudder. I prefer the vinyl for all my trim graphics. I’m the painter, so it’s the easiest route…
Attachments
Last edited:
rmarshall234
Well Known Member
That looks really nice. When you paint the pattern how do you mask? I started to layout my checkers and couldn't find an easy/reasonable way to mask and make sharp corners.
That looks really nice. When you paint the pattern how do you mask? I started to layout my checkers and couldn't find an easy/reasonable way to mask and make sharp corners.
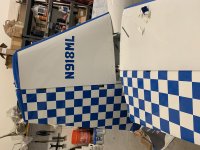
I usually start by painting the light color first. Usually white in most cases. Then I draw a vertical line using the trailing edge of the vertical stabilizer as a reference. When I plot out the squares I want my first full size square as high up on that line as possible. I use a small framing square to do my measurements. You can draw complete lines to make a grid or just draw the line intersections. Before you tape anything draw the lines on the opposite side so you can see them line up on the trailing edge. If they don’t line up, remeasure one side until they do.
Now that the grid is established it’s time to start taping. I like to use 1/2 inch fine line tape. Pick the first square that you want to cover up. Lay the tape on the inside of the line going slightly past the line intersection. Make sure to hold the tape straight but don’t stretch it. Now take a razor blade and place the edge on the tape right at the crossing point of the pencil lines and at a slight angle to the tape. Don’t cut the tape. That will put a scratch in the paint. Instead pull the excess tape back against the razor blade. That will trim tape and you should be left with just a point touching the line. Make sure all your tapes overlap but are trimmed at an angle. That keeps all your corners looking sharp. Now repeat for every square you wish to cover. Once all the fineline is done now fill in the rest of the square with masking tape.
The complete job usually takes about 2 to 3 hours.
koupster
Well Known Member
One of the toughest decisions was what size to make the checks. I looked at LOTS of images of RV’s with checked tails before deciding.
A local builder used a surplus overhead projector as was used in classrooms. With a checkerboard pattern projected on the rudder, he moved the projector back and forth until he had the desired checkerboard pattern on the rudder. From this he had a vinyl mask cut to paint the rudder.
Color matching
One of the toughest decisions was what size to make the checks. I looked at LOTS of images of RV’s with checked tails before deciding.[/QUOTE]
Your rudder looks great! What was your final decision on Check size?
Regarding vinyl versus painting. It seems white might be the most difficult color to match with an airframes existing paint?
andoman
Well Known Member
Size and Matching White
My Rocket’s red checks are 4 in.
My -4 has 3 in. blue checks on the rudder and elevator. I’ve always thought it was too busy.
The -7A I built had 6” checks and they were too big. I went big because I painted them and the fewer big checks simplified the job. It was less than perfect but the big checks allowed it to pass the 10 ft. test…
As for matching existing paint: you only need to paint the check color. You will be masking over the existing color, no?
If the base color must be re-painted you can opt for 2 new colors and avoid matching all together. It’s a bold look and may not be an option with the scheme on the rest of the plane.
Also, Aero Graphics will email you proofs. You can ask them to give you examples of different sized checks in your chosen color on virtual rudders.
Attachments
Last edited:
rmarshall234
Well Known Member
Here is one for you older guys...a 3.5 inch floppy turns out that is a good size
Ha! Yes, I can see how that would be great. I've already penciled 4" squares but 3.5 would be even better!
Thanks everyone! Good information in this thread.

