What's new
Van's Air Force

Don't miss anything! Register now for full access to the definitive RV support community.

RV horizontal stab crack reporting thread

Still, apparently there are sufficient reasons to recommend inspecting the fleet. We make decisions every day based upon imperfect data. The question isn't overall applicability, it's whether the number observed cracks plus Van's engineering is enough reason to inspect your plane or implement this SB.

As a (retired) aerospace structures engineer, I would say yes. In fact, Van's engineering assessment alone is plenty.

Dave

For me, it’s not about the reason to inspect but more about the speculation some folks are making about the frequency of cracking specific to factors reported.
Tailwheel airplanes are more susceptible. Rivet direction matters, etc…..

We just don’t know, and it only matters if folks are going to be proactive and do the “fix” before cracks are observed. Unless there is a smoking gun found at some point I will continue to inspect and take action if required.

We just don’t have enough good data to make any assumptions in my opinion.
 
It was easy to drill out the skin rivets with minor paint damage by using a #40 hole duplicator. The back side of the pin that goes in the hole is concave and fits perfectly over the shop head. This aligns the drill guide and allowes you to drill accurately through the center of the rivet.
.

Your entire post is great but this “pro” tip stands out to me. Always a challenge drilling out rivets. I’ve done thousands. But this method for this application is pure gold!
 
RV-8 80331
1700 hours
shop head forward
prop balanced
IAC Sporstman aerobatics (41/2, occasionali 5G)
Several very small cracks, one larger (1/2"). All on top rivets.

Scott A. Jordan
N733JJ

Thought I would follow up my situation. The "cracks" were only visible on the front side with a borescope. Because of the small size (no way to stop drill) and a discussion with Vans support, I decided to replace the spar and ordered the parts. Should have them at the end of the week.
I removed the spar yesterday, the “cracks” appeared to be flaws in the sloppy priming. I cleaned the primer off the front surface. What appeared to be a large crack in the borescope photos was gone. Nothing visible to the naked eye. I decided to try a dye penetrate, more out of curiosity and education since I already had parts on order. It appears that I may have two small cracks, both about ¼” long.

I repeated the process with similar results. Using a magnifying lupe, I can see the crack in one though it appears as nothing more than a scratch. The other is not visible.

Not sure what all this means/proves though I do believe replacing the spar (at the cost of some paint damage) was the right thing to do. I do wonder if there are cracks being missed simply by using the borescope. If my priming had not been sloppy or not primed at all, I would not have seen these small cracks. Perhaps not an issue for a number of years when they finally would show up.

Scott A. Jordan
80331
N733JJ
 
RV7. 500 TT, light acro, 50% soft field, balanced 3 blade MT, shop heads fwd., no cracks.
 
Inspection report

RV8, UK based
17 years old, TT 660hrs
AEIO-360-A1B6
Half its life with metal Hartzell, half with 3 blade MT
Half with mags, half with PMags
Heavy aerobatics, recently replaced vibration isolators due to excessive vibration
Factory pan heads on outside, squeezed heads on inside
No cracks found.
Also worthy of note that we have had the same result for all other SB's relating to cracks.
 
Five cracks from rivets. One crack appears to be very close to the spar bend radius.

RV-6, O-360 carb, old fashioned Magnetos. Three different props over the years. Moderate aerobatics. 5 different owners, history of flight unknown. Total time 1630.

Old tail, with .016 elev and rudder skin, several stop-drilled cracks.

Who is tabulating all this data? It would be nice to see if there is any correlation to taildragger, big engine, prop type, etc.

Since only slightly less than 1/3 of my 16 rivets are showing cracks, I'm thinking about flying on, and inspecting regularly. :p:rolleyes::eek:
 
RV 8

80497, flying since 2001
IO360, 200HP, Hartzell constant speed prop balanced
690hrs. tach time
based at home on grass strip
some aerobatics
Factory rivet head to the rear
No cracks
No cracks with previous SB's
 
2019 RV7
330 hours
Light aerobatics (3.5g max)
Balanced prop

One horizontal crack on left side near the bend radius of spar. Will be replacing both spars and installing repair kit.
 
False alarm. Looked like a crack but was just dirty

After scoping my rv 6 it appeared to have a crack running from one of the bracket rivets. I had many eyes on it and all agreed it was a crack. So I removed the skin and the hinge bracket only to find that it was just dirt. It was strange that it was a straight line, but with the skin off it is easy to tell that it wasn’t a crack. Maybe should have tried some brake clean or something like that to clean it up and verify that it was a crack before repairing. Never thought of it because everyone agreed it was a crack. I’m going to install the repair it anyways. Anyone else run into something similar?
 

Attachments

  • C13118C8-2D2B-4140-BA43-CD6ACCBBADA4.jpeg
    C13118C8-2D2B-4140-BA43-CD6ACCBBADA4.jpeg
    14.8 KB · Views: 129
After scoping my rv 6 it appeared to have a crack running from one of the bracket rivets. I had many eyes on it and all agreed it was a crack. So I removed the skin and the hinge bracket only to find that it was just dirt. It was strange that it was a straight line, but with the skin off it is easy to tell that it wasn’t a crack. Maybe should have tried some brake clean or something like that to clean it up and verify that it was a crack before repairing. Never thought of it because everyone agreed it was a crack. I’m going to install the repair it anyways. Anyone else run into something similar?

Mine looked similar (except it didnt emanate from the rivet), but after wiping clean and flying it another 5 hours the black line re-appeared in same spot. Sure looks like a crack and probably cant be definitive without doing dye penetrant test
 
1999 RV-6, ~1400 hrs, no cracks, however I'm installing the kit in order to terminate the service bulletin. RV-6 pre-punched emp, all the rivet holes matched and the hinge holes line up. Impressed how this fits my 24 year-old RV.
 

Attachments

  • SB00036.jpg
    SB00036.jpg
    228.2 KB · Views: 239
1999 RV-6, ~1400 hrs, no cracks, however I'm installing the kit in order to terminate the service bulletin. RV-6 pre-punched emp, all the rivet holes matched and the hinge holes line up. Impressed how this fits my 24 year-old RV.

I'm envious. I'm not looking forward to match drilling those to my non-pp empennage.
 
Repair of cracked rear spar with simple tool

I recently completed the repair for a crack in the left horizontal stabilizer rear spar on mt RV-8 as detailed in SB-00036 Rev3. I devised a tool for holding the repair doubler on the front side of the spar while all pieces were Clecoed in place.
This was the easiest part of the whole repair. Removing three rivets from the outer rib, and seven rivets from the rear spar will permit installation of the repair doubler. After removing the 10 rivets from the top skin and the rivets from the hinge brackets, and stop drilling the cracks, the nested spar doubler and hinge brackets were positioned.
A single Cleco was placed through each bracket, nested spar doubler, and spar. The skin was then flexed up and the repair doubler (attached to the doubler positioning tool) was slid over the top of the spar and rotated down into position. It is important that the wire holder clearance between the top of the repair doubler and the handle portion of the tool permits vertical alignment of the rivet holes in the doubler with the Clecos. This can easily be adjusted to get the right clearance.
Once the doubler rivet holes are aligned with the Clecos the tool handle can be pulled aft to hold the doubler in place while the Clecos are squeezed to permit them to engage the doubler. It should be possible to verify that the Clecos have engaged the doubler by viewing the repair doubler from the space between the flexed skin and the end rib. Once the Clecos have engaged the doubler you can contine Clecoing the rest of the rivet holes and proceed with riveting.
The 10 rivets can be removed from either the top or the bottom of the horizontal stabilizer. I believe from the top is easier, the positioning tool can be reversed to work from the underside. The only difference is the side which is opened up and flexed will have four addional rivets removed.
 

Attachments

  • Bracket holder.pdf
    215.5 KB · Views: 690
Attn MODS!

I recently completed the repair for a crack in the left horizontal stabilizer rear spar on mt RV-8 as detailed in SB-00036 Rev3. I devised a tool for holding the repair doubler on the front side of the spar while all pieces were Clecoed in place.
This was the easiest part of the whole repair. Removing three rivets from the outer rib, and seven rivets from the rear spar will permit installation of the repair doubler. After removing the 10 rivets from the top skin and the rivets from the hinge brackets, and stop drilling the cracks, the nested spar doubler and hinge brackets were positioned.
A single Cleco was placed through each bracket, nested spar doubler, and spar. The skin was then flexed up and the repair doubler (attached to the doubler positioning tool) was slid over the top of the spar and rotated down into position. It is important that the wire holder clearance between the top of the repair doubler and the handle portion of the tool permits vertical alignment of the rivet holes in the doubler with the Clecos. This can easily be adjusted to get the right clearance.
Once the doubler rivet holes are aligned with the Clecos the tool handle can be pulled aft to hold the doubler in place while the Clecos are squeezed to permit them to engage the doubler. It should be possible to verify that the Clecos have engaged the doubler by viewing the repair doubler from the space between the flexed skin and the end rib. Once the Clecos have engaged the doubler you can contine Clecoing the rest of the rivet holes and proceed with riveting.
The 10 rivets can be removed from either the top or the bottom of the horizontal stabilizer. I believe from the top is easier, the positioning tool can be reversed to work from the underside. The only difference is the side which is opened up and flexed will have four addional rivets removed.

This is great, thanks!

MODS - suggest moving this to a new thread for people to share installation tips for fitting the SB parts, separate from the reporting thread?
 
After scoping my rv 6 it appeared to have a crack running from one of the bracket rivets. I had many eyes on it and all agreed it was a crack. So I removed the skin and the hinge bracket only to find that it was just dirt. It was strange that it was a straight line, but with the skin off it is easy to tell that it wasn’t a crack. Maybe should have tried some brake clean or something like that to clean it up and verify that it was a crack before repairing. Never thought of it because everyone agreed it was a crack. I’m going to install the repair it anyways. Anyone else run into something similar?


See my post, #153

Scott A. Jordan
80331
N733JJ
 
Last edited by a moderator:
2017 RV-8
270 hours
Hartzell BA now MT 3 blade - no dynamic balances
Shop heads forward
No cracks
 
After scoping my rv 6 it appeared to have a crack running from one of the bracket rivets. I had many eyes on it and all agreed it was a crack. So I removed the skin and the hinge bracket only to find that it was just dirt. It was strange that it was a straight line, but with the skin off it is easy to tell that it wasn’t a crack. Maybe should have tried some brake clean or something like that to clean it up and verify that it was a crack before repairing. Never thought of it because everyone agreed it was a crack. I’m going to install the repair it anyways. Anyone else run into something similar?


Yes I did. I saw something like metal or may be a hair so scratched the area and the spar looks ok.

Before
YT5iTpA.jpg


After
u8FcvZX.jpg
 
Last edited:
Another false alarm

Looked like cracks on scope but after removing brackets and inspecting, no cracks
2006 RV-8
575 hours
No acro
Lives on grass strip
Prop not balanced for first 400 hours
Shop heads forward
 
RV-7

G'day folks

RV-7, SN #72450.

No cracks found, factory head on doubler.
Total air time 270 hours.

A few short rough landing strips. Lots of red dust inside from a major dust storm in Sep 2019 far west NSW, mainly on right (upwind) side. Not yet able to remove the dust, and swarf from drilling the access holes IAW the SB.

Home base is sealed runway with unpaved taxiways.

Occasional mild aerobatics: loops and rolls only; max 4G; no negative G; no spins, tail slides, nor flick manoeuvres; total 3.5 hours accumulated.
Checked to +6 and -3g twice during initial test period.

Borescope was Depstech DS450 'Endoscope', two lens/camera & video, 1080 pixel, 32G TF card, 3/10inch (7.6mm) diameter camera/cable, cable length 16.5 ft (5.03 metres aprox). Purchased through EBay and delivered within 2 days by Auspost for AUD $120.

Thank you for creating the thread.

Regards,
 
RV7-A No Cracks Serial# 71118

No Cracks on RV7A elevator spar:

2002 Built Elevator - plane finished in 2017
0360 with Balanced Prop
Catto 3 blade
Based on Grass Strip, all take offs/landings short field procedure.
387 hrs. hobbs
No acrobatics
Shop head on rivets aft on bracket

If I recall correctly, used a string to ensure alignment of elevator hinge brackets.
 
Last edited:
In my case, not boop stress

I think I can make a case for this.

As the rivet is being squeezed, it initially swells to fill the hole, tight. That process is fairly uniform along the length of the rivet. Then, the final squeeze to form the shop head focuses additional hoop stress (tension in a circumferential direction around the hole) locally near the face where the shop head is forming. This leaves a residual tensile stress surrounding the hole, locally right on the surface under the shop head.

Most applications have rivets loaded only, or predominantly, in shear, and this small stress increase doesn't matter. In some cases the residual tensile preload may actually be beneficial. So, in general practice, the rivet orientation probably doesn't matter.

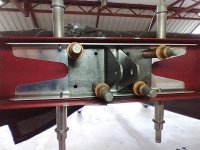
But, In the case of the rivets holding the hinge brackets on, there is a significant cycling of tension in the rivets. A vertical (upward) load on the hinge bolt produces a moment that is reacted as a combination of contact pressure on the face area above the hinge axis, and a tension in the rivets below the hinge axis. Similarly a downward vertical load on the hinge produces a moment that is reacted as a combination of contact pressure on the face area below the hinge axis, and tension in the rivets above the hinge axis. This tension is over and above the vertical shear that is shared among all the rivets in both directions.

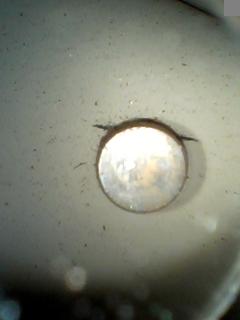
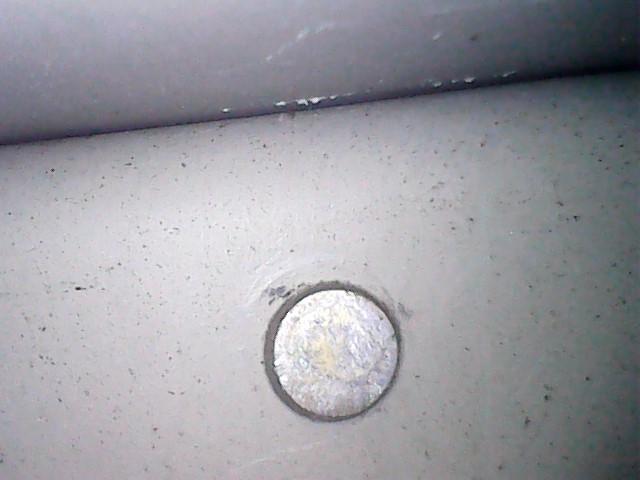
So, any vibration that produces alternating vertical load on the elevator mass produces cyclic tension loading and unloading in the rivets. The rivet head (shop or manufactured) carries that tension load into the spar as a cyclic local deformation of the spar material around the rivet head. This will eventually cause a fatigue crack. Having the initial tensile hoop stress around the hole will likely cause the fatigue crack to start sooner.

Remember, aluminum does not have an endurance limit, meaning that there is no minimum stress threshold below which fatigue will not occur. In aluminum, any cyclic deformation will eventually cause a fatigue crack. For low stress, it may be trillions of cycles. For higher stresses, it takes fewer cycles.
If the stress levels are such that sometimes fatigue cracks appear after a few thousand hours of service with certain service exposures (higher horsepower, lots of dirt landings, aerobatics, out of balance propeller, whatever), then the spectrum of which particular conditions may cause cracks to show up sooner is certainly influenced by the small residual stress distribution in the spar material around the shop head. But it is also likely that given enough service exposure, examples with the manufactured head against the spar will eventually show cracks too.

I previously reported finding a single crack on my left side outboard most hinge bracket on the inboard top rivet. Today I removed the outboard hinge brackets on both the left and right side HS and proceeded to perform a dye penetrant inspection. As it turns out, I have 2 cracks, both on the left HS on the top rivets closest to the hinge. The cracks do not emmanate from the holes themselves but are parallel to the tangent, slightly above the rivet holes. One of the cracks was clearly visible on the forward side of the spar during the borescope inspection while the other was not. On the rear side, the crack visible with the borescope was not visible on the untreated spar but is barely visible with the penetrant. The other crack was not visible with the borescope but was visible on the rear-side without penetrant, but the dye-pen shows it well.

I suspect that given the location of these cracks relative to the rivet holes, that they are low cycle fatigue cracks from tension loading of the upper rivets during upward elevator deflection while performing higher-G maneuvers. I don’t think it would’ve mattered which side of the spar the factory rivet head was located on in my case.
 

Attachments

  • 2C454885-B4B2-43B4-96EC-3E5344F6437E.jpg
    2C454885-B4B2-43B4-96EC-3E5344F6437E.jpg
    303.9 KB · Views: 185
  • 54ABB279-7428-4327-A90A-5B444B32E479.jpg
    54ABB279-7428-4327-A90A-5B444B32E479.jpg
    194.7 KB · Views: 254
Warp 10

I'm going to be looking at my RV 7A next week during for the 12 month Condition Inspection. About 850 hrs with less than 10 mins of aero with balanced prop. If I find No cracks, should I do the doubler repair anyways?
 
RV-8
First flight 2003...~1700 hours.
Mild Acro
WW200C prop / always dynamically balanced
Good bit of grass / rough field ops.

Cracks on 3 of the 16 rivets.

Installed the nested doubler on the aft side of the spar; doubler of the front and the new brackets. Not a big job (although the paint on some rivets was sacrificed).

I was impressed, not only with the speed at which Vans got the repair parts to me, but how well they fit in place..I mean I built that HS in 1997...nice job.
 
RV-7A
7 hours on the airframe
No cracks found, as expected
Shop heads on the forward (inside) side of the spar
 
RV-8, 2250 hours (50% inverted)
Shop head forward
Heavy acro (airshows & competition aerobatics)
Never over G limits
Very small cracks
 
Doh!

RV8
1999 build
2200 hours
No acro
IO390, flown fast, lots of grass strip action
Shop heads forward
Inner 4 rivets have cracks radiating laterally outward. Both sides.

Dennis Martin
Oconto, WI
 
I'm going to be looking at my RV 7A next week during for the 12 month Condition Inspection. About 850 hrs with less than 10 mins of aero with balanced prop. If I find No cracks, should I do the doubler repair anyways?
Depends how comfortable you are with metalwork... Did you buy or build?

I don't think there's any suggestion that any aircraft have come apart in flight due to these cracks, so you should be able to find them long before they become an issue if you're following the SB recommendations. No cracks should mean fly on until (and if) you find cracks at a regular inspection.

Repair now means you'll never have to inspect for these cracks again, but it does mean opening your HS and risking maintenance-induced damage in the process.
 
No cracks

RV-8
220 hours
Shop heads towards rear
5% grass landings, one beach landing
No acro
Elevator built in 2003
Hartzell metal, balanced
IO-360 dual pmags
Stock tailwheel w/bell tailwheel fork
Every landing is a greaser
No cracks


(one of the above "facts" is not true :))
 
Shop heads towards rear

I'd rather put my money on this one as the odd one out... I've seen Mickey land more than once, even on that famous beach, and all I've seen are kisses :)
 
Back
Top