What's new
Van's Air Force

Don't miss anything! Register now for full access to the definitive RV support community.

Repairing bubbled paint - fairing it in

Saville

Well Known Member
Hi all,

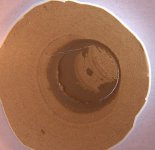
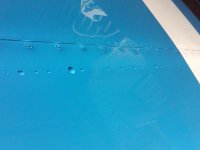
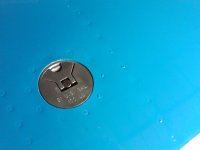
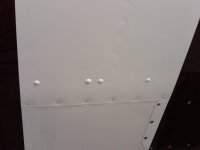
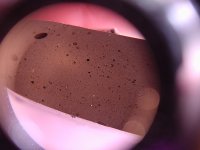
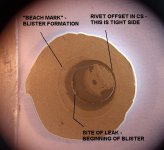
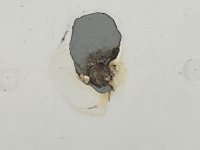
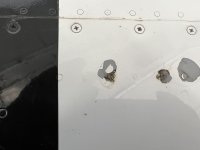
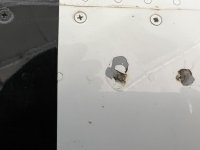
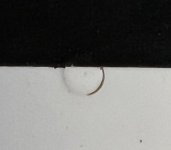
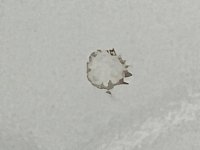
I have a few paint bubbles around some upper wing rivets. Some of them broke - others will soon. There is bare aluminum where the bubbles broke.

What I want to do is remove the loose paint, do whatever has to be done for priming, and repaint the small areas, feathering in the paint so that there won't be obvious old paint perimeters.

But I have a few questions:

1) How do I remove the loose paint until I get to paint with solid adherence without damaging the aluminum?

2) Should I alodine the area? (I believe I need to but I want to check).

3) Will the alodine lift more paint?

4) How can I prime and paint the area and feather in the old paint so that the bubble perimeter does not show?

Thanks for any tips you may have.
 
Sand and feather edge the bubble spots

Alodine is an option. Use a small sponge or paper towel to dab a little bit on. Wait a few seconds then wipe off.

Mask off any surrounding areas that you don’t want paint overspray on.

Spray your bare spots with a bit of high build primer. I like PPG K36. It’s a direct to metal primer. If your primer of choice is not direct to metal then a dtm primer has to be put down first.

Sand your primer spots and any surrounding areas you wish to repaint. 320 grit if using single stage urethane and 600 grit if using base-clear.

Clean with wax and grease remover on a lint free towel.

Paint

Hope this helps. :)
 
For sure, find the reason for the bubble first......:eek:

One of the bubbles was a little larger than the size of a quarter.

Given that there's bare metal under the bubble, no gas stains, no evidence of alodine, I figured the cause was improperly applied paint - maybe no primer (there' s no primer color on the underside of the bubble material) that it was a bad application over a non-smooth area.
 
Fuel vapor

Ask yourself why it is happening only at the fuel tank rivets? Fuel vapor escaping especially on hot days. Any other rivets affected other than fuel tank rivets? Sorry, but I too had this problem, had to install rear baffle openings for access to repair tanks, and most likely would need to re paint them before installation.
 
Ask yourself why it is happening only at the fuel tank rivets? Fuel vapor escaping especially on hot days. Any other rivets affected other than fuel tank rivets? Sorry, but I too had this problem, had to install rear baffle openings for access to repair tanks, and most likely would need to re paint them before installation.

I'll provide a picture but these rivets are not as nicely flush to the skins as the rest of the plane. Also some fuelers have splashed gas while filling the tank. Any pinholes or failure of the paint would suck that up too.

Maybe when I clean around the rivet I'll hit it with some green locktite
 
Last edited:
Can you get a detailed photo of the underside of the paint bubble? This one was taken through a 10x magnifier.
.
 

Attachments

  • Blister.jpg
    Blister.jpg
    65.5 KB · Views: 107
Can you get a detailed photo of the underside of the paint bubble? This one was taken through a 10x magnifier.
.

I'll try to get some with magnification. It looks like yours except it's not gold but silver - raw aluminum.

I saw another one where there was a slit around less than a 1/4 of the rivet head edge - this is how I think it starts.
 
Thanks everyone for the suggestions about finding the cause. I agree that's important.

but my focus here is in the painting technique used to repaint the area.

The pain looks mighty thin. I'm concerned about trying to sand the good left-over pain so as to feather the edge of the paint but NOT scratch the aluminum that is bared because of the bubble.

What grade sandpaper is best for that? 320?

Is it actually doable to repair a spot like this with no evidence of the repair?

Thanks
 
What grade sandpaper is best for that? 320?

Is it actually doable to repair a spot like this with no evidence of the repair?

Thanks

My experience is that 320 sandpaper is awfully aggressive unless you are OK seeing scratches later. I'd be tempted to start with 400, then move to 600. As to whether you can make an invisible repair, yes, it can be done, but it takes real skill to get a paint match on older paint.
 
My experience is that 320 sandpaper is awfully aggressive unless you are OK seeing scratches later. I'd be tempted to start with 400, then move to 600. As to whether you can make an invisible repair, yes, it can be done, but it takes real skill to get a paint match on older paint.

Yeah color matching is another issue altogether. But for right now I'm concentrating on thinking through the steps to feather in the new paint.

400-600...thanks.

I'm thinking pof putting bits of masking tape on the aluminum, as close to the old paint edge as I can get it to protect the aluminum.
 
I'll try to get some with magnification. It looks like yours except it's not gold but silver - raw aluminum.

Not the wing surface. Shoot the underside of the bubble. Raw aluminum doesn't transfer to the underside of a paint bubble.

Thanks everyone for the suggestions about finding the cause. I agree that's important. but my focus here is in the painting technique used to repaint the area.

The effort spent for a quality repaint will be wasted if the underlying problem isn't fixed first.

Is it actually doable to repair a spot like this with no evidence of the repair?

A lot depends on the paint. Just the little patch? Base white, maybe. Metallic or pearl, not a showball's chance. Polyurethane, difficult. Acrylic urethane, maybe. Operator skill counts too. No evidence of repair? I doubt I could do it.
 
Paint Blisters

Here is some of my experience with them.
 

Attachments

  • IMG00038-20090805-1451.JPG
    IMG00038-20090805-1451.JPG
    310.8 KB · Views: 120
Here is some of my experience with them.
This picture alone with many others negates the suggestion that fume from fuel is the cause of this since this row of rivets is outside of the tank.

My last two planes which were QB wings had bubbles, my current 14 which has been a SB does not have any but it has been just about a year since it was painted so time will tell.
 
These rivets hold in the rear Baffle, the last most difficult part of the tank to install making sure sealant is correct, if anything, this reassures the Vapor theory.


This picture alone with many others negates the suggestion that fume from fuel is the cause of this since this row of rivets is outside of the tank.

My last two planes which were QB wings had bubbles, my current 14 which has been a SB does not have any but it has been just about a year since it was painted so time will tell.
 
Paint Blisters

A little background, these tanks were QB around 2007/2008. I repaired paint when very minor on one wing. Blisters came back quickly. I then removed tanks, accessed through rear baffle with Van's kit. Scraped and cleaned ribs, tank flanges, fuel fill flange, and especially rear baffles, applied new sealant to entire tank, stripped and repainted tanks, and no more Blisters since around 2010. Here's a few blisters definitely from the tanks and not the rear baffle. I have dealt with several more QB tanks from friends that had me open up and repair and Blisters have stayed away. I'm in the process of building a RV7 QB for myself at the moment. Not a chance in HE** I'll paint these tanks without opening up and properly sealing first, my 2 cents, YMMV.
 

Attachments

  • IMG00040-20090805-1451.JPG
    IMG00040-20090805-1451.JPG
    348.5 KB · Views: 95
  • IMG00042-20090805-1452.JPG
    IMG00042-20090805-1452.JPG
    237.6 KB · Views: 72
Last edited:
These rivets hold in the rear Baffle, the last most difficult part of the tank to install making sure sealant is correct, if anything, this reassures the Vapor theory.

As you mentioned, the rivets are outside of the fuel area in the tank. So, I am not sure of the logic that the fume will get out thru the flange of the baffle and make way thru the rivet and not just the flange which has no proseal.
 
Mehrdad, cut the skin countersinks just a wee bit too deep, and the rear flange line becomes the worst case for blister formation.
 
Mehrdad, cut the skin countersinks just a wee bit too deep, and the rear flange line becomes the worst case for blister formation.
Dan,
I can see that now, though not everyone countersink that.
I know you have been looking into this issue for a long time, do you see a trend at around how long after the paint this starts to show itself
 
Mehrdad,
Back in the day, Dan and I worked on this issue together with a few others gathering info. It would be very hard to say how long this issue takes to show itself, but what I do know is when I repaired the tanks the issue never returned. Everyone including Van's has their own reasons and speculations about why it happens. Tanks could become slightly pressurized on a hot day clearing a path for the fumes, once started they never repair themselves.
 
I know you have been looking into this issue for a long time, do you see a trend at around how long after the paint this starts to show itself

Time is only indirectly relevant. Given too-deep countersinks and/or oversize dimples, the key factors appear to be structural loading and temperature. More time simply means more opportunities for exposure to those factors.

Some time ago, much of the community bought into the idea that enlarged dimples and countersinks were necessary to provide extra space for sealant under the rivet head. There is no aerospace standard to support that belief, and in fact, the sealant manufacturers want a film of 0.001" or less, essentially metal-to-metal. However, very good RV builders supported the idea of extra space, and it grew.

Everyone knows what happens when a rivet isn't fully expanded to fill the hole. Sooner or later it allows relative movement between itself and the aluminum around it. The telltale is "smoke" and cracked paint around the head. It doesn't take a lot of unfilled space. A recess only 0.003" deeper than necessary to set a perfectly flush rivet enlarges the width of the recess by 0.007". The extra width has another effect too. The rivet head can shift off center while being set, just like a rivet tail can walk to one side.

Cured polysulfide is a sponge, riddled with microscopic air bubbles. The sealant material itself is not vapor proof, and those voids fill with vapor.

So imagine a rivet in an oversize recess, surrounded by a sponge full of fuel vapor. Apply a shear load, or the combined shear and tension of nested dimples. The rubber-filled joint allows a tiny relative movement. The sponge is compressed, pressurizing the vapor voids, while at the same time the relative movement stresses the paint film adhesion. The combined forces work to separate the paint from the surface, right at the point of maximum displacement.

Bring on the sunshine. Ever look at a vapor pressure chart for 100LL? Pressure applied to the inside of a blister rises very rapidly as surface temperature goes up. Once the stressed paint starts separating, a few trips into the hot sun has vapor expanding out of the sealant, blowing the bubble.

The photo I posted earlier was paint cut from Bill's airplane. Look close. The mirror image says the rivet head was offset to one side of the recess. The wide side is the point of maximum combined stress on the paint film, pressure plus strain. Adhesion failed there first, and beach marks show the blister progression, just like crack progression in metals.

There are a bunch of other lesser factors which can slow or speed the creation of blisters, but oversize dimples, structural stress, and heat appear to be the fundamentals.
 

Attachments

  • Vapor Pressure 100LL.jpg
    Vapor Pressure 100LL.jpg
    26.1 KB · Views: 87
  • Air.jpg
    Air.jpg
    201.3 KB · Views: 99
  • INSIDE.jpg
    INSIDE.jpg
    267.3 KB · Views: 123
Last edited:
Some photos

Ok so I managed to get some photos of the paint bubbles. I didn't clean the area beforehand so as to not remove any evidence.

The first photo is a close up of a bubble. The blistered portion of the paint is at the 6 o'clock to 9 o'clock position in the picture.

I then flaked off some of the bubble and the next two pictures show both sides of the flake.

(Dan Horton asked to see " a detailed photo of the underside of the paint bubble". the above-mentioned photos attempt to satisfy that request - if I understand the request correctly)

The next two photos show how the bubbles seem to start. It looks to me as if there's thin paint around the periphery of the rivet and that the dimple isn't fully covered by the rivet. Don't know if the alodining (if it was done) got into that crevice nor if the primer (if there was primer) got in there as well.
 

Attachments

  • One_Bubble.jpg
    One_Bubble.jpg
    129.2 KB · Views: 138
  • Chip_side_a.jpg
    Chip_side_a.jpg
    170.2 KB · Views: 108
  • chip_side_b.jpg
    chip_side_b.jpg
    159.6 KB · Views: 89
  • How_it_starts_a.jpg
    How_it_starts_a.jpg
    20.9 KB · Views: 107
  • How_it_starts_b.jpg
    How_it_starts_b.jpg
    106.4 KB · Views: 120
I think it's highly likely, if not certain, that the bubbling is caused by fuel leaking through the baffle rivets. In the first photo it looks like some blue dye tinge from avgas, and the primer is wrinkling.
Before trying to fix the paint, the leaks will need to be fixed, from the inside. First step would be to remove the tanks and then cut access holes in the back to inspect the condition of the sealant inside and whether it has reverted to goo. Perhaps they were just not adequately sealed when the baffle was initially installed.

p.s. a couple more things to try before pulling the tanks:

Use a borescope via the wing root gap to inspect the back of the tanks for evidence of leaks (blue stains).

Pop all the blisters and then go flying for a while and monitor the exposed rivets areas for signs of leaks (blue streaks)

If you watch the Vans tank sealing video by Scott McDaniels on Youtube you will see that the rear baffle is ideally sealed with a bead of sealant that prevents the fuel in the tank from actuallly reaching the rivet shanks.
 
Last edited:
The pictures help. If I found bubbles on or near my tanks, I would think of everything it could be other than having to fix fuel leaks. I thought like the OP said, maybe there is something under or around the rivet making the paint bubble. Then trying to figure out how I would repair it - either way is the same repair. The rivet most likely needs to be removed, the area cleaned and new rivet resealed. Perhaps a larger rivet to make up for drilling and dimple stretch.

Other than replacing the canopy, I cant think of a less fun job than trying to fix a fuel tank leak. Since I have a wing kit in my garage, I might just build a new tank and hope it didnt leak!

Best of luck. No matter the cause it is going to be work to fix.
 
These pictures look very different than my last RV that has bubbles. The bubbles in my RV is just like a balloon and putting tiny hole in them, prevents them from growing.

@Dan,
I am not sure if VANS QB uses tank dies (oversized one), but I doubt since Scott clearly advises against it. I suppose time will tell if my SB tanks will have any such ballooned paint but I am really hoping NOT.
 
Back
Top